¶ Document Requests and Action Requests
When you click Generate Document, you expect a new file in Salesforce showing data you fetched. Besides the file, the generation process creates new records:
¶ Document Requests
This record is crucial in document creation and plays a main role in the entire application. It’s always created when document generation starts.
¶ Creating Document Requests
Document Requests are created by inserting them into the database. Just like every object in the Salesforce system, there are different ways of inserting Document Requests:
- Create the Document Request record manually in the respective tab in Maven Documents.
- Use Flows.
- Use Apex Code.
- Use buttons.
The status of a Document Request record reflects the status of the generation process. You can check the status of document generation by checking the Status__c field on requests:
New. The processing has not yet started.Processing. The request is being generated.Completed. The document has been generated and is available in whatever format and location you specify.Error. Document Generation ended in an error.
The error message is available in the Error_Message__c field elaborating on what went wrong.Canceled. The processing was cancelled.
The newly created Document Request can only have the New status.
¶ Fields
The fields displayed in the created Document Request may vary depending on the Document Template used.
Here is the list of all fields that the Document Request record contains:
| Field API Name | Values / Type | Description |
|---|---|---|
Name |
Auto Number |
The Document Request number. Automatically assigned by the app. |
OwnerId |
Lookup(User,Group) |
Lookup to the owner of the record. |
Record_Id__c |
Text |
ID of the record that document generation started from. |
Status__c |
New, Processing, Completed, Error, Canceled |
Current status of the record. |
Document |
Lookup |
Lookup to the Document Template record that this Document Request is using. |
Document |
Lookup |
Lookup to the Document Solution record that this Document Request is using. |
Document |
Text |
The title of the generated document. |
Document |
PDF, DOCX, GDOC, GSHEET, XLSX, CSV, PPTX |
The format of the generated document. |
Save |
Salesforce File, Salesforce Attachment, GoogleDrive, OneDrive |
How the generated document should be saved. |
Processing |
Queue, Batch, Synchronously |
How the record is processed. |
Error |
Long Text Area |
Descriptive text containing an error message if such an error occurred. |
Reuse_File |
Checkbox |
If checked, the Content Version is linked to the existing Content Document. Otherwise, a new Content Document is created. |
Network |
Text |
Salesforce Community/Network ID that is applied to the Salesforce File. |
Share_ |
Long Text Area |
Comma-separated values of users' emails, that have the Edit permissions to the generated document. |
Create_ |
Checkbox |
If checked, the link to the generated file on a Drive with Edit permissions is created. |
Create_ |
Checkbox |
If checked, the link to the generated file on a Drive with View permissions is created. |
Share_ |
Long Text Area |
Comma-separated values of users' emails, that have the View permissions to the generated document. |
Create_ |
Checkbox |
If checked, the link to the generated file with Edit permissions, available only to the Organization members, is created on a Drive. |
Create_ |
Checkbox |
If checked, the link to the generated file with View permissions, available only to the Organization members, is created on a Drive. |
PDF_Conformance_Level__c |
PdfA1a, PdfA1b, PdfA2a, PdfA2b, PdfA2u, PdfA3a, PdfA3b, PdfA3u |
Levels of conformance for PDF documents. |
PDF_Version__c |
PDF_1_0, PDF_1_1, PDF_1_2, PDF_1_3, PDF_1_4, PDF_1_5, PDF_1_6, PDF_1_7, PDF_2_0 |
The version of the PDF specification to which the PDF document conforms. |
Embedded_Data__c |
Long Text Area |
JSON that should be embedded in the document. |
Language__c |
Text |
Defines the language of the Template Label. |
Locale__c |
Text Area |
Defines the Locale in which data is shown in the generated document. |
Folder_Path__c |
Long Text Area |
Defines the destination point of the generated document on Drive. |
External |
Text |
The ID of the generated document in the external system (e.g. Google Drive). |
External |
Text |
Name of the generated document in the external system (e.g. Google Drive). |
File |
Text |
Salesforce File or Attachment ID. |
External_ |
Long Text Area |
The URL of the generated document in the external system (e.g. Google Drive). |
External_ |
Long Text Area |
The URL of the generated document with the Edit access to the defined users on a Drive. |
External_ |
Long Text Area |
The URL of the generated document with the Edit access on a Drive. |
Failed_ |
Long Text Area |
Comma-separated list of email addresses of users for whom document sharing failed. |
External_ |
Long Text Area |
The URL of the generated document with the View access on OneDrive. |
External_ |
Long Text Area |
The URL of the generated document with the View access to the defined users on OneDrive. |
External_ |
Long Text Area |
The URL of the generated document with the Edit access on a Drive, available only to the organization members. |
Failed_ |
Long Text Area |
Comma-separated list of email addresses of users for whom document sharing failed. |
External_ |
Long Text Area |
The URL of the generated document with the View access on a Drive, available only to the organization members. |
LastModifiedById |
Lookup |
Lookup to the user who last edited the record. Includes the date and time of the last edit. |
CreatedById |
Lookup |
Lookup to the user who created the record. Includes the creation date and time. |
The Batch Processing Type is an exception. It needs to be run separately to start generation.
So what do all these fields allow us to achieve? They offer more options when generating documents and allow users to customize the generated document to achieve the needed result. For example, the Document Format field allows the user to choose between options to save the resulting document. The Save As field allows users to decide where the created document resides: in Salesforce as a File or Attachment, or on the Google Drive of the organization.
When creating a Document Request manually, you are not limited by the options in Button Configuration. For example, you can have the Format option set to PDF in Button Configuration. However, in Document Request, you can choose from all possible options in Maven Documents.
¶ Fields Extra Capabilities
¶ Name the generated file according to your needs
In the Document Title field, you can type the name for the generated file. It may vary from the template’s name.
If the field is left empty, the generated file will have the same name as the template document used.
¶ Set the level of access to the generated file
Using these fields, you can tailor access to the generated file according to your preferences and security policies.
| Field | Shared with | Azure templates preview | Google templates preview |
|---|---|---|---|
| Create Shareable Edit Link | Anyone with the link can edit | In the Salesforce pop-up window | In the Salesforce pop-up window |
| Create Shareable View Link | Anyone with the link can view | In the Salesforce pop-up window | In the Salesforce pop-up window |
| Create Organization Edit Link | People within your Organization domain can edit | On OneDrive | In the Salesforce pop-up window |
| Create Organization View Link | People within your Organization domain can view | On OneDrive | In the Salesforce pop-up window |
| Share User Edit List | Only specified users can edit; other users don't have document access | On OneDrive | In the Salesforce pop-up window |
| Share User View List | Only specified users can view; other users don't have document access | On OneDrive | In the Salesforce pop-up window |
¶ Embed additional data
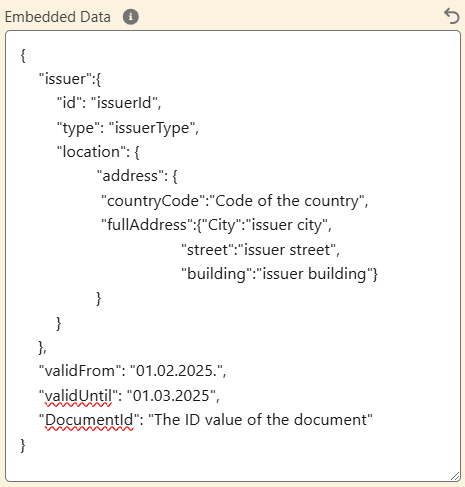
If you would like to store extra JSON metadata inside the generated file, you can use the Embedded Data field. Place the JSON snippet inside the text frame of the field and save the Document Request.
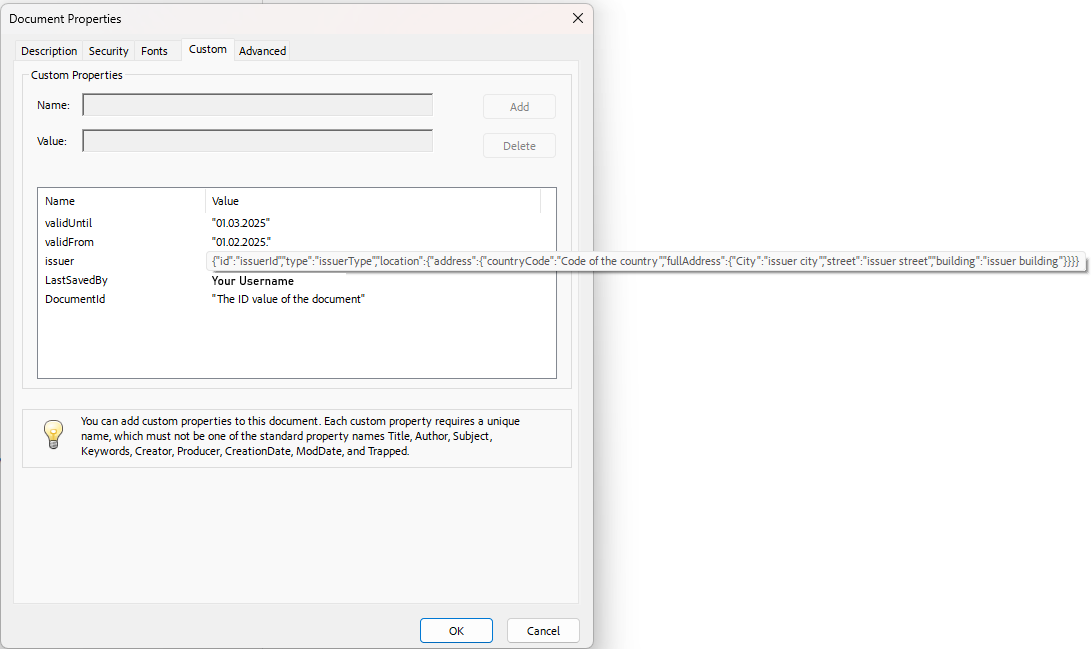
The structure of the embedded JSON is vital. For each top-level attribute in the JSON snippet, we create one PDF custom field with the same name. The value of the field is the content of the respective JSON attribute.
Once the request is processed, the document is generated. Now, you can download this file to your device and open it with a specified app. Check the document properties to have the embedded metadata in place.
For example, you would like to add issuer details, information about the document's validity, and the unique document ID. Compose JSON with that information and paste its content into the Embedded Data field.
{
    "issuer":{
        "id": "issuerId",
        "type": "issuerType",
        "location": {
                 "address": {
                  "countryCode": "Code of the country",
                  "fullAddress": {"City": "issuer city",
                                    "street": "issuer street",
                                    "building": "issuer building"}
                 }
        }
    },
    "validFrom": "01.02.2025.",
    "validUntil": "01.03.2025",
    "DocumentId": "The ID value of the document"
}
After the document is generated and opened, here is how the metadata looks in the document properties:
This feature is available for PDF and DOCX file formats.
¶ Set characteristics of the generated PDF file
-
In the PDF Conformance level field, enter the value that represents the needed level.
These levels establish clear rules and standards for PDF files. They ensure that files are self-contained, compatible across all devices, and suitable for long-term preservation. The standards address elements such as fonts, color spaces, metadata, transparency, and other aspects of PDF creation and archiving. The goal is to guarantee consistent appearance and functionality, regardless of the system or software used to view the files.If you leave the field untouched, the PDFA3a level is applied by default.
-
The PDF Version field defines the version of the PDF specification to which the PDF document conforms. In this field, put the value that represents the needed version.
If you leave the field untouched, the PDF_1_7 version will be applied by default.
¶ Translate the defined document elements
Maven Documents gives an option to translate specific elements of the template. You can achieve it with the Template Labels feature. More information on how to use it can be found on the corresponding page.
In the Language field on the Document Request, you can determine the needed language value from the Template Label record. Once the request is completed, the generated file contains the translated labels in the selected language.
¶ Specify which country’s format is used to display the data in the generated document
The Locale field enables the formatting of data—such as currency, numbers, dates, and times—in the generated document according to the standards of the specified country's locale. If no locale is specified, the system defaults to using the current user's locale settings. Here you can find more information on how to use the field. In most cases, the user's locale should be used to generate the document, so this field can be left empty.
¶ Define the destination folder
If you would like to place the generated document in a specific folder in Drive, you can define the path in the Folder Path field. You can check the Document Templates page for more information on how to fill in the field according to different template types.
In this field, you can use the Drive folder’s ID or manually type the path to the destination folder with string values. You can also use merge fields to name the folders. In that case, the folder in OneDriveis named after the value from the merge field once the generation process is completed.
The ID of the folder can only be used for Google Templates and only at the beginning of the path. If you place it in the second position or later, the ID is recognized as a string, and the folder will be named after the ID value.
When using the App-to-App Flow, all documents generated with OneDrive as an output will be saved in the dedicated application folder in OneDrive.
If the field is left empty, the generated file appears in the same folder as the template document.
¶ Mass Document Generation
There is a way to create more document requests than the limit. To do that, you can use the Batch feature from the Setup Assistant tab.
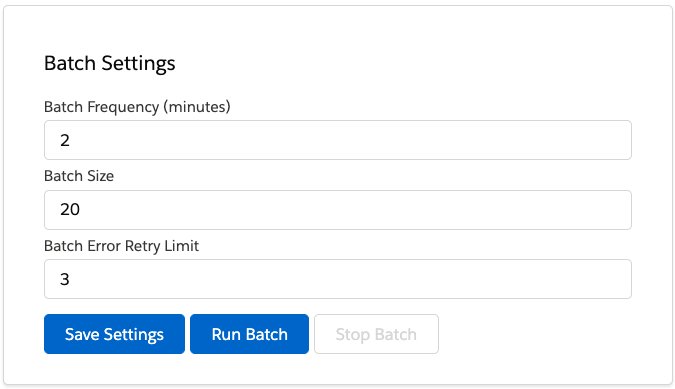
- When creating a Document Request, specify its Processing Type as Batch.
- Fill in the other fields and save the request.
- Go to Setup Assistant and set Batch settings. You can change the number of documents to generate, the number of batches to run, and the generation frequency.
- Save the settings and click Run Batch.
After running the batch, stop it by clicking the Stop Batch button, which is only available while the generation process is running. The generation process may take a while. After that, the generated documents are available in the attachments section of every record where the document was generated.
¶ Action Requests
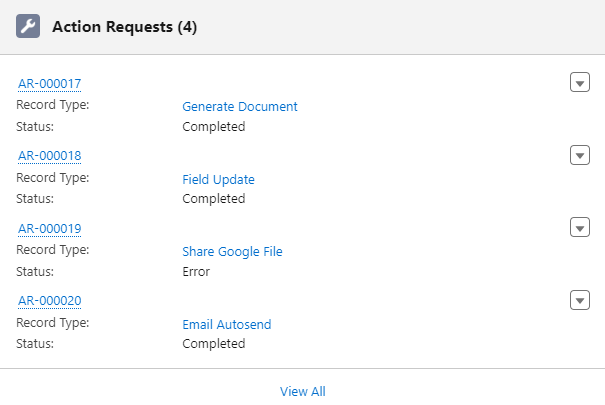
There's also the Action Requests related list on the corresponding Document Request. The list holds the records of the executed Actions, showing their status.
The order in which an Action Request appears in the list is determined by the Order Of Execution field on the Action Object.
The Generate Document Action is executed first, despite the set order. The only exception is inserting Action Requests with code. In this case, you can arrange the order differently.
If you have the Before or After Merge preview configured, the Copy Document Action is executed by default and listed among Action Requests.
After clicking on each Action Request, the associated record opens showing the corresponding data.
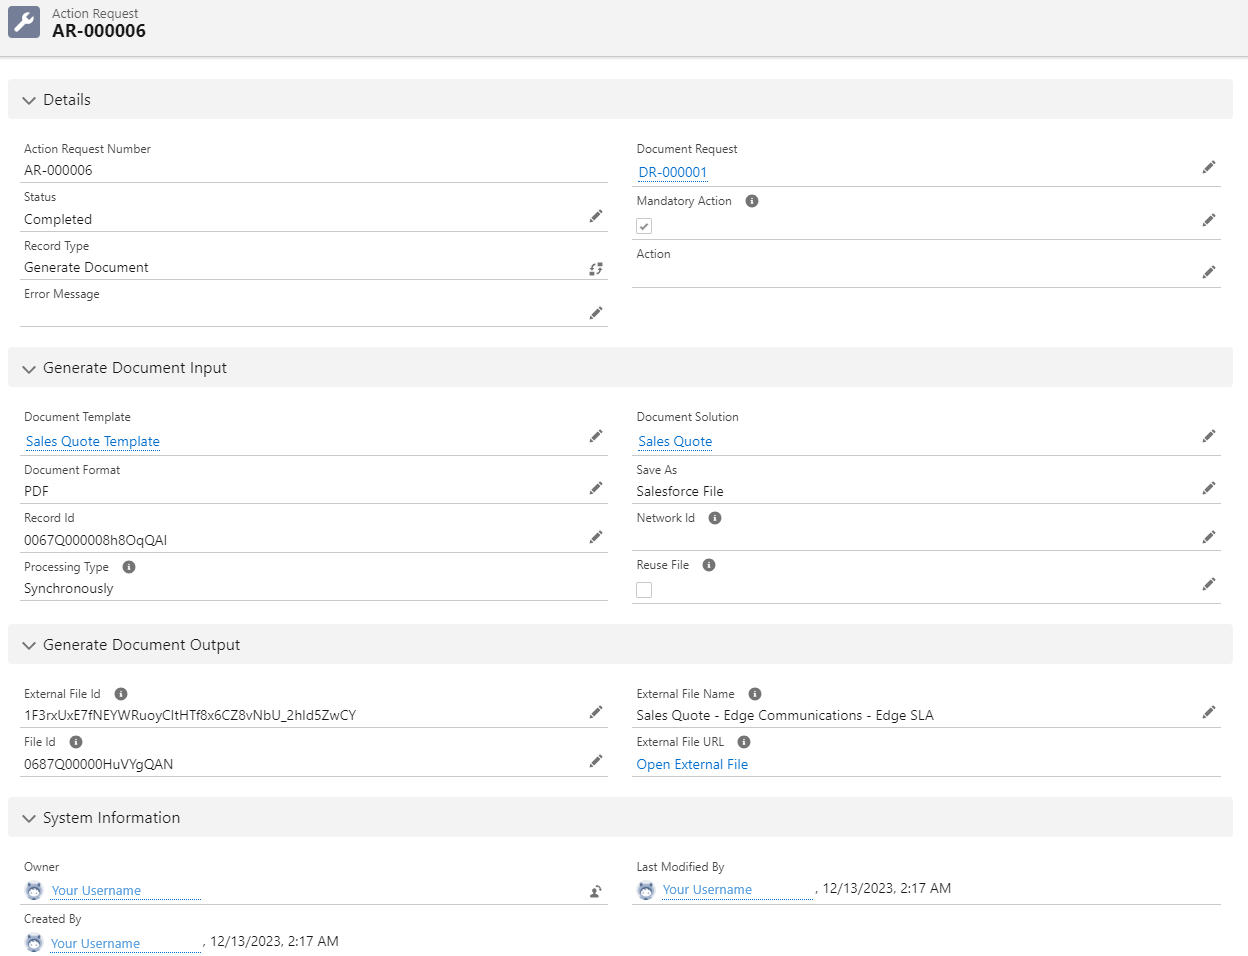
The content of the Action Request record depends on the action type.
Fields between the Details and System Information sections differ, depending on the selected Action. In the Input section, you can see the values that you've put in when creating the action. The Output section shows the action’s result values.
In our example, you can see the Generate Document Action, which is always created by default when the document generation process takes place:
- The Input section displays the data that was selected during the template selection process.
-
- The Output section shows the generation outcome: ID, Name, and URL of the created external file, and ID of the file in Salesforce.
¶ Fields
Depending on the type of action, the set of fields on the Action Request may vary. Most of those fields are taken from the connected Document Request.
However, some fields are specific to the Action Request record:
| Field API Name | Values / Type | Description |
|---|---|---|
Name |
Auto Number |
The Action Request number. Automatically assigned by the app. |
Document_Request__c |
Lookup |
Lookup to the connected Document Request record. |
Mandatory_Action__c |
Checkbox |
Signifies if the action is mandatory or not. |
Record_Type__c |
Record Type |
The type of the action the record stands for. |
Action__c |
Lookup |
Lookup to the corresponding action. |
Operation |
Text |
The ID of the respective operation in the Headless app. |
Other fields on a record duplicate fields and content from the connected Action record.
¶ Creating Action Requests
There are two ways of creating an Action Request:
- It is created automatically when you start the template generation process or trigger a Document Request that includes a Document Solution with associated Actions.
- You can insert an Action Request by using code via the Developer Console.
Since using code is too technical and too advanced, let's focus on the first option.
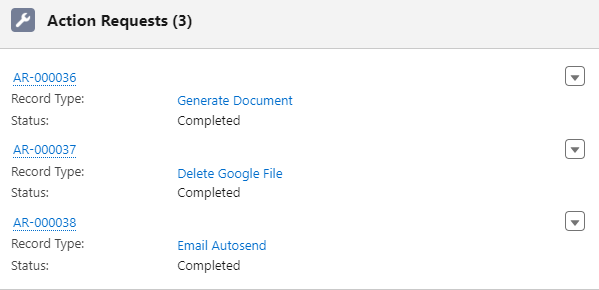
First, note that the number of Action Requests associated with a Document Request corresponds to the number of Actions defined in its linked Document Solution. For example, if that Solution includes Delete Google File and Email Autosend actions, two separate Action Requests are created.

It means there should be three Action Requests related to the created Document Request:
- The Generate Document Action Request.
- The Delete Google File Action Request.
- The Email Autosend Action Request.
¶ Mandatory Actions
In the Actions section, we mentioned the Mandatory Action checkbox. This checkbox affects the overall status of the Document Request. If you have multiple actions on Document Solution and one of them, marked as Mandatory, fails during document generation, the entire Document Request is marked as an Error. Actions scheduled to follow the failed one are marked as Cancelled, while those executed beforehand are marked as Completed.
If the Mandatory Action checkbox is not marked, a failure in that specific action doesn't impact the Document Request status or the statuses of the subsequent Action Requests.