¶ FAQ. Generating Documents
¶ When I try to generate a new document, the spinner keeps going even after two minutes. Why does it happen?
- There is a limit to the API call duration we make to generate your document, which is 2 minutes. If we do not receive the information from the API for this long, it means the template you have built is highly complex and needs optimization.
¶ How can I preview a document before it is generated? I do not see the Preview button.
- Allow Preview checkbox shall be set on your Button Configuration. More information can be found in our documentation.
¶ I got this error message: "exceptionType"."mmdoc.MavenDocsException","isUserDefinedException": true,"message": "invalid _grant", "stackTrace”: ”(mmdoc)”. Can you help me understand what it means and how I can fix it?
- This error signals that you need to revoke and grant access to your Google account one more time. Perhaps some changes were made to your Google account. So you can grant access to it in the Maven Documents settings tab. And this instruction(link here) may help you.
¶ The generation process ends in the following error: Error[{"exceptionType":"System.LimitException", "isUserDefinedException":false,"message":" Apex heap size too large: 7058814","stackTrace":"External entry point\n(mmdoc)"}]. There's something said about the limits, but I didn't reach any Salesforce limit. Can you explain why this is happening and which limits are reached?
- This error is telling you that data in the query you've built is not filtered, so the generated document is trying to show you all the data that you have in your org connected to the query.
To avoid this issue, you just need to add a filter to the query in the Query Builder tab. So set the needed conditions in the Filter section of Query Builder and save it.
If the generation process ends in the following error: Error[{"exceptionType":"System.LimitException","isUserDefinedException":false,"message":"mmdoc:Too many query rows: 50001","stackTrace":"(mmdoc)"}], the described solution fixes it as well.
¶ Can I use the image uploaded to Salesforce as a source for Image element?
- Yes, you can. Once you've uploaded the image to Salesforce, you can fetch its data by adding the corresponding object and field to the Query.
-
Go to the Query Builder tab and click Add Query.
-
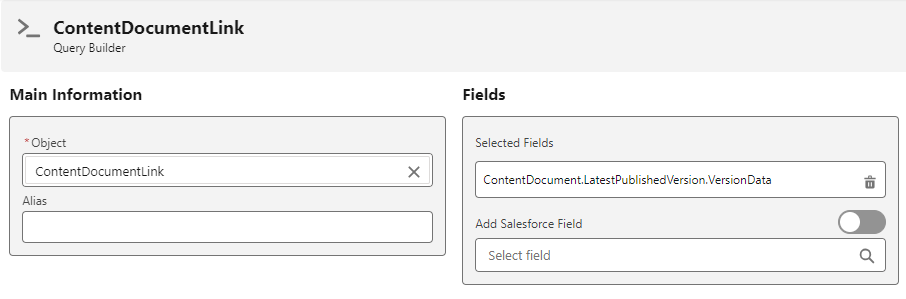
For the Object, select "ContentDocumentLink".
-
For the Field, start writing down Content and click on ContentDocument ContentDocument ID.
-
In the "Select Field" field, start writing down Latest and select LatestPublishedVersion.LatestPublishedVersion.ID.
-
In the "Select Field" field, write down Version and select the VersionData field.
-
Save the Query.
-
Go to the document in which you want to insert the Image element and run the Maven Add-in.
-
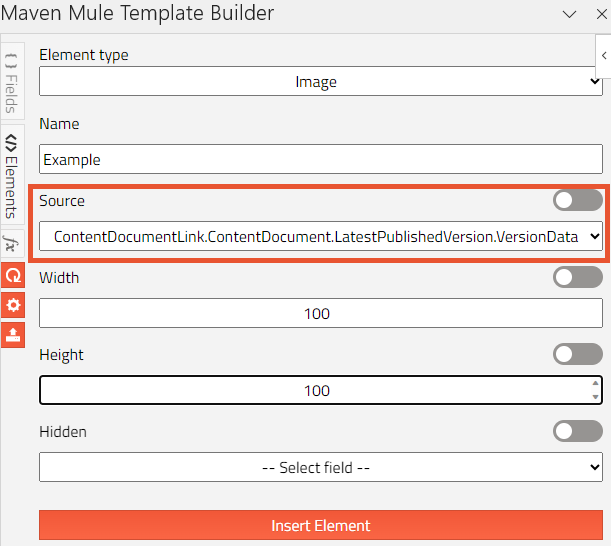
Select the Image element and in the Source field select the added field from the Query.
-
After you insert the element and generate the template, the uploaded image will be shown in the generated file.
¶ After the XLSX template is generated, merge fields that are used in Excel formulas are not processed in the generated file. Is it even possible to use merge fields in those formulas?
- It is possible to use merge fields in Excel formulas. The reason why these fields are not processed is because that generated file is open without having Edit mode enabled. Make sure that you allow editing after you open the file.

¶ I have a Watermark added to the Microsoft Word document. Can I generate that document with the Watermark in it?
- Yes, having either an image or text Watermark in your document won't break the generation process. The generated file will have the corresponding watermark.
These statements are true for both Google Docs and Microsoft Word templates.
¶ Is it possible to show or hide a Watermark depending on some conditions?
- The answer is yes. Here is how you can do it:
- Duplicate the original file uploaded to the Document Template.
- Clear the content of the duplicated file. If needed, leave the header and footer.
- Instead of the deleted content, add the following Include element:
<mdoc:include name="The Name of the element" sourceType="documentTemplate" source="The name of the original Document Template"/>. - Double-check that you put the correct name of the original Document Template.
- Add the needed Watermark to the newly created file.
- Create a new Document Template and name it "Document with Watermark" or anything meaningful to your taste.
- Adjust your process to use the initial Document Template or new Document Template with the Watermark, depending on the requirements.
It allows you to maintain the content of the Initial Document Template just in your original file. The new template adds the Watermark and includes the whole content from the original template. This means you make changes to the template in one place only.
¶ I used some special characters in the Folder Path field on a DOCX Document Template, but got an error while generating. Is it okay, cause I tried the same in Google Document Template and it works fine?
- Yes, it works as expected. There are some differences between processing the content in the Folder Path field on the Google and DOCX Document Templates:
- If you use special characters such as # (Number) or * (Asterisk) in the Folder Path field, it leads to an error for DOCX Document Templates, but it works fine for Google.
- If you use a DateTime merge field in the path, it leads to an error for DOCX Document Templates, but is resolved fine for Google.
- If you have two forward slashes // in a row in the Folder Path field, it does nothing on OneDrive, but creates a folder called "New Folder" on Google Drive.
¶ Cloning the Document Template fails after updating from the Anisoptera Minor1 version
The Document Templates record structure has changed significantly since the Anisoptera Minor1 version.
Ensure that all required fields are present and populated with correct values.
One important field introduced in later versions is Template Document URL. This field is required and must contain the URL of the online document associated with the Document Template record.
- Verify that the Template Document URL field is populated.
- Add the value by:
- Manually pasting the document URL.
- Uploading the online document using the Add-in(for Microsoft Templates).
For Google Document Templates, the field is only populated manually. You can not upload a new document to the Document Template using the Add-on and overwrite the value in the field.
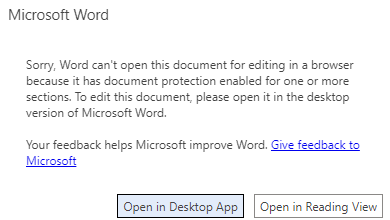
¶ What if I have the After Merge preview of the Microsoft Word file, which has some parts protected from editing? Can I edit such a file in the preview?
We've already mentioned in our Documentation that, because of the Microsoft limitations, the Restrict Editing feature is only available in the desktop version.
With that in mind, there are two requirements to meet that allow you to edit the "restricted" file in Preview:
- It is crucial to have Microsoft Word installed.
- Turn on the Autosave feature in the desktop version of Microsoft Word.
Once you click edit on the file in Preview, you'll be prompted to open it in the desktop version of Microsoft Word.
After you agree, the file from Preview is open, and the Autosave toggle is switched.
That means all the changes you make in the file are saved in its copy in OneDrive, and you will find them in the generated document.
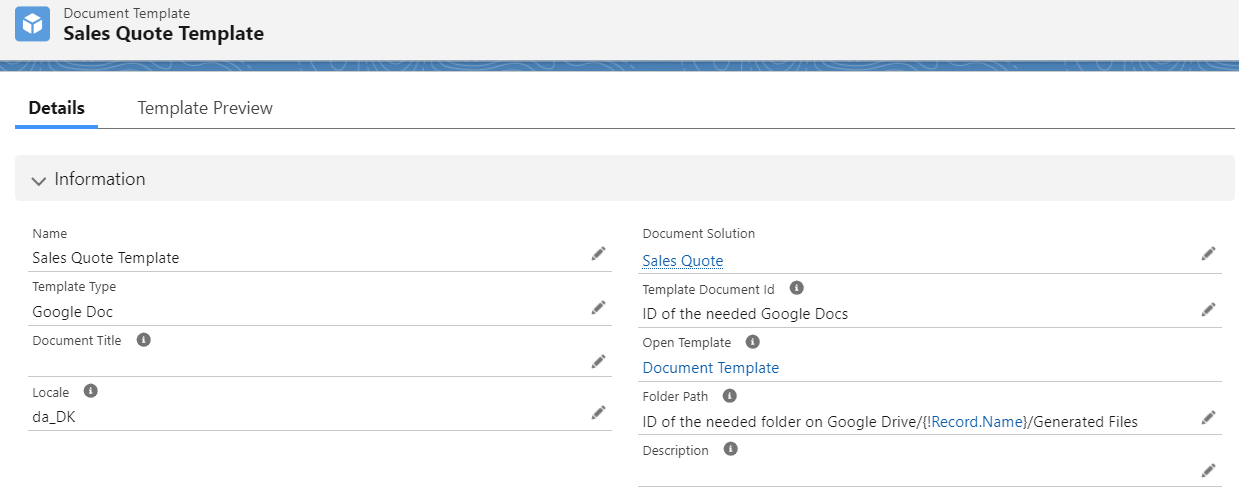
¶ Can I generate the document in a Locale different from the system one?
Yes, you can. Depending on how you are generating the document, you can:
- use the Locale field on a Document Template.
- use the Locale field on a Document Request record.
- use the Locale field in Flow.
All you need to do is put the needed locale value into the field and generate the document. In the screenshot below, we displayed how it could look on a Document Template. In our case, the Danish locale is used.
¶ I generated a DOCX document, and the number of pages in Word does not match the respective value in the consumption record. Is there an issue in the app?
This can happen in some scenarios. Different applications that support the DOCX format have their own internal document processing. Because of that, they can show the file with a different number of pages.
Similar is in Maven Documents: when we process the DOCX file, we calculate its pages, which in some cases can be different from the page count you'll see when you open that document in your Word application.
¶ I added a list of emails to the "Share User Edit List" field to share the generated document. However, when the generation finished, all the email addresses ended up in the "Failed Share User Edit List." There was only one incorrect email in the list, so why did all the valid ones fail as well?
This scenario is possible. We've included some additional theoretical information in the response to help you understand the full context.
- Emails can be internal or external.
Internal emails represent users from a single organization and typically use a domain associated with that organization.
External emails represent users who are not part of the organization and may use various types of domains. - If an internal email does not match any user with the specified email address, it will appear in the corresponding field on the created Document Request.
If valid external emails are defined in the same list, they will also be marked as failed - If any internal or external emails are invalid or malformed, only those emails will fail.
- If any email fails, the generation process is still completed.
Failed emails are listed in the respective fields on the Document Request.
The generated file on OneDrive includes a sharing link without any specific user assigned.
¶ I get the "Error calling copy file service" message when generating a document from a Google Template. What could be wrong here?
Please check if you have Google Drawings embedded in your template. Generation might fail when drawings are created directly in the Google Docs you work on.
But you can use the following instructions as a workaround:
- Create a Google Drawing on your Drive.
- In your Google Docs, click "Insert" and select the "Drawing" option to be inserted "From Drive"
- Select the Drawing and select the "Link to source" option
- Click "Insert"
With that sequence, Google Docs is going to be generated without issues, showing the inserted Drawing.
¶ I’m having issues generating documents with Custom Queries. Each attempt ends in an error. Are there any specific considerations related to Custom Queries?
Please make sure you’ve reviewed the respective article in our Documentation, where we describe common use cases and highlight possible obstacles to keep in mind.
¶ Why does my Word template document lose formatting when edited by users with different system languages?
In some cases, a single Microsoft Word file may be edited by users from different countries. When this happens, the formatting of the document can be affected. For example, editing a header might reset its formatting, and the generated document may display that header with the default style.
This is not an issue with Maven Documents itself, but rather a limitation of Microsoft Word. Styles and their styleIDs in a Word document depend on the system language of Microsoft Word.
For instance:
- If a template document is created in Word with the English system language, it uses English style names and IDs.
- When that same template document is opened in Word with, say, the Croatian system language, the style names and IDs are automatically converted to Croatian.
- If you have a template document with one set of styles, and you include a document with a different set of styles (due to the styleId), this issue becomes visible.
Since Maven Documents relies on styleIDs, this language-based change can lead to formatting issues in the generated output.
Workaround
To avoid this problem, we recommend using custom styles. Unlike default Word styles, custom styles keep the same styleID and formatting regardless of the system language. This ensures consistent formatting across Word users with different language settings.
¶ Why is a Word table inside the "Repeater" element combined into one large table instead of being repeated multiple times in my DOCX template?
When you place a Microsoft Word table inside a Repeater, Word may merge the resulting tables in the generated document into a single long table if they are not separated from the Repeater’s opening or closing tags by a paragraph or line break.
This happens because of how Word handles consecutive tables — it automatically combines them into one unless something (like a line break or empty paragraph) separates them.
How to fix it:
Add a line break or empty paragraph between the table and the opening or closing tag of the Repeater in your template.
This ensures that each table is generated separately and prevents large blank spaces from appearing in your document.
¶ Can't generate a document after the Sandbox was refreshed. The error is saying that the Org connection needs to be reconfigured. What are my actions here?
When a Sandbox Org is refreshed, certain settings are reset or reconfigured. This can affect document generation.
The actions required depend on the Maven Documents version you are using.
¶ Versions before 6.0
The first thing to do is to contact Maven Mule support. There some custom settings in your Org that needs to be changed and only the support team can modify those.
After custom settings are changed, follow the instructions below to reauthorize the Google and Azure accounts.
¶ Re-authorize Google Account
To successfully connect the account, the user who performs authorization should have either ModifyAllData or ModifyMetadata permissions in Salesforce.
Follow the steps below to authorize the account:
-
In the "Maven Documents Setup Assistant" tab, click Revoke Google Permissions.
-
Once permissions are revoked, click on the "Authorize Google Account" section.
-
Then click the "Sign in with Google" button.

-
Select the needed account and choose what parts of your Google data Maven Documents can access.
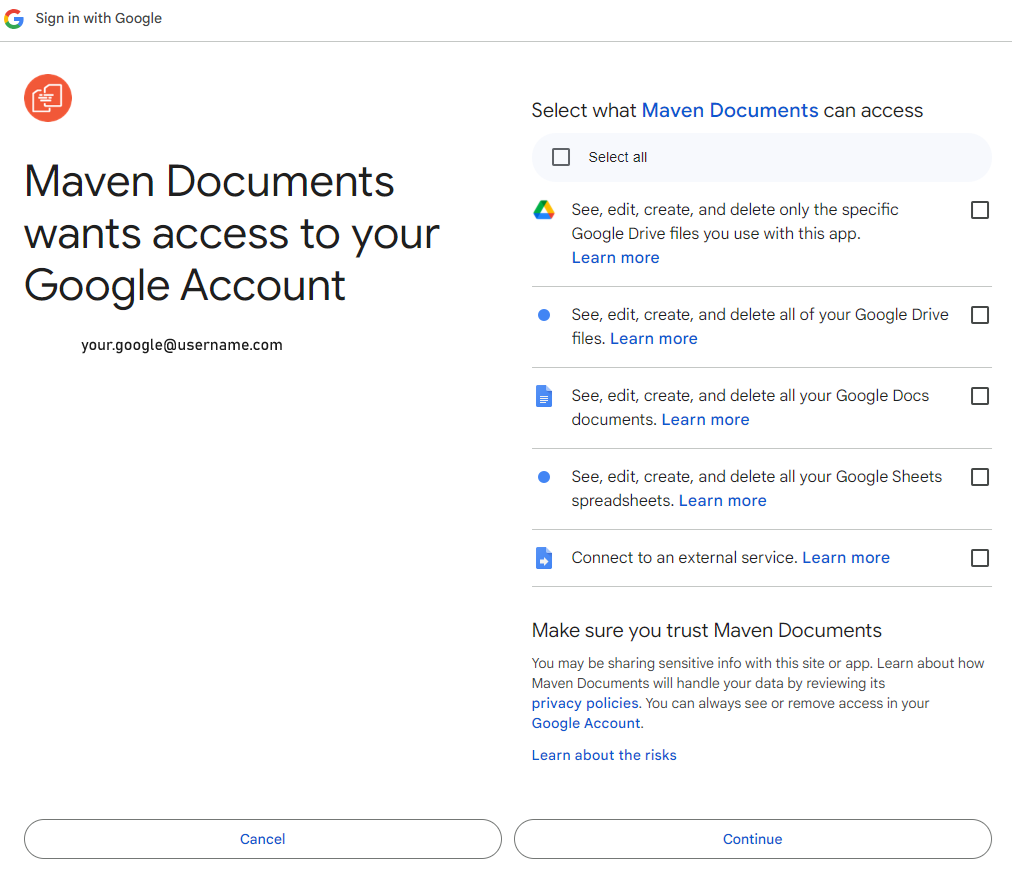
-
Mark needed checkboxes or just select all and click Continue.
Be aware that our app needs these permissions to deliver its capabilities. If some of the permissions are not given, some core features might not work as expected. To make sure that you'll get all of the app's capabilities, give the app all the requested permissions.
The page with Setup Assistant will be refreshed and you will see that the icon next to the section name is marked and painted green. The same thing happened to the icon next to the corresponding setting inside the section. The Sign in with Google button in the section is changed to Revoke Access.
Maven Documents uses the authorized account to access the Google Docs template and generate new documents. All Google templates created by Maven Documents will be initially owned by this Google account.
¶ Re-authorize Microsoft Account and grant Access to Microsoft App
To successfully connect the account, the user who performs authorization should have either ModifyAllData or ModifyMetadata permissions in Salesforce.
Follow the steps below to connect the account:
-
In the "Maven Documents Setup Assistant" tab, click Revoke Microsoft Permissions and then Revoke Access from App in the corresponding section.
-
Once permissions and access are revoked, click the "Sign in with Microsoft" button.
-
Select the needed account and allow the requested access. When the account has been connected successfully, you'll see the green ribbon message.

The page with Setup Assistant will be refreshed, the icon next to the section name is half circled with the blue line. The Sign in with Microsoft button in the section is changed to Revoke Microsoft Permissions.
-
In the "Authorize Microsoft Account" section, click the Grant Access to App button and select the needed account.
Once you are connected successfully, you'll see the success message in the new browser tab.

The page with Setup Assistant will be refreshed and you will see that the icon next to the section name is marked and painted green. he Grant Access to App button in the section is changed to Revoke Access from App.
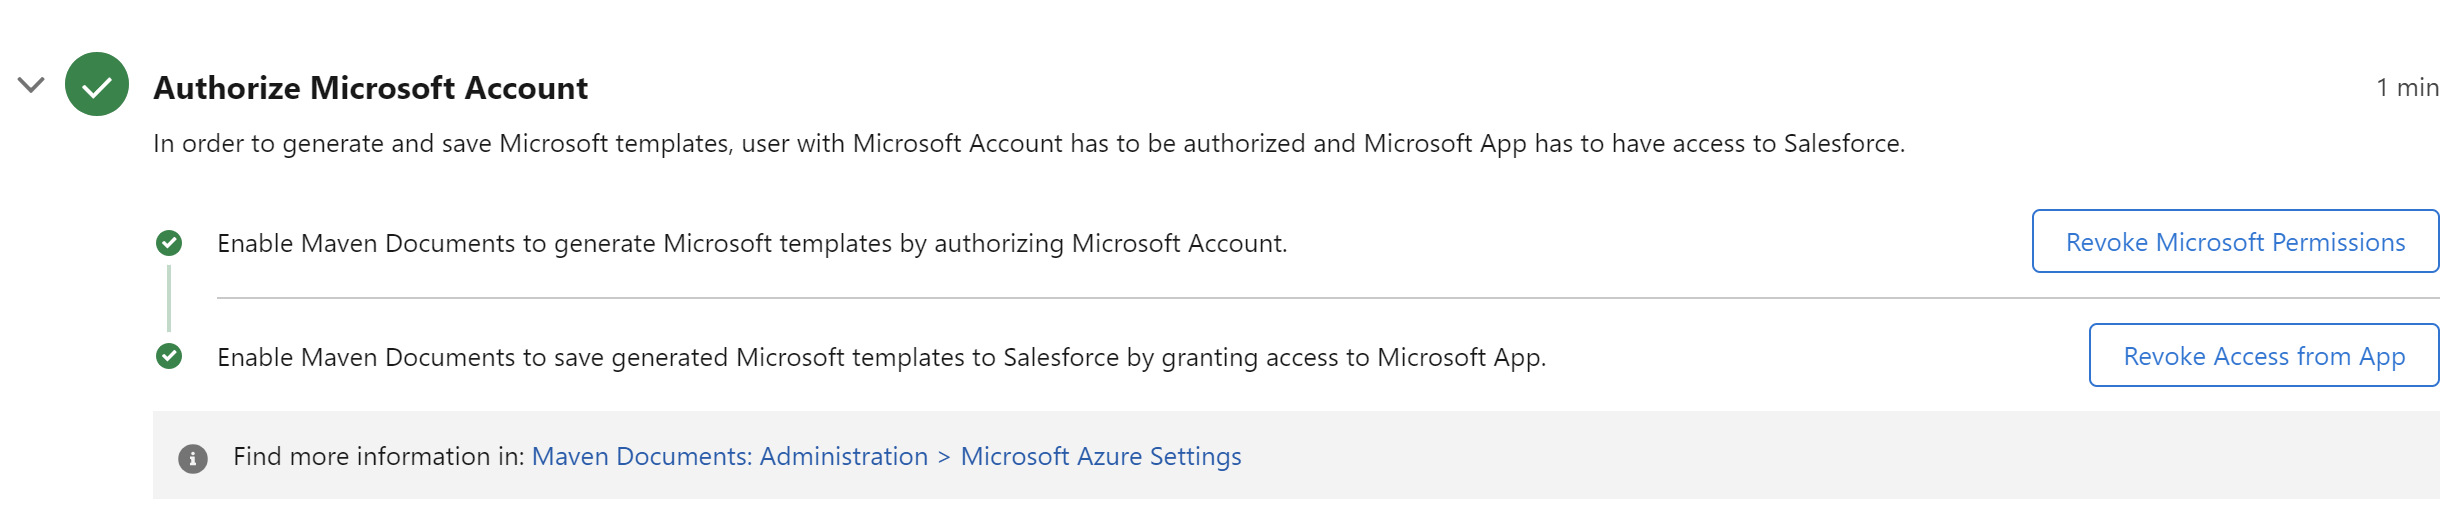
Maven Documents is connected to a Microsoft Azure account associated with the service you signed in with and to the OneDrive service of the corresponding Microsoft Account. It means that you can use DOCX or XLSX files and upload them to Document Templates in Maven Documents.
¶ Versions after 6.0 and before 6.5
If you get the "Authorization header is invalid. TokenInvalidAudience" or "Unauthorized SubscriptionKeyInvalid" errors that means you are not using the correct AMP Subscription Id or your Org is trying to connect to the wrong Maven Headless environment.
For Maven Documents version 6.0 and above, you’ll need to reconfigure all Headless Settings in the Setup Assistant.
¶ The Browser Login Flow
-
In the Setup Assistant, open the Maven Headless Configuration and click the "Open Application Settings" button.
-
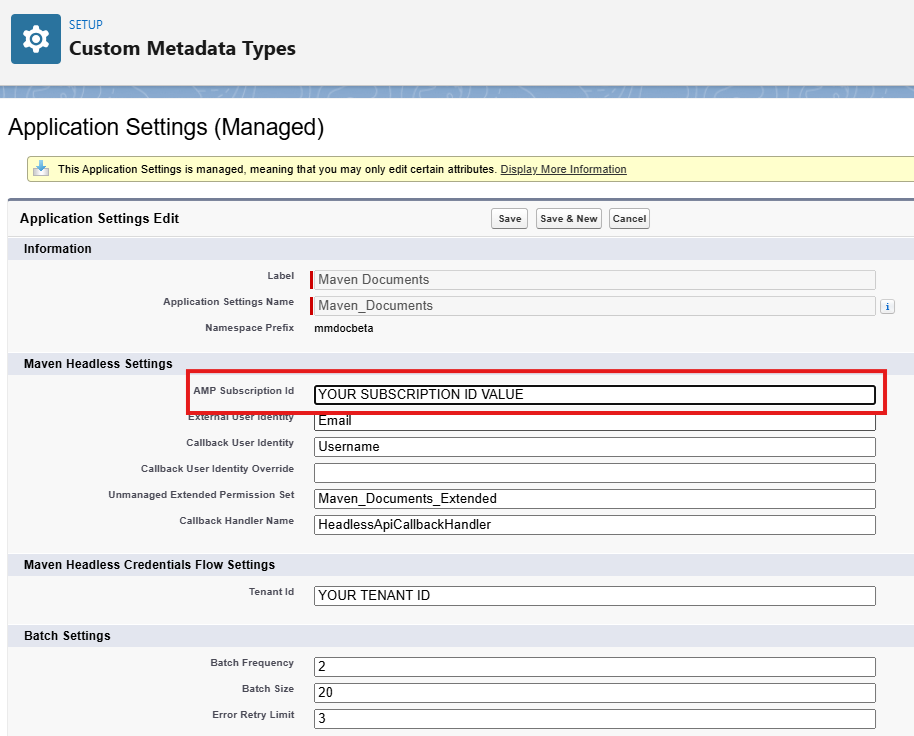
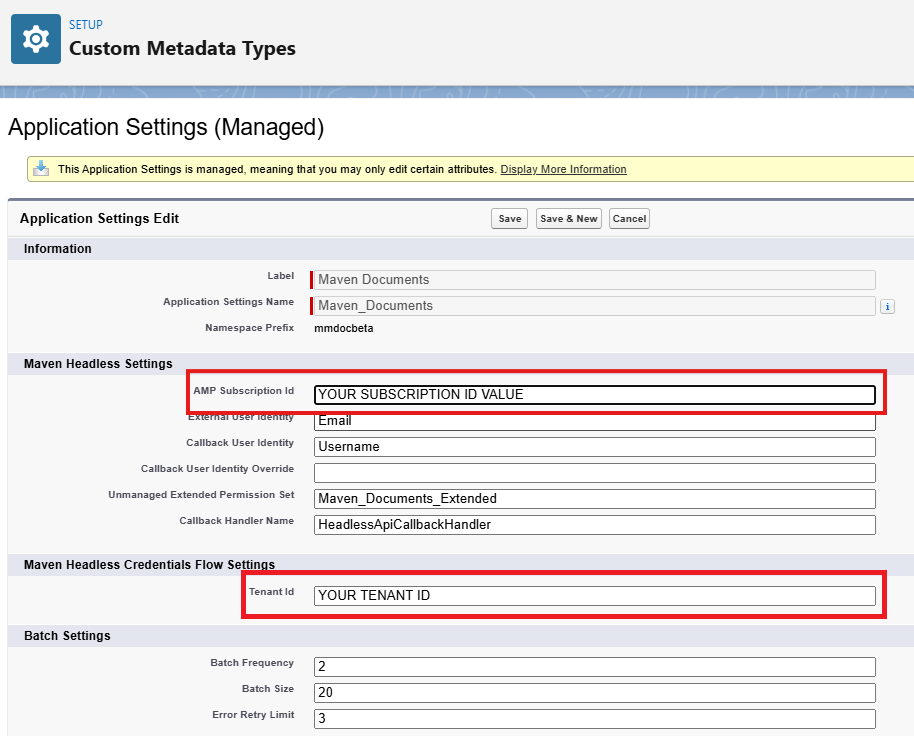
In the open "Application Settings" page, click "Edit" and clear the value from the "AMP Subscription Id" field.
-
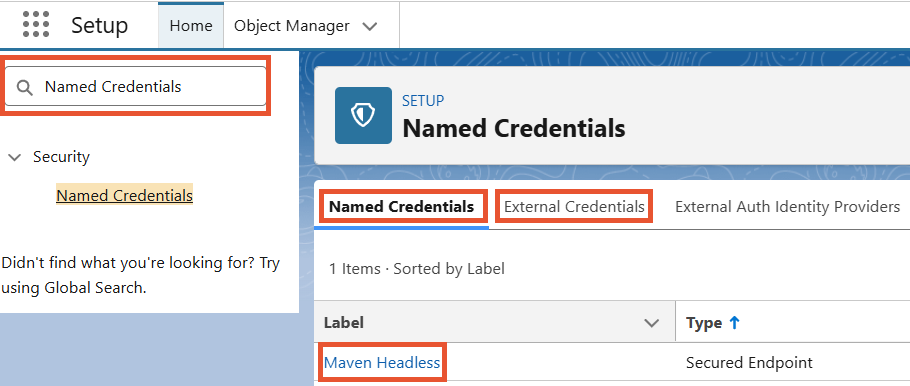
In the "Quick Find" box, search for and open the "Named Credentials" settings.
-
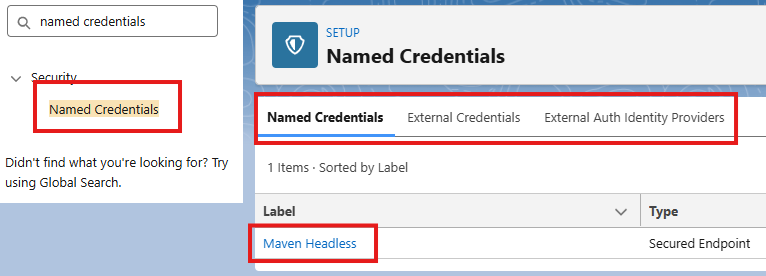
Delete the "Maven Headless" entries under both the "Named Credentials" and "External Credentials" tabs.
-
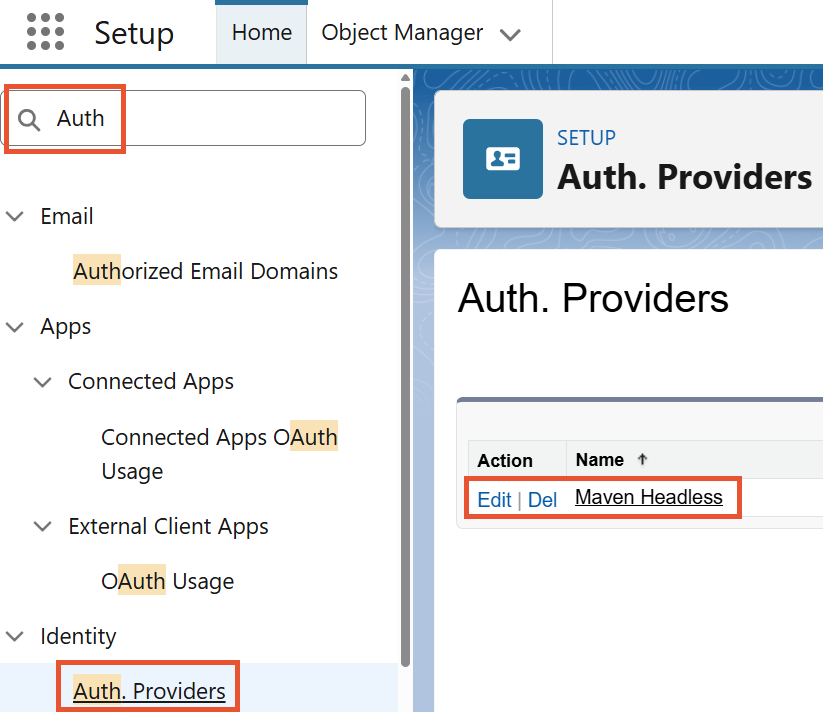
In the Quick Find, enter "Auth" and open the "Auth. Providers" settings.
-
Delete the "Maven Headless" provider.
-
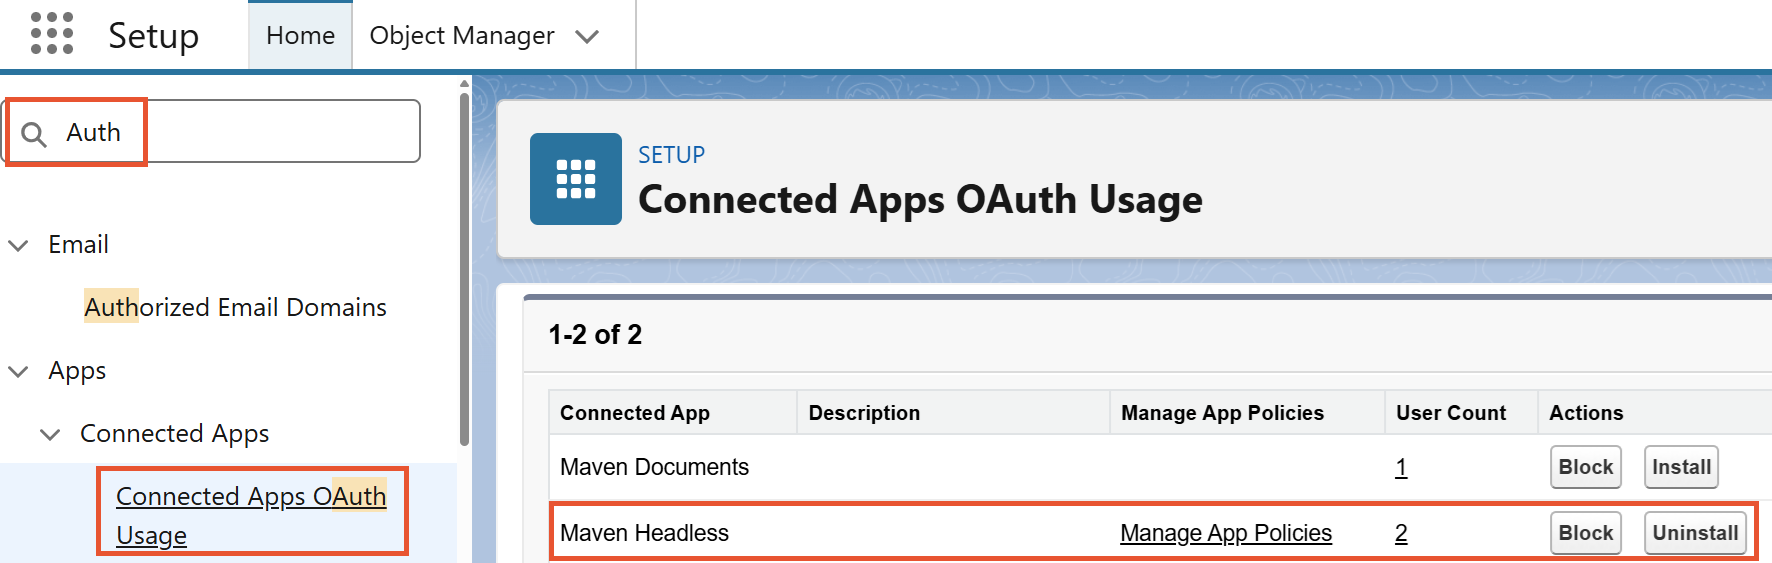
In the search results on the left pane, click on the "Connected Apps OAuth Usage" setting.
-
Uninstall the "Maven Headless" connected app.
-
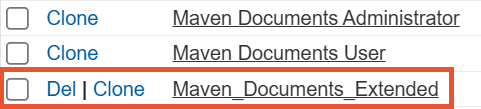
Unassign the "Maven Documents Extended" permission set from affected users and delete the permission set.
-
Configure the "Maven Headless" settings from scratch, using the following instructions.
¶ The App-to-App Flow
-
In the Setup Assistant, open the Maven Headless Configuration and click the "Open Application Settings" button.
-
In the open "Application Settings" page, click "Edit".
Clear the values from the "AMP Subscription Id" and "Tenant Id" fields.
-
In the "Quick Find" box, search for and open the "Named Credentials" settings.
-
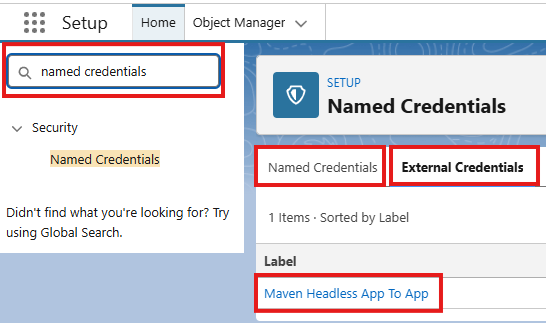
Delete the "Maven Headless App To App" entries under both the "Named Credentials" and "External Credentials" tabs.
-
In the search results on the left pane, click on the "Connected Apps OAuth Usage" setting.
-
Uninstall the "Maven Headless" connected app.
-
Unassign the "Maven Documents Extended" permission set from affected users and delete the permission set.
-
Configure the "Maven Headless" settings from scratch, using the following instructions.
¶ Versions after 6.5
If you get the "Authorization header is invalid. TokenInvalidAudience" or "Unauthorized SubscriptionKeyInvalid" errors that means you are not using the correct AMP Subscription Id or your Org is trying to connect to the wrong Maven Headless environment.
For Maven Documents version 6.5 and above, you’ll need to reconfigure all Headless Settings in the Setup Assistant.
¶ The Browser Login Flow
-
In the Setup Assistant, open the Maven Headless Configuration and click the "Open Application Settings" button.
-
In the open "Application Settings" page, click "Edit" and clear the value from the "AMP Subscription Id" field.
-
In the "Quick Find" box, search for and open the "Named Credentials" settings.
-
Delete the "Maven Headless" entries under the "Named Credentials", "External Credentials", and "External Auth Identity Providers" tabs.
-
In the search results on the left pane, click on the "Connected Apps OAuth Usage" setting.
-
Uninstall the "Maven Headless" connected app.
-
Unassign the "Maven Documents Extended" permission set from affected users and delete the permission set.
-
Configure the "Maven Headless" settings from scratch, using the following instructions.
¶ The App-to-App Flow
-
In the Setup Assistant, open the Maven Headless Configuration and click the "Open Application Settings" button.
-
In the open "Application Settings" page, click "Edit".
Clear the values from the "AMP Subscription Id" and "Tenant Id" fields.
-
In the "Quick Find" box, search for and open the "Named Credentials" settings.
-
Delete the "Maven Headless App To App" entries under both the "Named Credentials" and "External Credentials" tabs.
-
In the search results on the left pane, click on the "Connected Apps OAuth Usage" setting.
-
Uninstall the "Maven Headless" connected app.
-
Unassign the "Maven Documents Extended" permission set from affected users and delete the permission set.
-
Configure the "Maven Headless" settings from scratch, using the following instructions.
¶ Document generation fails for users who have Multi-Factor Authentication (MFA) enabled for Salesforce login. Is there a workaround?
Currently, document generation within Maven Documents will fail if the user's profile is configured to require a High Assurance session security level at login.
- Session Security Settings: If a user profile has the "Session Security Level Required at Login" set to High Assurance (which is common when MFA is enforced at the profile level), Salesforce restricts certain API interactions required by Maven Documents to finalize the generation process.
- Current Limitation: When a session is strictly flagged as High Assurance, the automated background processes used for document generation may not have the necessary permissions to execute.
- Identification: To verify if this is the cause, check the user's profile settings under Profile -> Session Settings -> Session Security Level Required at Login. If it is set to "High Assurance," the generation will encounter this error.