¶ Automate with Flow
Generating documents by using Button Configurations in Maven Documents is pretty simple and easy to use. But there are some other options to generate your template. For example, you can do that with different types of Salesforce Flow.
We won't describe all the Flow types or their components here. We'll just show you some basic examples of using Flows to generate documents. If you want to dig a little deeper in that field, here's the Salesforce trail and Salesforce documentation on Flow Builder
¶ Generate documents with a Screen Flow
Here we describe how to create and use a "Screen" Flow for generating documents.
¶ Build the Flow
-
Open Setup and search for Flows in Quick Find Box.
-
Open Flows.

-
Click the "New Flow" button to create a new Flow.
-
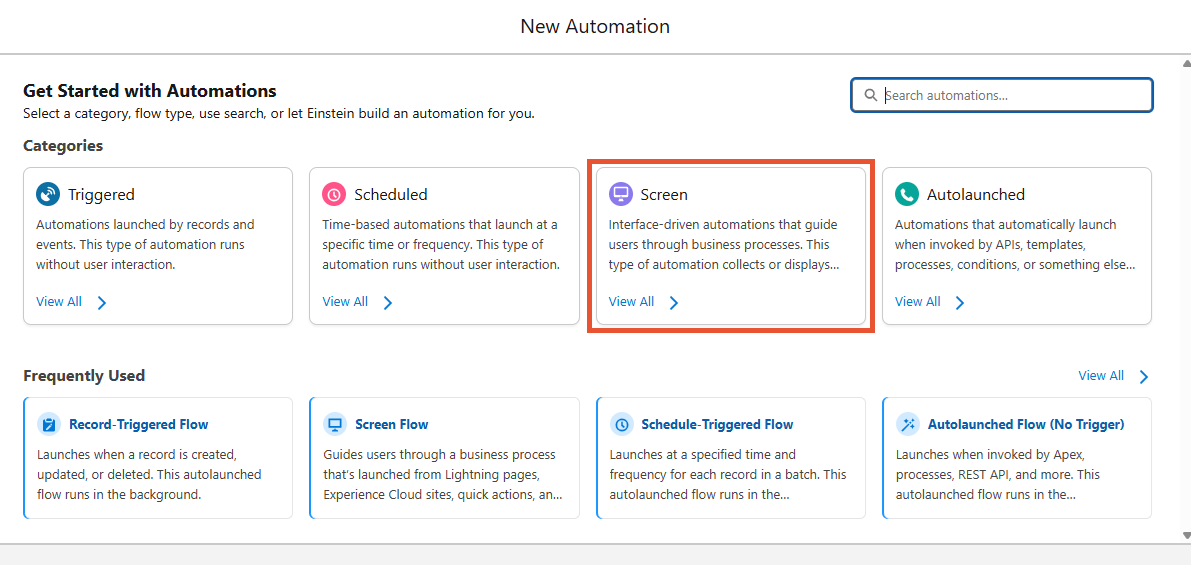
From the list of automation categories, select Screen.
-
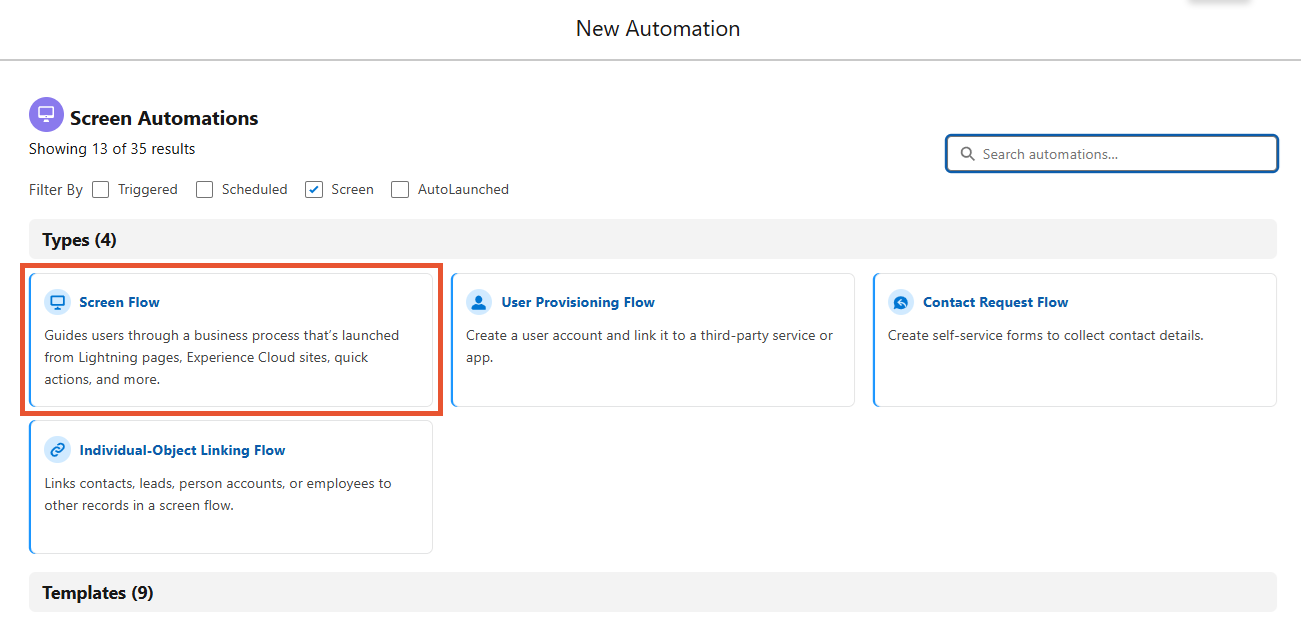
Pick the "Screen Flow" option from the available screen automations.
After these steps, you will see the "Flow" canvas, where you operate with the Flow components. So let's get straight to business.
-
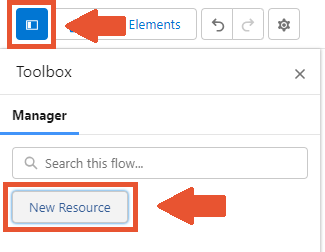
First, we need to do some preliminary work and create a variable that holds the ID of the corresponding record. In the left section of Flow Builder, open the Toolbox and click New Resource.
-
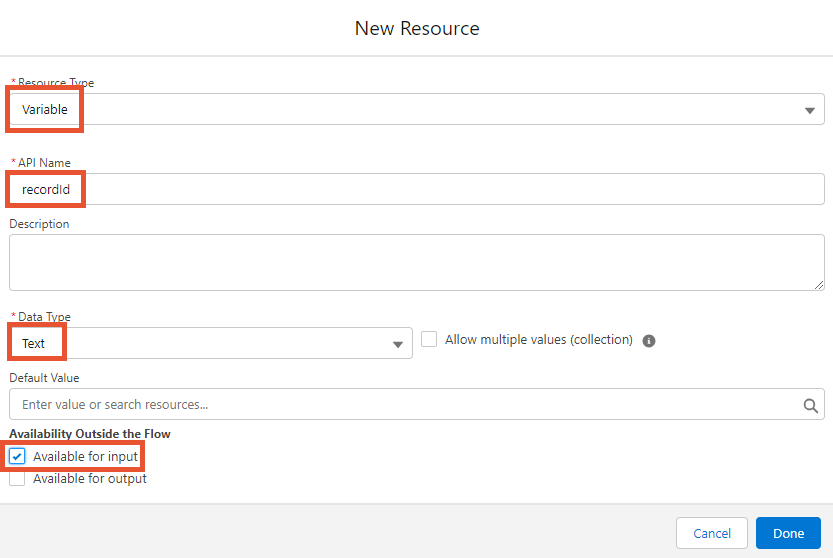
Create the Text Variable using the screenshot below as a reference.
-
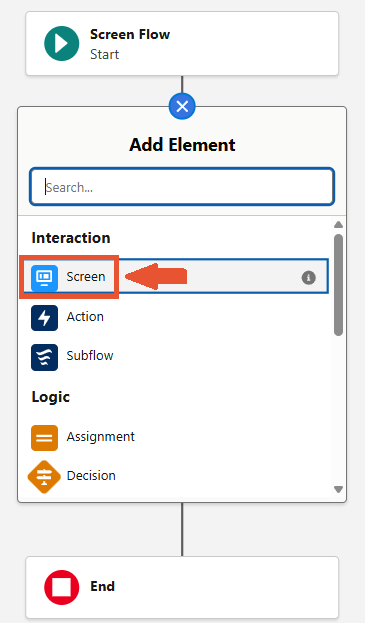
Now we can add Flow elements.
Click the "Add "+" element" button between the "Start" and "End" points and select the "Screen" element.
-
Give the Screen a name by filling in the "Label" field in the right panel and scrolling down the "Components" tab on the left to inspect available components in the "Custom" section.
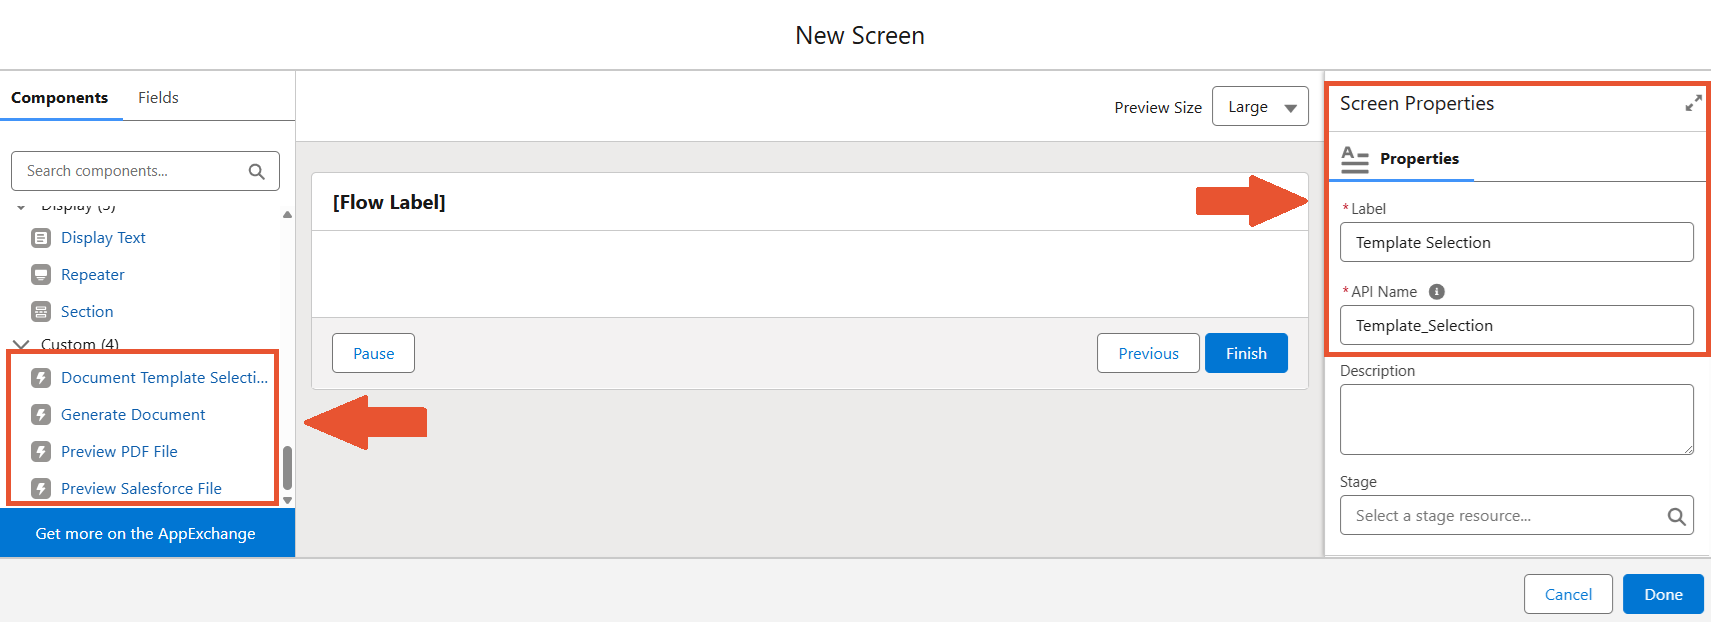
These are the building blocks of your future Flow. Each of the components stands for the well-known functionality from Maven Documents. You are already familiar with most of them:
- Document Template Selection. The component is added as a Screen and allows users to select the Document Template in the Flow.
- Generate Document. This one is added as the "Screen" element and includes some important information about the document generation process. Here you can choose the format of the generated document, whether the document will be generated as a "Salesforce file" or "Attachment", or the ability to edit the document before or after the merge.
We recommend you use this component with the Document Template Selection in the Flow, so you can reference it and retrieve the needed data automatically.
- Preview Salesforce File. The component is added as a Screen and shows the preview of the generated Salesforce file.
-
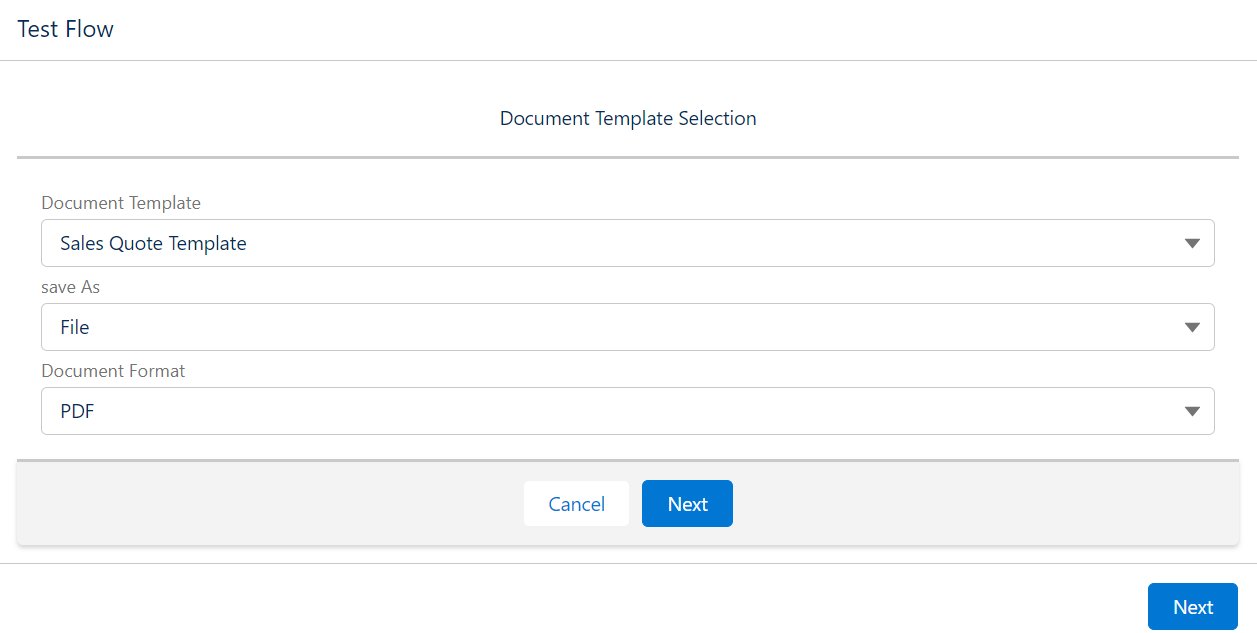
Select the "Document Template Selection" component and click on it or drag it to the area under the [Flow Label] header. You should start with this component as it provides the necessary information for the generation process. If this component is skipped, the Flow ends in an error.
-
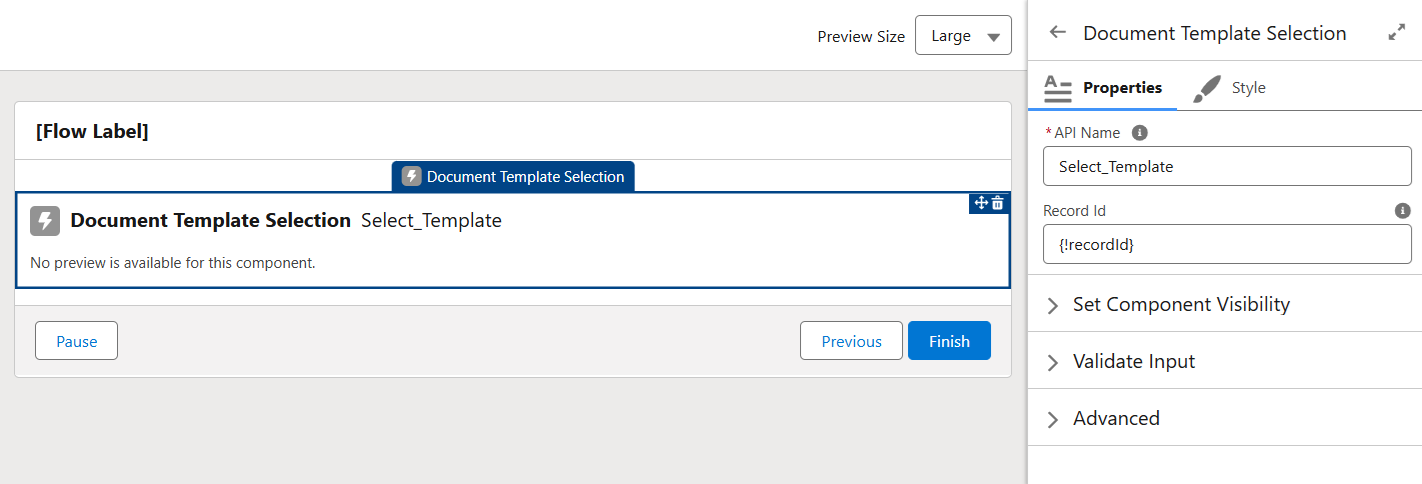
Fill out the "Properties" form in the right panel:
- API Name: e.g. Select_Template.
- Record Id: select the recordId Variable here.
You can also use the ID of the record where the Flow is run. In this case, the Flow will generate the document linked to that specific record, even if the generation process is initiated from a different one.
-
Click Done.
You will find the added screen element with the selected component on the canvas.
Once you run the Flow, the first screen component looks like that.
You can notice that there are two "Next" buttons. The reason for that is having the "Footer" checkbox marked in Screen Properties.
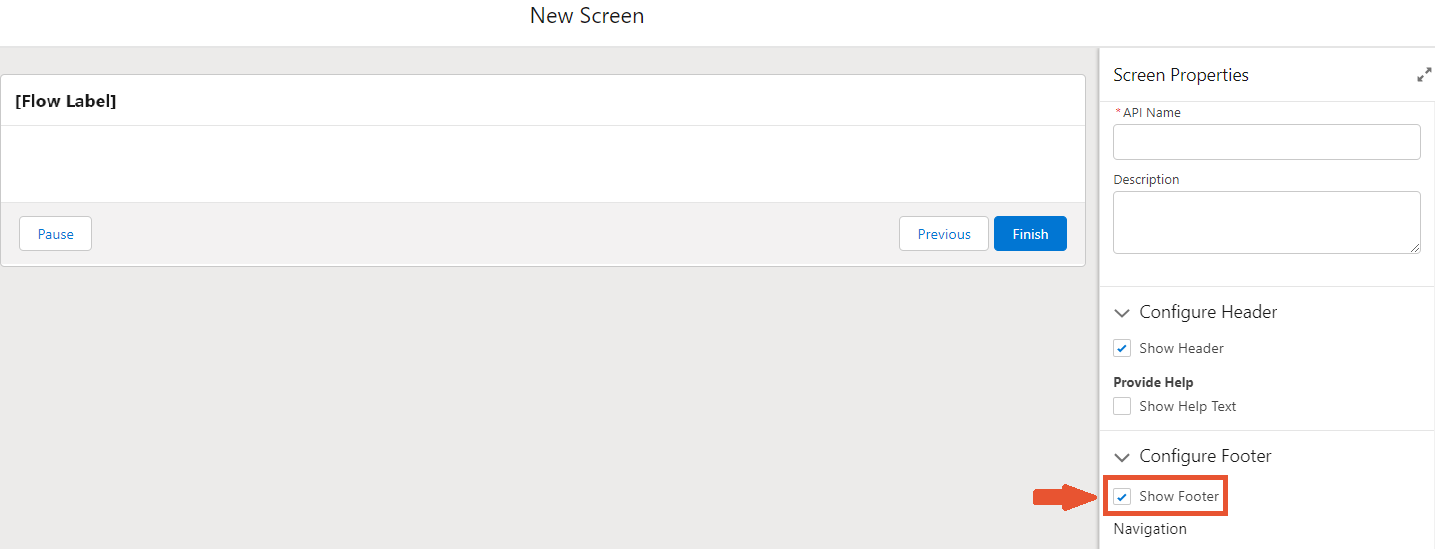
We recommend deselecting this checkbox, as having two sets of buttons can be confusing, and using the footer buttons may lead to incorrect Flow outcomes.
-
Now, let's add a new "Screen" element under the Template Selection. Give the element a name, for example, "Document Generation", and select the "Generate Document" component. Label it as Generate_Document as well.
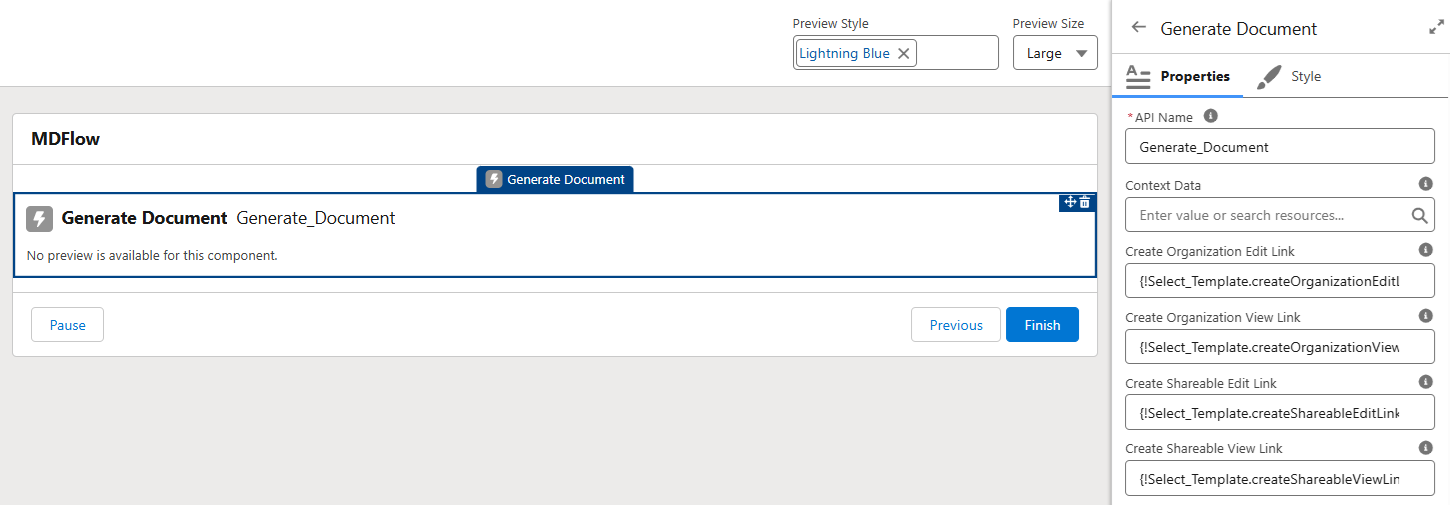

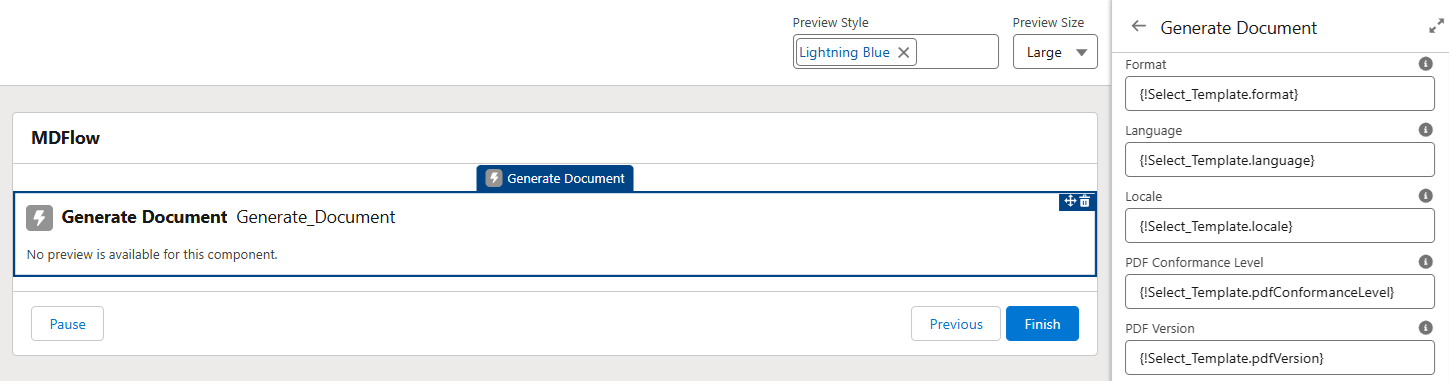
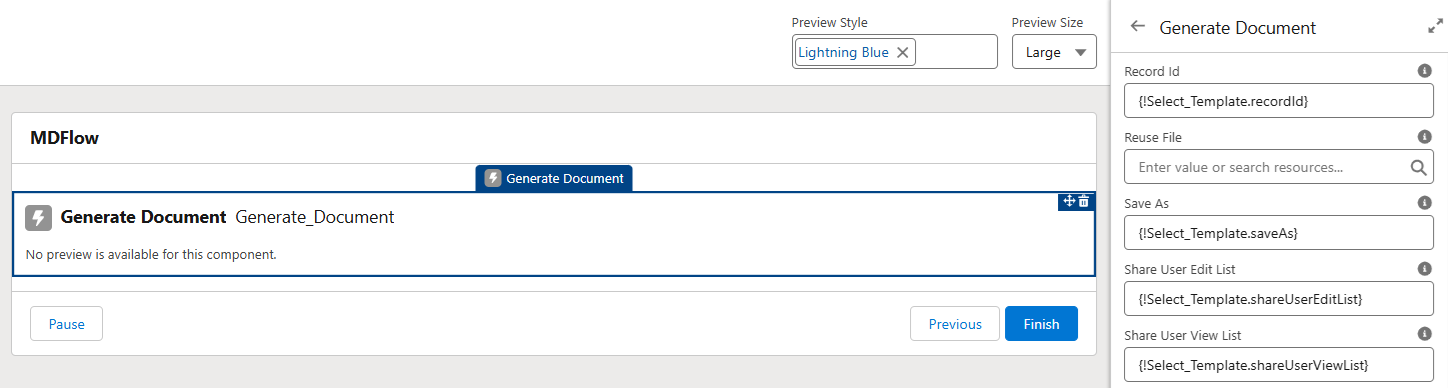
Notice that in the properties fields, we used references to the "Template Selection" screen. This means that the generation process uses the outcome of the first screen as data.
If you would like to overwrite the values you have in the Document Template, you can manually put the necessary data in the Flow component field. For example, take a look at the "Folder Path" field in the screenshot above.If you use merge fields in the "Folder Path" field, you need to add the dollar sign "$" to the name of the field, as we have in the screenshot. It allows the app to separate Flow elements and merge fields during the generation process.
-
Click Done, then refer to the screenshot below to compare.
In the end, we'll add one more screen to show the preview of the generated document.
If you remove the "Pause/Back" buttons from the Generate Document screen component, consider the following: if you have the "Before/After Merge" preview during the generation, clicking the "Cancel" button in the preview leads the process to the next screen, not the previous one. In this case, the generation process is cancelled. The corresponding Document Request and Action Request have the "Cancelled" status too.
-
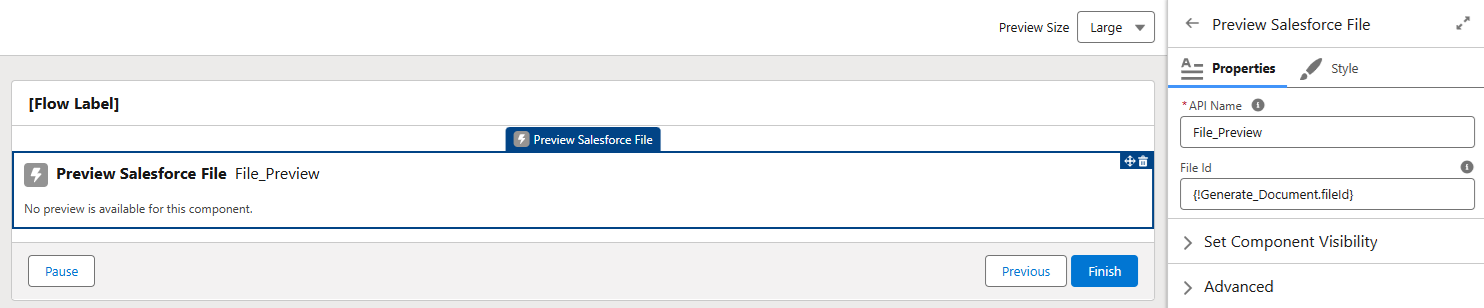
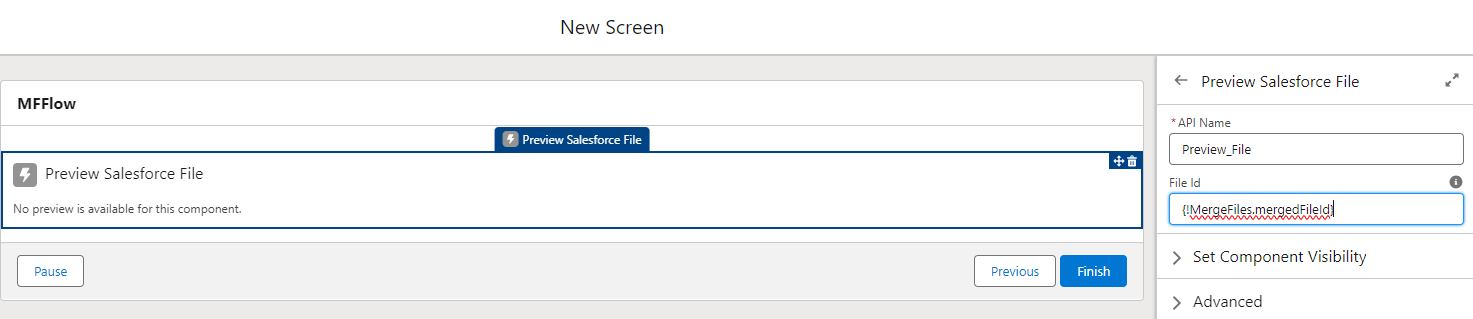
Add a new Screen to the Flow and name it. Then select the "Preview Salesforce File" component, label it, and fill in the "File Id" field.
-
As you can see in the screenshot above, we are referencing the "Document Generation" screen in the "File Id" field. By doing this, we ensure that the final screen displays a preview of the document generated by the current Flow.
-
Click Done.
-
Save the Flow and click Activate.


¶ Add the Generate Document Listener Component
The Generate Document Listener component is required for a Screen Flow to run. The component “listens” for status changes in the Document Request record and transfers that information to the initiated Flow.
-
Go to the record page where you trigger the Flow
-
Click the Settings button and select the Edit Page option
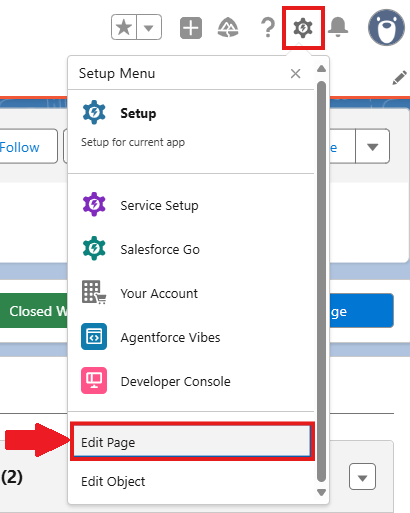
-
From the left-side bar, select the Maven Documents: Generate Document Listener Component and drag it to any place on the page

-
Save and Activate the page.
With that steps accomplished, you can add the Flow to the Opportunity record page as a button on the Page Layout and see the it in action.
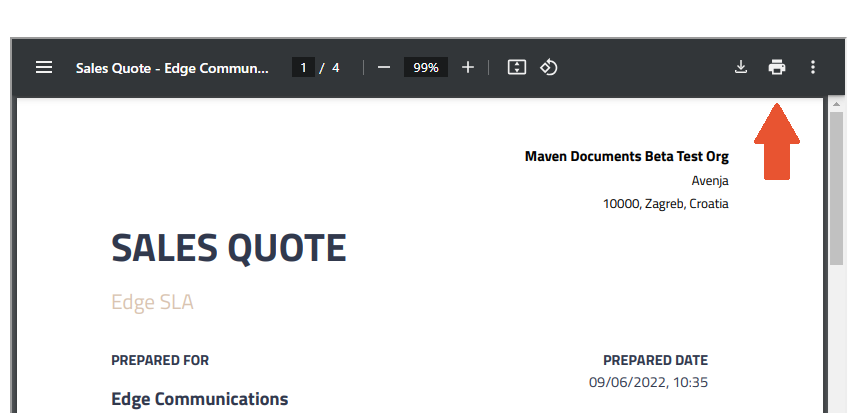
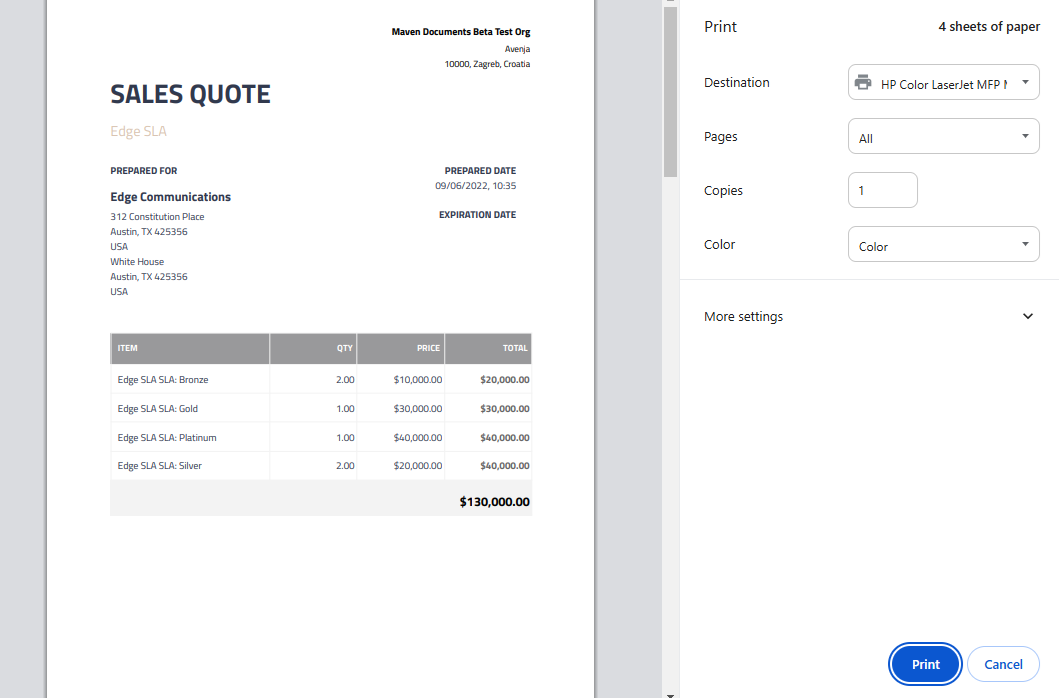
¶ Preview PDF File
The preview component allows you to view and print the generated document directly from the preview screen.
Currently, the component displays only documents that are generated as Salesforce File in PDF format.
A couple of steps are needed to set the environment for the new Flow component to work properly:
-
Go to "Setup" settings and search for "File Upload" and "Download Security" settings.
-
Click Edit over the list of displayed File Types.
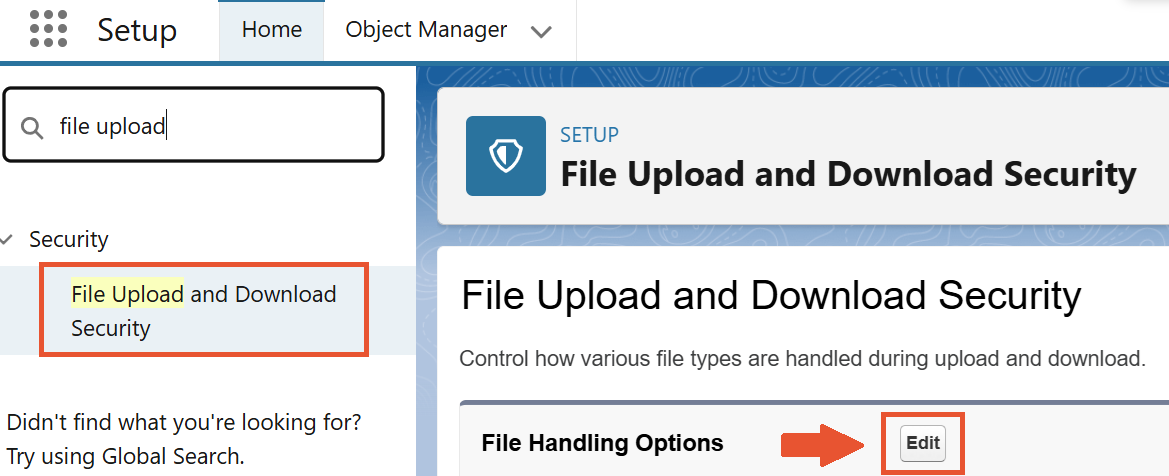
-
In the list of File types, find ".pdf" and change its Download Behavior to "Execute in Browser".

-
Save changes.
Once the setup is done, you can make the most of what the component has to offer.
-
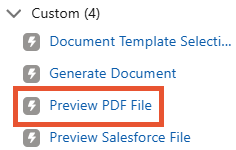
Add a new "Screen" element after the Screen with the "Document Generation" Component.
-
Add the "Preview PDF File" component from the "Custom" section.
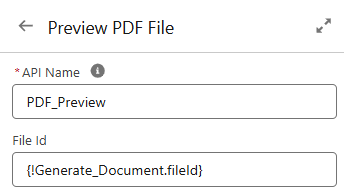
-
Fill in the fields of the component, using the fileId value from the Document Generation component.
-
Save and Activate the Flow.
Once the Flow is created, generate a document. Save it as the Salesforce File in PDF format. The preview of the generated file has the printing functionality.
The component opens the PDF in your browser's default PDF viewer, so depending on the browser you are using, it may look different.
¶ Post-generation Actions
There is also an opportunity to add "Action" elements to the Flow. They have the same functionality as Actions that you can add to Document Solution.
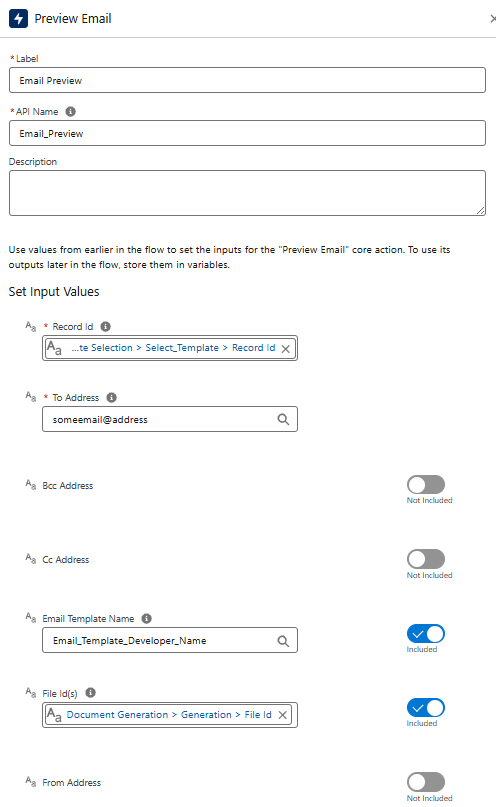
¶ Preview Email Action
Let's begin by adding the "Email Preview" Action at the end of the Flow.
-
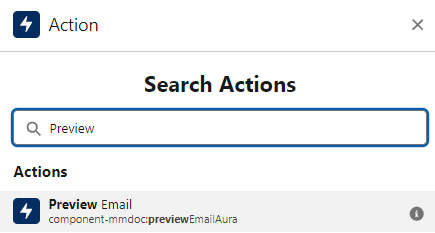
While building the Flow, add a new action after the "Document Generation" screen and search for the "Preview Email" Action.
-
The next step is to select the needed values. Here, you can choose the values you want to edit by toggling the switch and entering the corresponding data in the field. We selected some core values for Email Preview and added the necessary data.
-
Click Done and the action appears in the Flow.

In the File Id(s) field you can have several values separated with commas. For example you can manually add the Content Version IDs of the files you want to attach to the email.
You can attach different file types and all of them will be shown in the email preview once the Flow is finished.
¶ Delete Document Action
The Action removes the Google file with the generated document from the respective Google Drive.
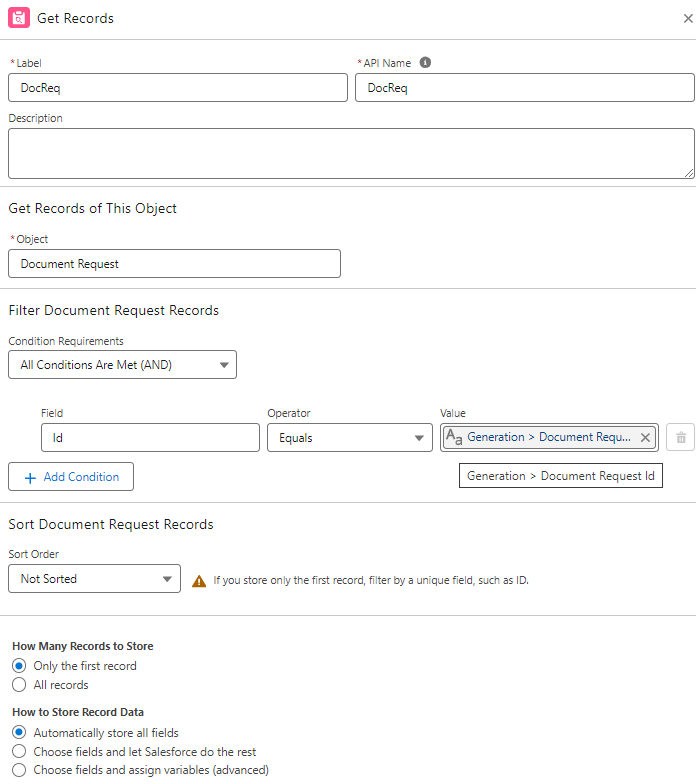
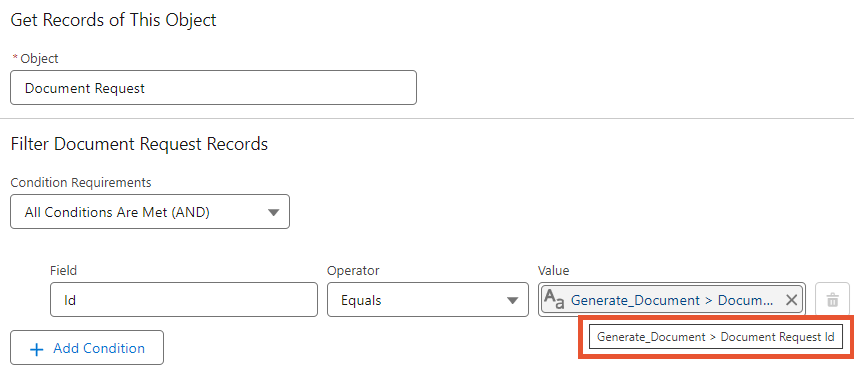
For this Action, we will need some additional information. This time, we need values from the "Document Request" record that is created during the Flow. It means that it's time to use the "Get Records" element
-
Delete the "Email Preview" Action.
-
Add the "Get Records" element and fill in the fields as shown in the screenshot below.
-
Add a new "Action" element and in the "Category" section select the "Maven Documents Actions" category.
-
Click on the Search Bar and select the "Delete Document" Action from the list.
-
Fill in the required and other needed fields with values. You can use the screenshot below as a reference.
-
Click Done and the action appears in the Flow.
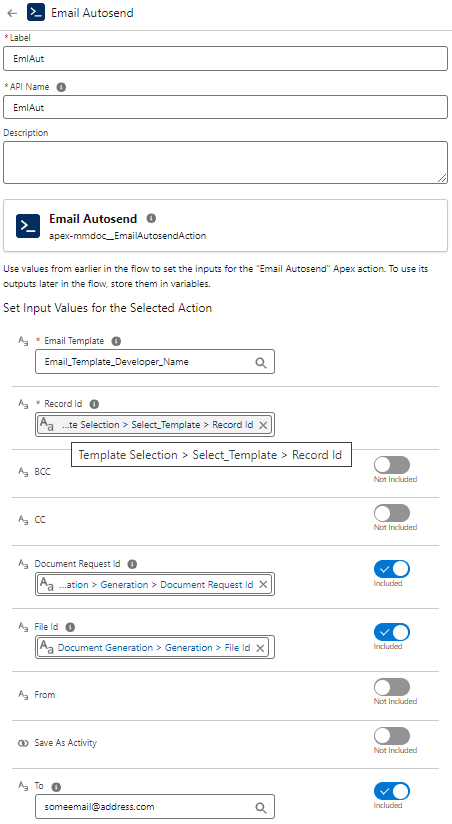
¶ Email Autosend
-
Delete the "Delete Document" Action.
-
Add a new "Action" element and in the "Category" section select the "Maven Documents Actions" category.
-
Click on the Search Bar and select the "Email Autosend" Action from the list.
-
Fill in the required and other needed fields with values. You can use the screenshot below as a reference.
-
Click Done and the action appears in the Flow.

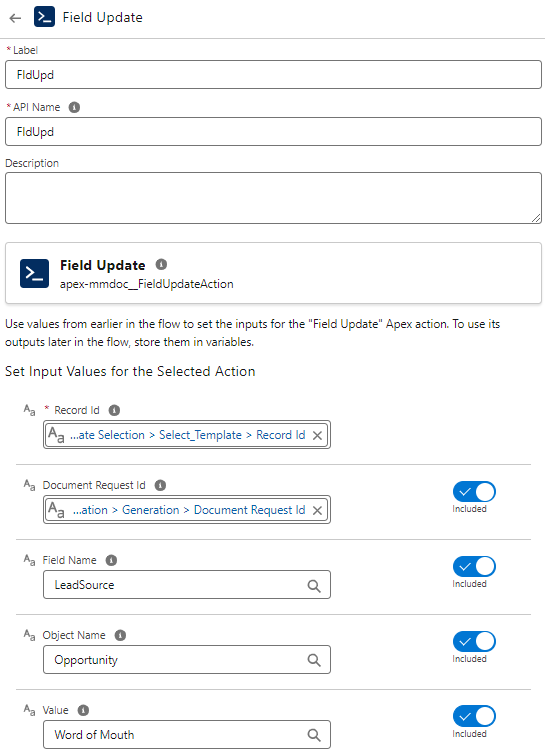
¶ Field Update
The Action updates the field on the related Object after you generate the document.
-
Delete the "Email Autosend" Action.
-
Add a new "Action" element and in the "Category" section select the "Maven Documents Actions" category.
-
Click on the Search Bar and select the "Field Update" Action from the list.
-
Fill in the required and other needed fields with values. You can use the screenshot below as a reference.
-
Click Done and the action appears in the Flow.
¶ Move Document
By default, the generated Google Document is saved in the same Google Drive folder as the template.
Using this Action, you can move your newly created file to the existing folder. The Action can also create subfolders to keep your Google Drive neat.
-
Delete the "Field Update" Action.
-
Add a new "Action" element and in the "Category" section select the "Maven Documents Actions" category.
-
Click on the Search Bar and select the "Move Document" Action from the list.
-
Fill in the required and other needed fields with values.
-
Click Done and the action appears in the Flow.
¶ Share Document
By default, all newly generated Google files are initially owned by the Admin user who is connected to the Google Drive.
If you would like to share the generated file with another person, let's say a customer, then use the "Share Document" Action.
-
Delete the "Move Document" Action.
-
Add a new "Action" element and in the "Category" section select the "Maven Documents Actions" category.
-
Click on the Search Bar and select the "Share Document" Action from the list.
-
Fill in the required and other needed fields with values.
-
Click Done and the action appears in the Flow.
This is how you build the Screen Flow! Now you can click Debug to check how it works. If everything is as expected, then save it and click Activate. Now you can add it to the Opportunity record page as a button on the Page Layout and see the Flow in action.
¶ Copy Document To Salesforce
As we've mentioned in the Actions article, you can execute the "Copy Document to Salesforce" Action by embedding it in the Flow. The instructions below provide examples of how to use the Action both as a standalone component and as part of a document-generating Flow.
¶ Separate Component
The "Copy Document to Salesforce" Action can be the only Action in the Flow and still deliver the result you need. You’ll be able to place the generated file on the record you need.
Follow the steps below to get things going.
-
In the "Setup" settings on Salesforce, search and select Flows.
-
Click the "New Flow" button and select the Screen Flow.
-
On the Flow canvas, add the "Action" element and select the "Copy Document to Salesforce" Action.
-
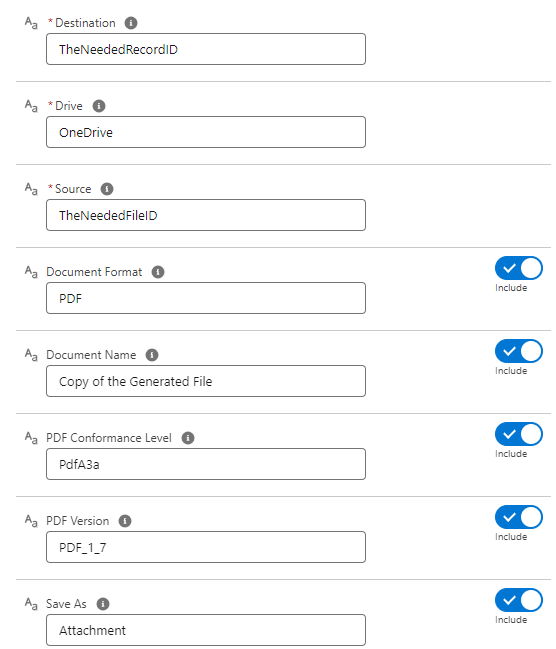
Fill the fields of the component with the needed information:
- Destination. Enter the ID of the record where you would like to place the file.
- Drive. Enter the type of the Drive where the file is stored. It could be OneDrive or Google Drive.
- Source. Put the ID of the desired file here. You can find the ID in the "External File Id" field on the corresponding "Document Request" record.
The "External File Id" field on the "Document Request" record is only populated when the "Save As" option is OneDrive or Google Drive.
- Document Format. You can switch the toggle to add a value to this optional field. Here, you can specify whether you want the file saved in DOCX or PDF format. By default, the document inherits the format of the source-generated file.
- Document Name. You can switch the toggle to add a value in this field, as it is not required. Here, you can enter the name that will become the title of the pasted document. By default, the document title is the name of the file on the Drive.
- PDF Conformance level. You can toggle this option to enter the value for the required PDF compliance level. These levels define clear standards to ensure PDFs are self-contained, compatible across devices, and suitable for long-term storage. They cover aspects like fonts, colors, metadata, transparency, and other elements involved in creating and storing PDFs. The goal is to ensure your PDFs appear consistent, regardless of the system or software used to open them.
- PDF Version. You can switch the toggle to put the value that represents the needed version. This value defines the version of the PDF specification to which the PDF Document conforms.
- Save As. You can switch the toggle to add a value in this field, as it is not required. Here, you can define whether the document is stored as the Salesforce File or Attachment. By default, the document is stored as the Salesforce File.
You can use the screenshot below as a reference.
-
Save and Activate the Flow.
Now, when the Flow is saved, you can run it either from the Flow canvas by clicking "Run" in the top right corner, or you can create a Flow Action on the needed record and add the button with the action to the record's layout. In the second case, the Flow is executed after you click the button.
That is it! Once the Flow is executed, the file is placed in the "Notes & Attachments" related list on the selected record. You can also find the Document Request record for the executed action in the "Document Requests "tab.
The "pages-managed" record on the "Consumption" Object from the created Document request is populated with the number of pages in the used file.
¶ Part of the Document Generating Flow
For this option, you can use the document-generating Flow we've described earlier in the documentation.
-
Once the document generation Flow is built, add a new "Get Records" element after the "Preview File" Screen.
With this element, we pick the "External File ID" from the created "Document Request" record and use it in the "Copy Document to Salesforce" Action. Use the screenshot below as a reference.
-
Add the "Copy Document to Salesforce" Action at the end of the Flow.
-
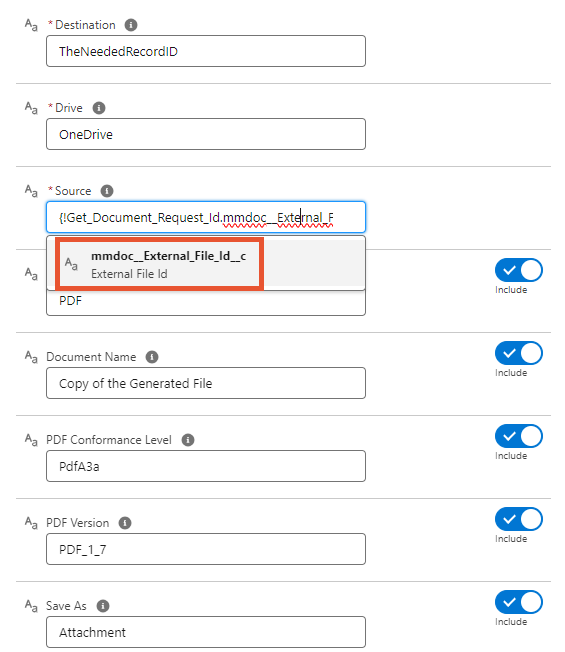
Fill the fields of the component with the needed information:
- Destination. Enter the ID of the record where you would like to place the file.
- Drive. Enter the type of the Drive where the file is stored. It could be OneDrive or Google Drive.
- Source. Here, you can use the outcome from the previous "Get Records" element as the value. The screenshot below will help you.
The "External File Id" field on the "Document Request" record is only populated when the "Save As" option is OneDrive or Google Drive.
- Document Format. You can switch the toggle to add a value to this optional field. Here, you can specify whether you want the file saved in DOCX or PDF format. By default, the document inherits the format of the source-generated file.
- Document Name. You can switch the toggle to add a value in this field, as it is not required. Here, you can enter the name that will become the title of the pasted document. By default, the document title is the name of the file on the Drive.
- PDF Conformance level. You can toggle this option to enter the value for the required PDF compliance level. These levels define clear standards to ensure PDFs are self-contained, compatible across devices, and suitable for long-term storage. They cover aspects like fonts, colors, metadata, transparency, and other elements involved in creating and storing PDFs. The goal is to ensure your PDFs appear consistent, regardless of the system or software used to open them.
- PDF Version. You can switch the toggle to put the value that represents the needed version. This value defines the version of the PDF specification to which the PDF Document conforms.
- Save As. You can switch the toggle to add a value in this field, as it is not required. Here, you can define whether the document is stored as the Salesforce File or Attachment. By default, the document is stored as the Salesforce File.
Here’s how you can embed the "Copy Document to Salesforce" Action into your document-generating Flow. When you run the Flow, it will generate the document, automatically retrieve the external file ID from the relevant field, and pass this value to the "Copy Document to Salesforce" Action. As a result, with just one click, a copy of the generated file will be saved to the desired record!
The "pages-managed" record on the "Consumption" Object from the created Document request is populated with the number of pages in the used file.
¶ Merge Files
We will describe this action separately because it is somewhat special. As we mentioned in the corresponding section in the "Actions" article, the "Merge Files" Action is not available on a Document Solution; however, you can call it using the Flow functionality.
Here, we’ll explain how to use the "Merge Files" Action within a Flow that generates templates, as well as how to build a Flow that solely merges PDF files from your Salesforce Org.
¶ Merge the generated file
-
Remove the "Share Google File" Action from the Flow you've built using our Documentation.
-
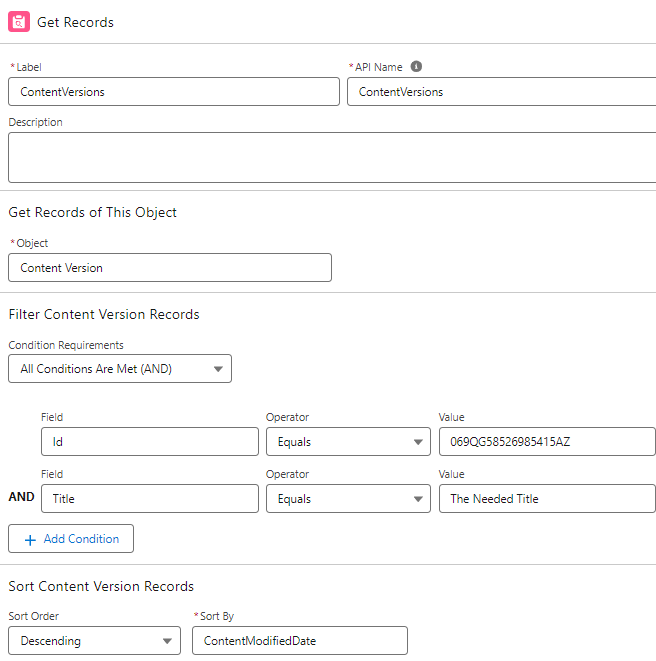
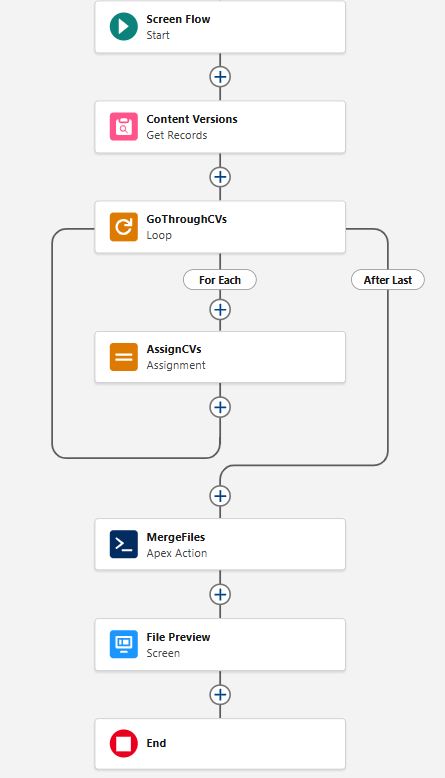
Add a new "Get Records" element that retrieves Content Versions of the needed PDF files. Use the screenshot below as an example.

The Condition Requirement should have the "OR" junction. That will let you retrieve several files filtered by different conditions. In our case, we will use the generated file and all the files that have "uploaded" in their title.
It is also important to store all the filtered records. -
The next step is to add the "Loop" element. We will use it to go through all the files you've collected with the previous "Get Records" element.
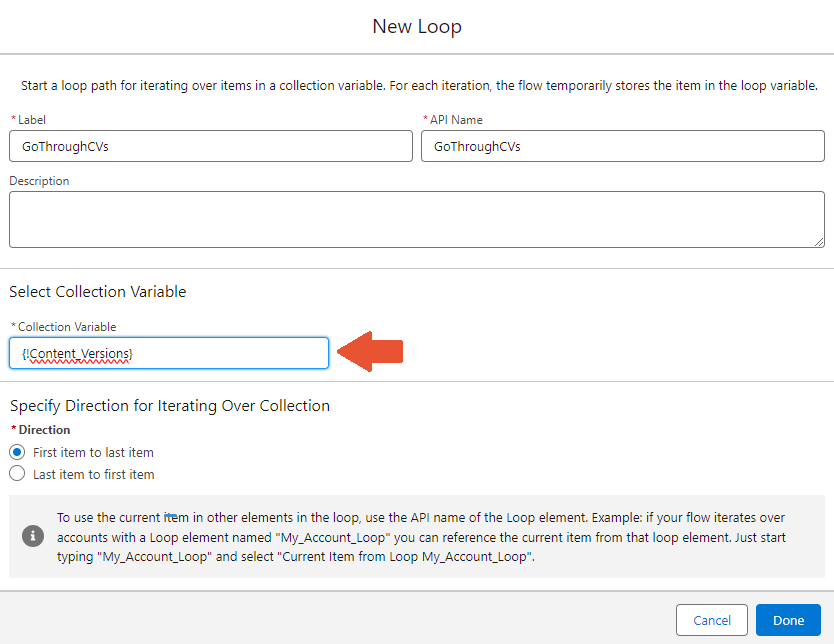
-
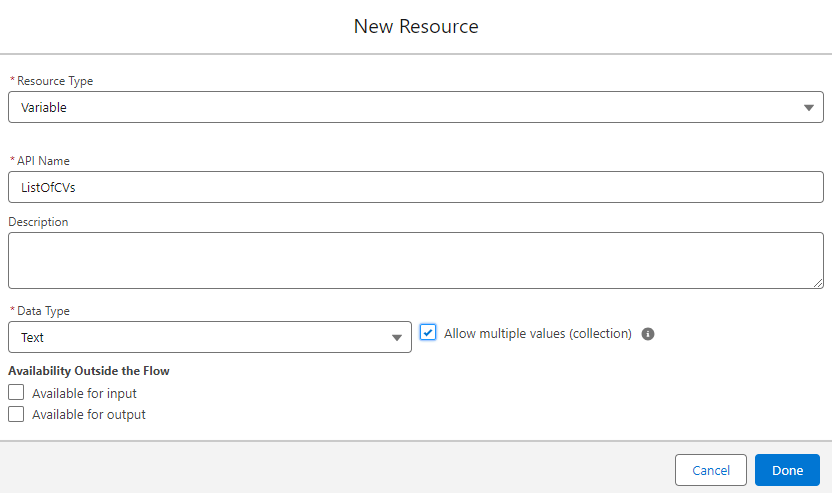
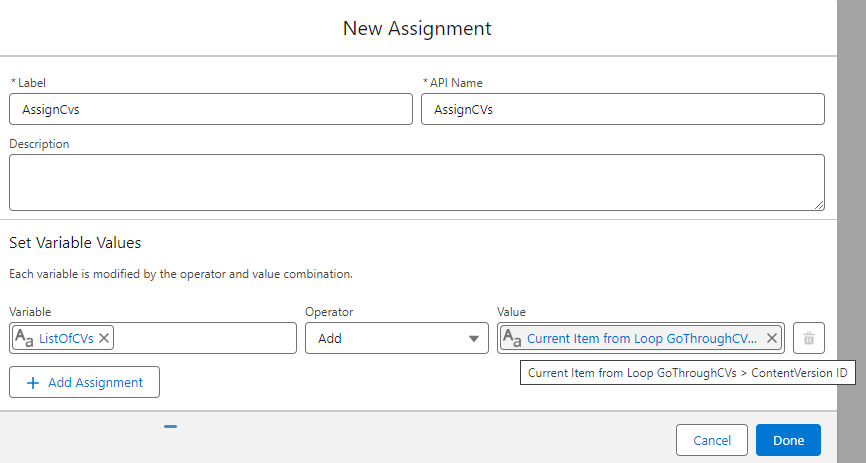
After the Loop is added, it is time to group all the found files in one place. To do that, we will use the "Assignment" element. With the help of this element, we store the IDs of all the files that we found in one Variable.
In our case, we need to create a new Variable. You can do it right in the Variable field in the added "Assignment" element by clicking the "New Resource" option. Use the screenshot below as a reference.
Once the Variable is created and placed in the corresponding field, use the "Add" operator and select the "ContentVersionID" field from the Loop as "Value". Take a look at the screenshot below.
-
When the needed IDs are collected and stored, you can use them as the source of data in the merging process. So we will finally add the "Merge Files" Action to the Flow.

Fill in the "Action" fields as shown in the screenshot above and click Done.
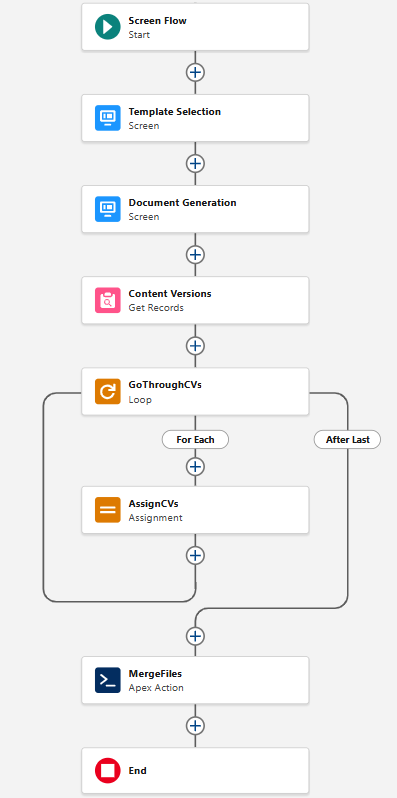
In the screenshot below, you can see what the Flow should look like if you were following our instructions.
This is how to use the Screen Flow to generate a template and merge the resulting file with other PDFs. Save the built Flow and click Activate. Add it to the Opportunity record page as a button on the Page Layout and see the Flow in action. Once the Flow finishes, you can find both generated and merged files in the Notes & Attachments section on the used record.
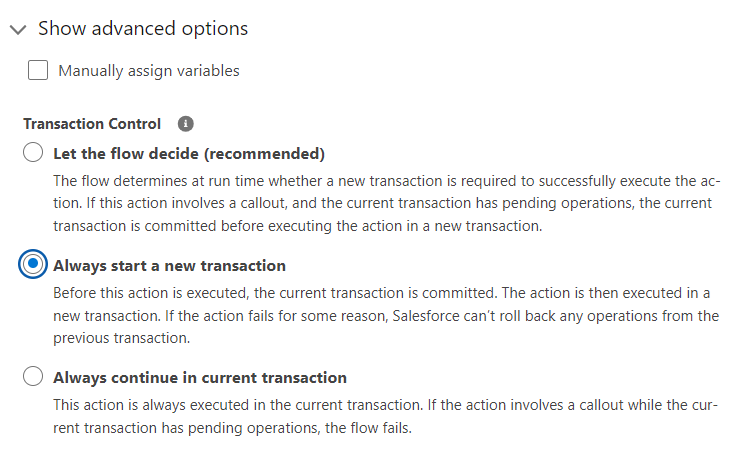
If you would like to use the "Merge Files" Action in the Flow with two or more callouts, you can do it by changing the advanced options. Open the respective section on the "Merge Files" Action layout and select the "Always start a new transaction" option.
¶ Merge PDFs without generating the Template
If you need to merge some PDF files from Salesforce without generating a template, you can easily do it by building the corresponding Flow.
-
Use the instructions above as the basis. Since you don’t need the generation process, you can skip the steps of adding the "Select Template" and "Generate Document" screen elements and go directly from obtaining the record ID to retrieving Content Versions.
After adding the "Get Records" element, select the "Content Version" Object and define the needed filtering conditions.Use the exact title of the needed file so it is fetched during the merge process. You can also sort records by the modified date. In that case, you can be sure that the "freshest" file is used from several documents with the same name.
Use the screenshot below as a reference.
In our example, we merge the file with the defined ID and all files that contain defined words in their title.
-
Then you need to add the "Loop" and "Assignment" elements to collect and group the IDs of all the corresponding files.
-
Add the "Merge Files" element by filling in its fields with the needed data.
-
At the end of the Flow, we will add a screen with the "Preview" element to display the merged file when the Flow is finished.
The result of the steps above is shown in the screenshot below.
Once the Flow is complete, save and activate it. Add the Flow to the Opportunity record page as a button on the Page Layout, then run it to see the result. You’ll see a preview of the file on your screen, and the merged file will appear in the "Notes & Attachments" related list.
These two examples above are not the only ways to use the "Merge Files" Action. You can use different types of Flows to call that action, to fit the business logic.
¶ Generate documents with a Record-Triggered Flow
As you may have noticed, generating a document with the Screen Flow also requires clicking some buttons. Earlier in the documentation, we focused on generating quotes from an "Opportunity" record by clicking a button.
However, sometimes we want to avoid doing that manually and would like documents to be generated automatically. That's where the "Record-triggered" Flow comes in. We can generate documents from a Flow and have our quote ready as soon as a certain event happens.
¶ Building Flow
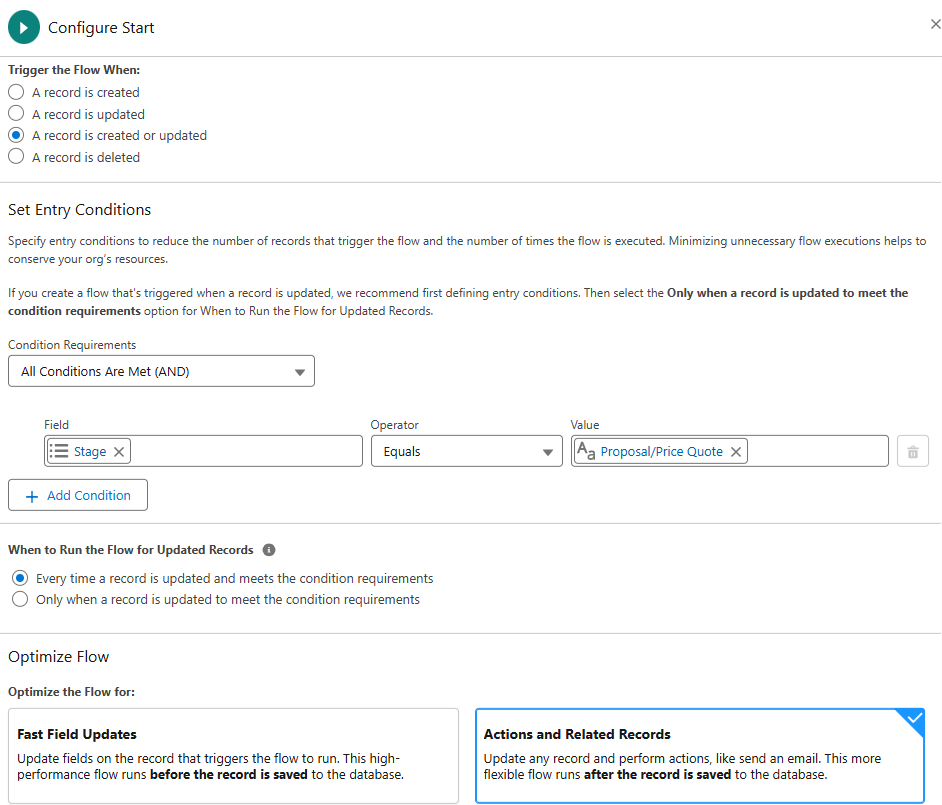
Let's say that we want to have our quote automatically generated for us as soon as our Opportunity enters the "Proposal/Price Quote" stage. We can easily set that up in Flows.
-
In Setup, search for Flows in the Quick Find Box and open the respective item.
-
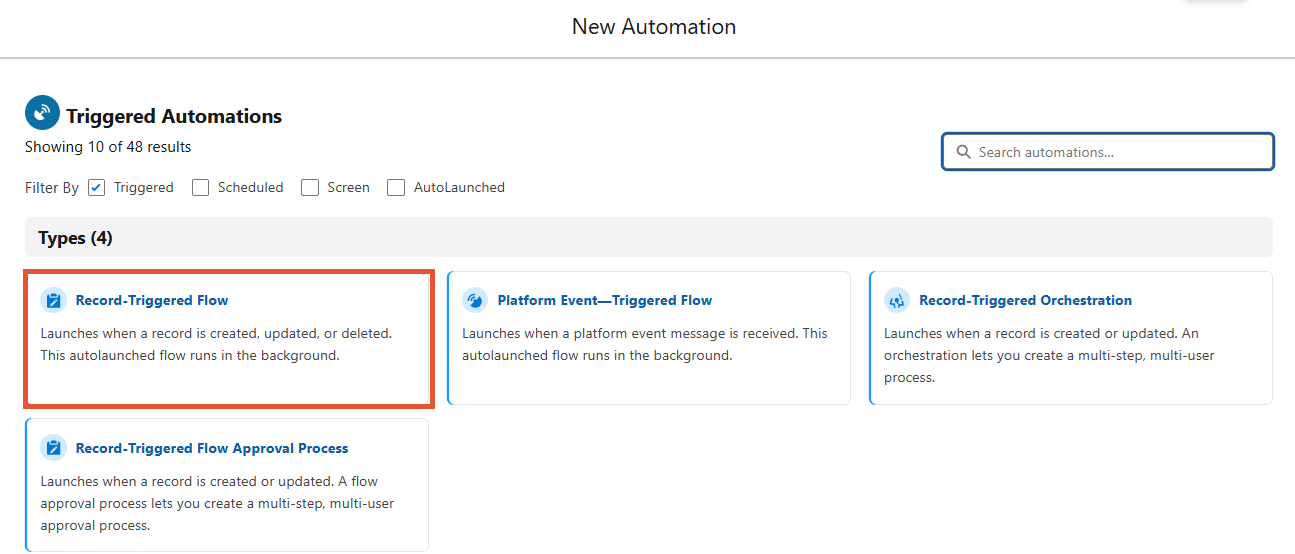
Click the "New Flow" button and select the "Triggered" category.
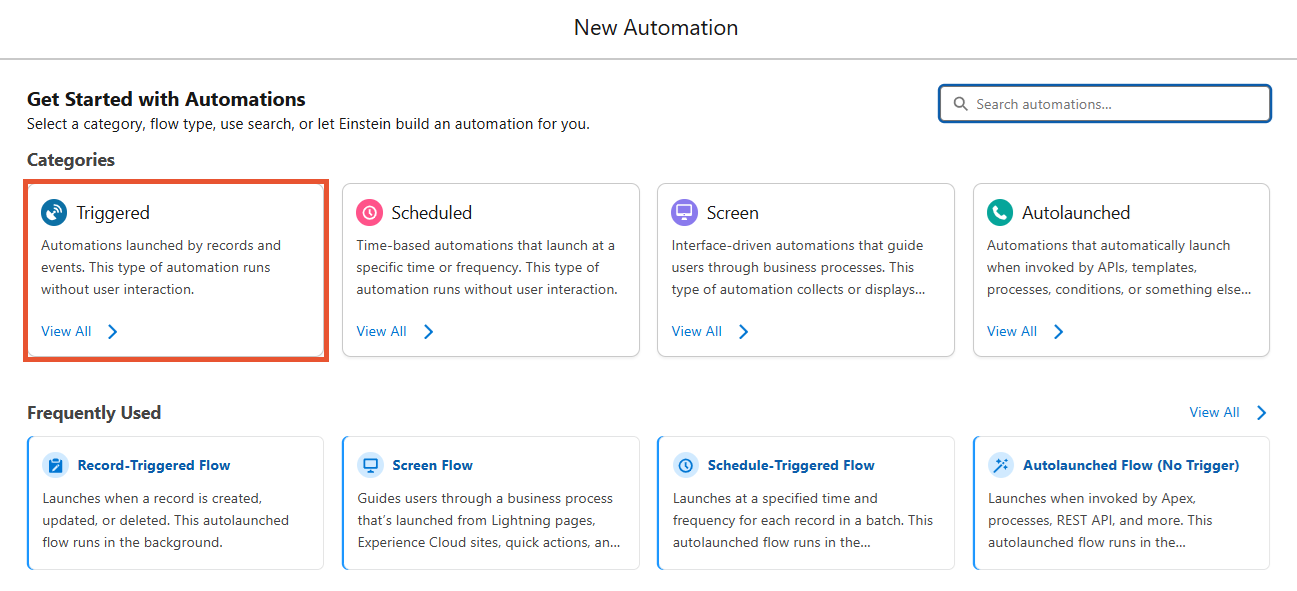
-
Select the "Record-Triggered Flow" type.
Let's now edit the Flow we just created:
-
On the "Configure Start" element, select the "Opportunity" Object in the corresponding field.

-
Configure the trigger to start the Flow every time a record is created or updated.
-
In the "Set Entry Conditions" part, in the "Condition Requirements" field, select the "All Conditions Are Met" option.
Set it so the "Stage" field equals "Proposal/Price Quote".
Leave the rest of the "Configure Start" part as it is, and click Done.
-
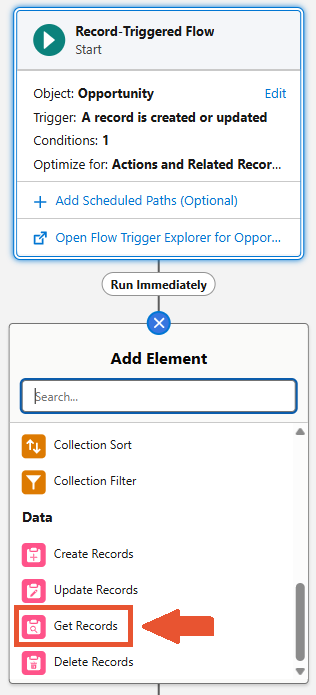
Press "+" to select a new element and then choose Get Records.
-
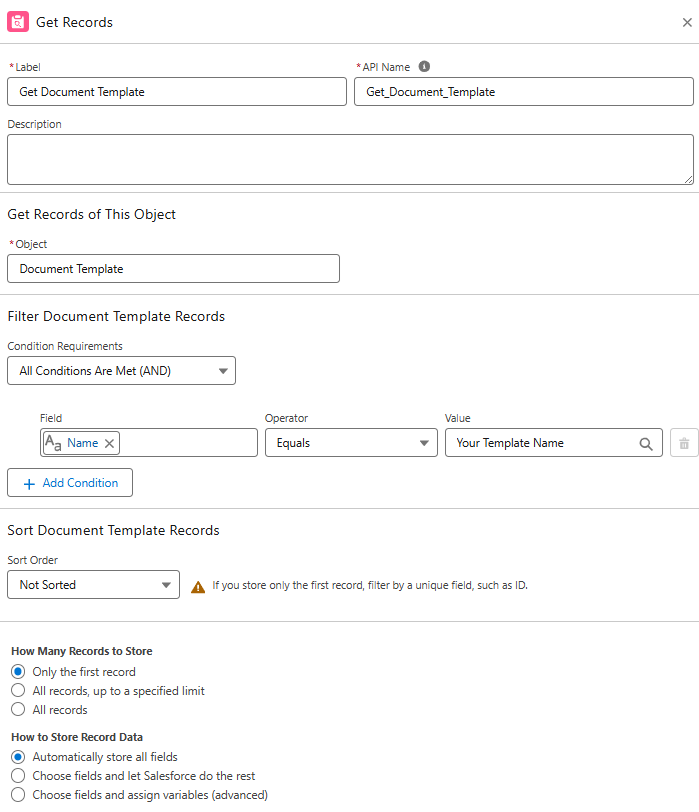
Input the following and click Done:
- Label: Get Document Templates.
- Object: Document Template.
- Condition Requirements: All Conditions Are Met (AND).
- Field: Name, Operator: Equals, Value: Your Template Name.
-
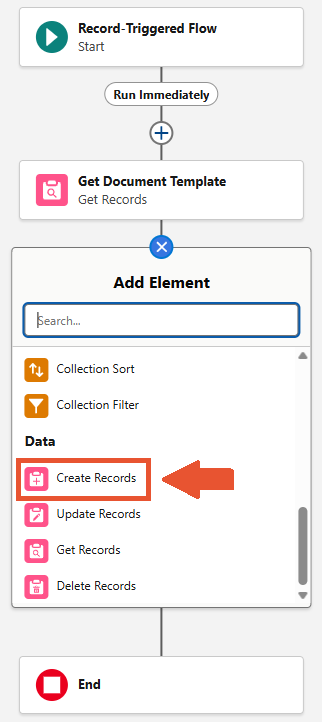
Press "+" to select a new element and then choose Create Records.
-
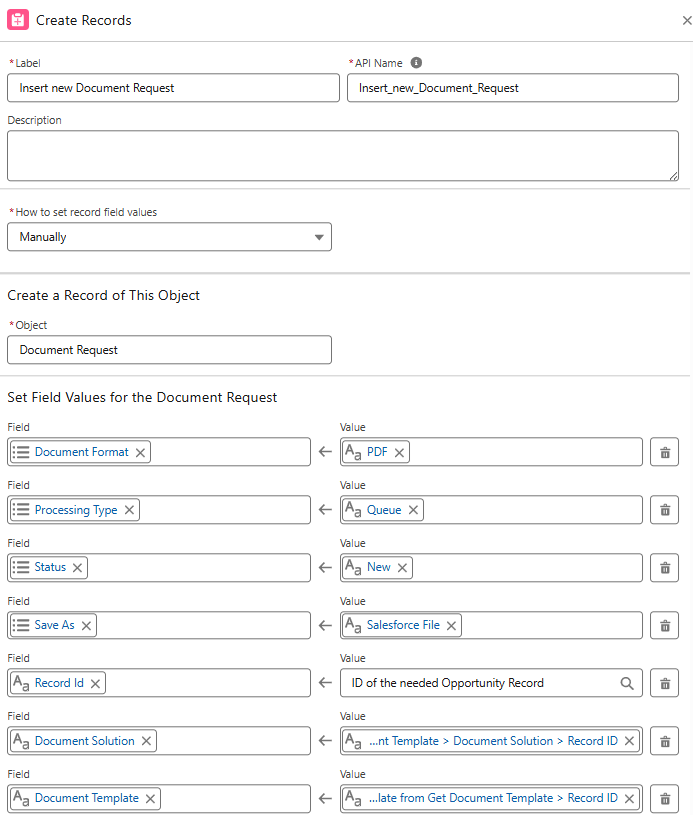
Name the element "Insert new Document Request" and input the following:
- Label: Insert new Document Request.
- How to set record field values: Manually.
- Object: Document Request.
- Document Format: PDF.
- Processing Type: Queue.
- Status: New.
- Save As: Salesforce File.
- Record Id: Id of the needed Opportunity record.
- Document Solution: Get_Document_Template>Document Solution>Record ID.
- Document Template: Get Document Template>Record Id.
-
Save the Flow, and name it something along the lines of: Opportunity - Generate Document.
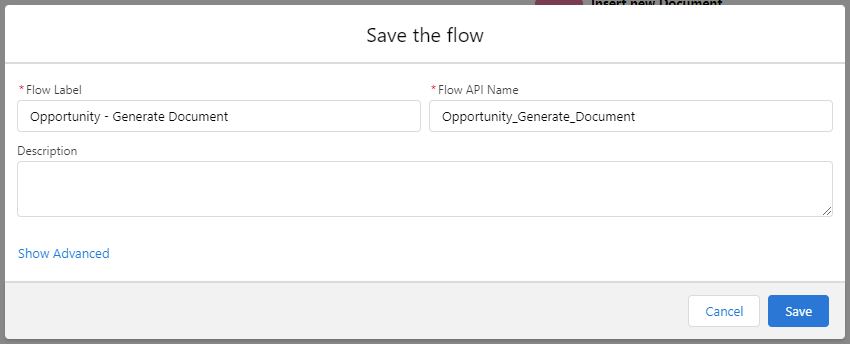
-
The last step is to activate the Flow by clicking the "Activate" button.
¶ Triggering Flow
Now that our process has been activated, we can check how it works. Here, we have the "GenePoint SLA" Opportunity in the "Perception Analysis" stage. The Opportunity has products associated with it.
If we mark the current stage as complete, it will move to the "Proposal/Price Quote" stage. That update will then trigger our Flow, which will create a new "Document Request" record.
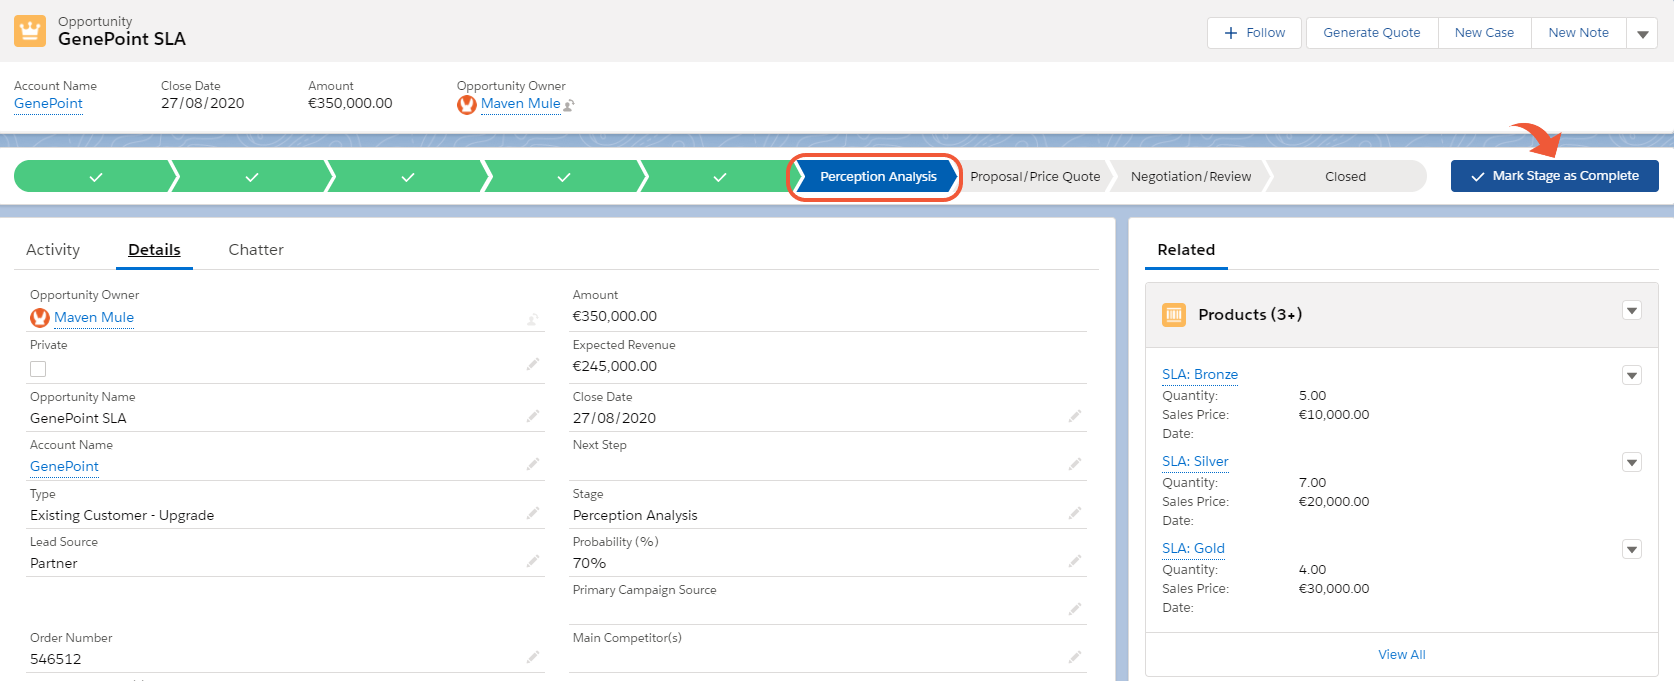
After changing the stage to "Proposal/Price Quote", refresh the page and check the "Notes & Attachments" related list. You should see that your quote has been generated.

Document generation takes a few seconds to complete, so if your document is still not there try refreshing a few more times until it appears.
With that, we have successfully automated the generation of our quote document using the Flow. From now on, quotes are automatically generated for an Opportunity as soon as the record reaches the "Proposal/Price Quote" stage, and we don't have to worry about it ourselves.
If you want to learn more about automating document requests, check the Automate with Code page.