¶ Salesforce and Web App Integration
As mentioned, you can store envelope data from the web app and send envelopes with Salesforce. Let us show you how this integration works and how envelopes appear on Salesforce.
¶ Web App
The Maven Digital Signature web application is where you create and send envelopes. We've already described how it works as a standalone application in detail.
To mantain the connection between Salesforce and web applications, you need to open the web application from Salesforce:
a. Go to the "Portal" tab on the MDS Salesforce app.
b. Click the "Open Portal" button.
Only after the web app is open this way, created and sent envelopes appear on Salesforce. Otherwise, you can find them just in the MDS web app.
If you have an envelope in both the web and Salesforce apps, you can edit the envelope in one place only. This change will be visible in both applications. For example, once the envelope's status changes in the web app, it is registered in the respective Salesforce record as well.
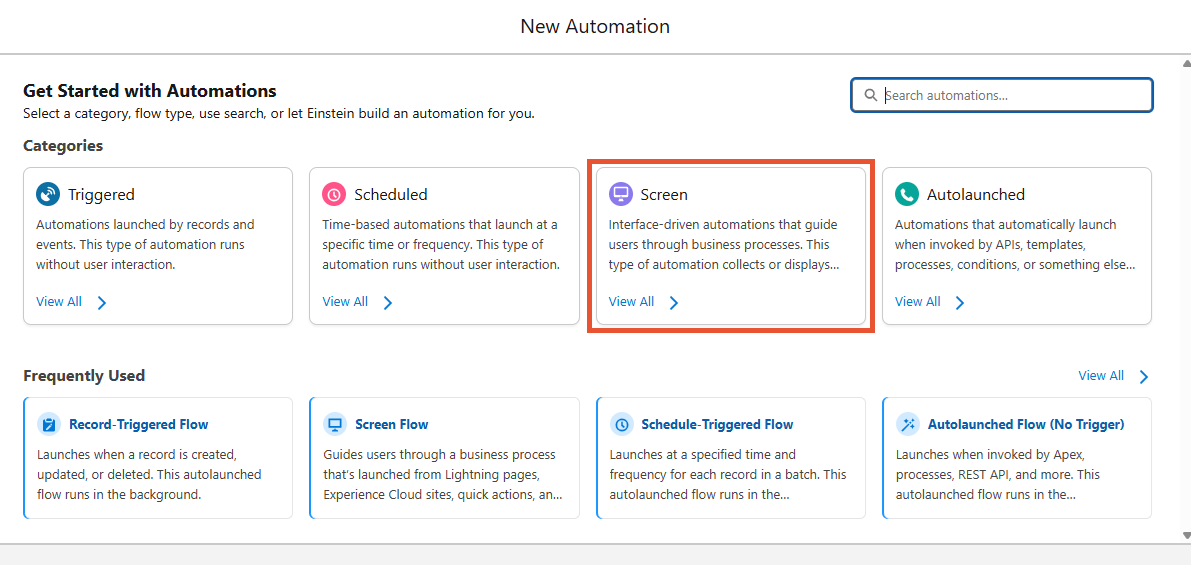
¶ Create and send envelopes with Flows
There is also an option to create an envelope on Salesforce and it will be displayed in the Maven Digital Signature web application. For that, you need to build a Flow.
Follow the steps below and you will create the needed Flow.
In our example we use the "Screen Flow" type. But depending on your business logic, you may use any other flow type.
-
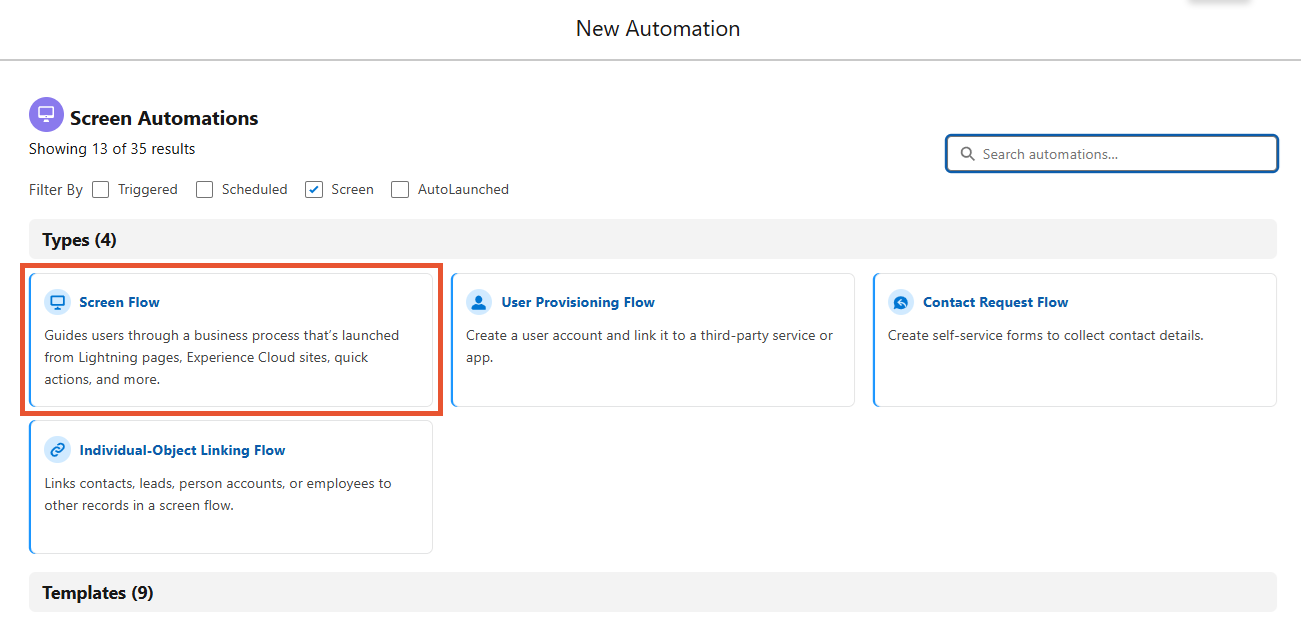
Create a new Flow and select the "Screen" automation category.
-
Out of the available screen automations, pick the "Screen Flow" option.
-
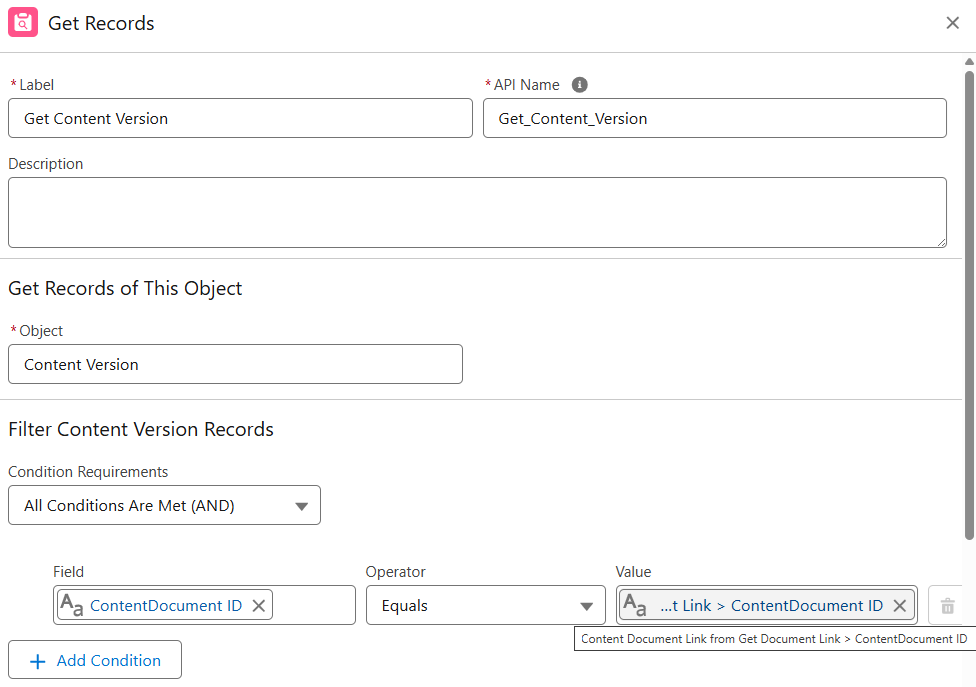
In our example, we will use a document that is stored on Salesforce as Content Version and is linked to some record.
We begin the Flows with the "Get Records" element. The element retrieves the link between the file we will include in the envelope and the Salesforce record, where this file is located. For that purpose, we will fetch data from the "Content Document Link" Object, where the "LinkedEntityId" field equals the ID of the record with the needed file. Take a look at the screenshot to have a clear picture.

-
In the next step, we get the file's "Content Version". To do that, add another "Get Records" element. The element retrieves data from the "Content Version" Object where the value of the "ContentDocumentId" field equals the "ContentDocumentId" value taken from the previous "Get Records" element.
-
To attach the document to the envelope we first need to upload that document to the Storage. Currently, the Maven Digital Signatures application consumes documents only from the Storage.
The "Upload Document" action is here to help you.-
Switch on the toggle next to the "contentVersionIds" field.
-
Select the "ContentVersion ID" field from the previous "Get Content Version" element.
-
Unfold the "Show advanced options" menu and mark the "Manually assign variables" checkbox.
-
In the "output" field, select the "+New Resource" option and create the text variable called "DocumentUrn".

-
Use the created variable as the output value.

-
-
Before adding another Flow element, we need to make some preparations.
In the following steps, we create variables to be used later in the Flow.
Let's begin with the "SingleDocument" variable. It stands for the single document to be included in the envelope.- In the "Toolbox" create a "New Resource".
- For the "Resource Type" select "Variable".
- For the "Data Type" select "Apex-Defined".
- In the "Apex Class" field find and choose the "mdsign_Document" class.
- Leave the "Allow multiple values(collection)" checkbox unmarked.

The Flow should have one variable element per including document. Each variable stores data from one document.
In our case, we include only one document, so there's only one variable. -
Per design, you can create an envelope with one or more documents. For that purpose, the information about documents in the Flow is collected in a separate variable and is processed as a list. Even if you'd like to have only one document you still need to transfer its information as a list. In your case, there'll be just one item in it.
The next variable represents this list. Let's call the variable "CollectionOfDocuments".- For the "Resource Type" select "Variable".
- For the "Data Type" select "Apex-Defined".
- In the "Apex Class" field find and choose the "mdsign_Document" class.
- Mark the "Allow multiple values(collection)" checkbox.

-
The same set of variables we'll create for the envelope recipients and fields added to the document.
The "SingleRecipient" variable represents a recipient who gets the created envelope.- For the "Resource Type" select "Variable".
- For the "Data Type" select "Apex-Defined".
- In the "Apex Class" field find and choose the "mdsign_Recipient" class.
- Leave the "Allow multiple values(collection)" checkbox unmarked.

The Flow should have one variable element per recipient. Each variable stores information about one recipient.
In our case, we have only one recipient, so there's only one variable. -
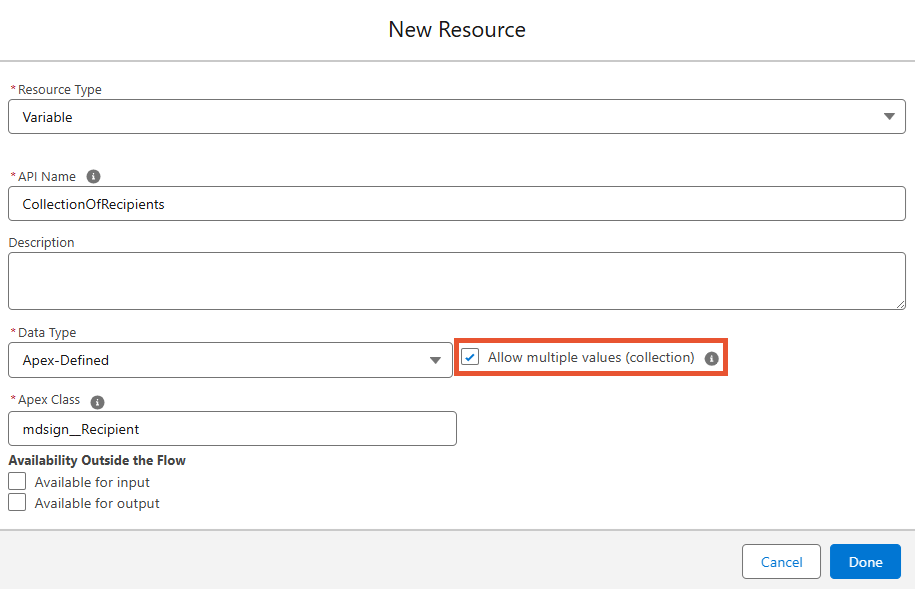
The "CollectionOfRecipients" variable collects all the envelope recipients in one list.
- For the "Resource Type" select "Variable".
- For the "Data Type" select "Apex-Defined".
- In the "Apex Class" field find and choose the "mdsign_Recipient" class.
- Mark the "Allow multiple values(collection)" checkbox.
-
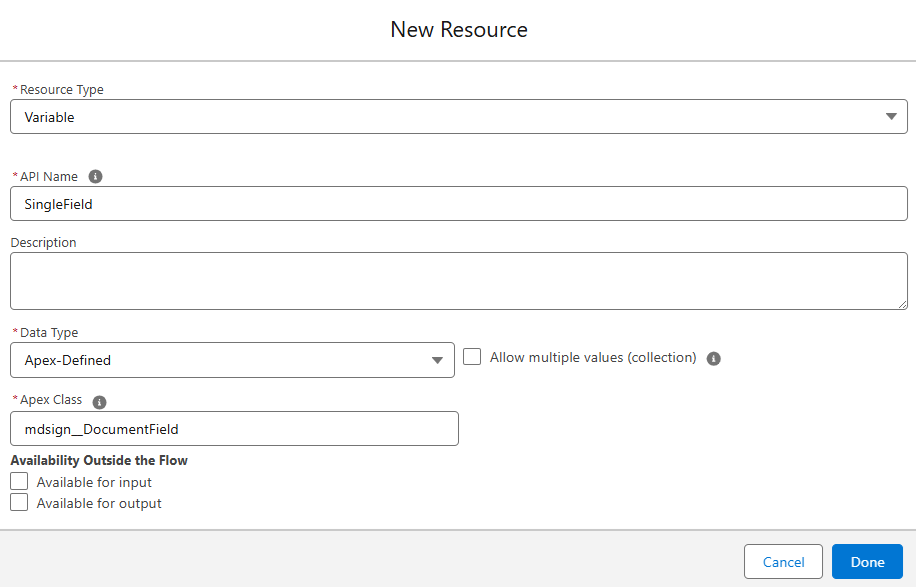
The "SingleField" variable gathers information about the single field to be added to the included document
- For the "Resource Type" select "Variable".
- For the "Data Type" select "Apex-Defined".
- In the "Apex Class" field find and choose the "mdsign_DocumentField" class.
- Leave the "Allow multiple values(collection)" checkbox unmarked.
The Flow should have one variable element per the added field. Each variable stores the parameters of one field.
In our case, we add only one field, so there's only one variable. -
The "CollectionOfFields" variable gathers all the fields to be added to the included document in one list.
- For the "Resource Type" select "Variable".
- For the "Data Type" select "Apex-Defined".
- In the "Apex Class" field find and choose the "mdsign_DocumentField" class.
- Mark the "Allow multiple values(collection)" checkbox.

-
The last variable we create, will hold the envelope we create. Let's call this variable "EnvelopeInformation".
- For the "Resource Type" select "Variable".
- For the "Data Type" select "Apex-Defined".
- In the "Apex Class" field find and choose the "mdsign_EnvelopeInfo" class.
- Leave the "Allow multiple values(collection)" checkbox unmarked.

-
Now, when all the needed variables are created, we can continue building the Flow.
Once we upload the file to Storage and get the "DocumentUrn" value, we can use this data to attach the document to the envelope.
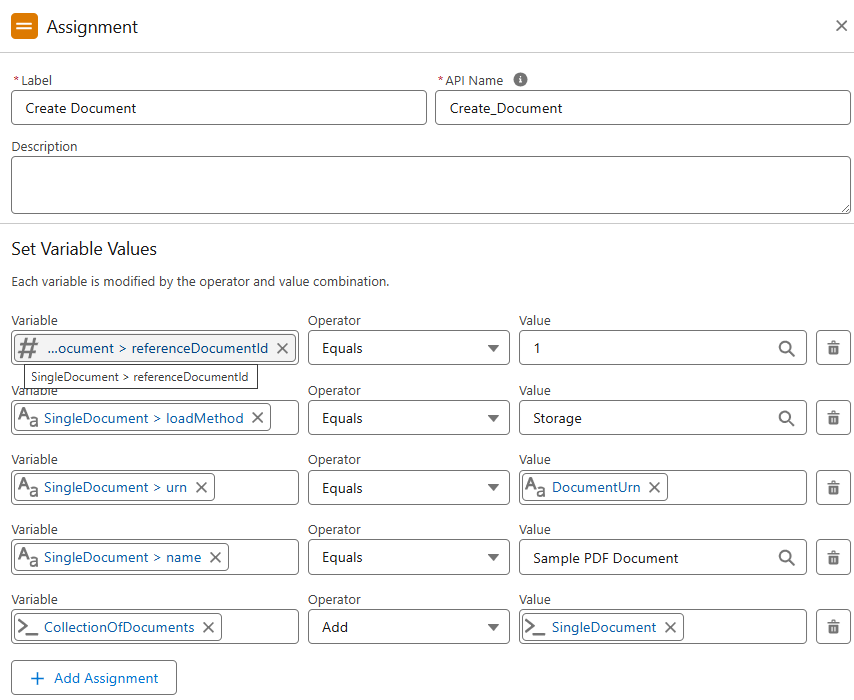
For this purpose, we use the "Assignment" element. It fulfills the "SingleDocument" variable with the data of the defined document and adds the completed variable to the needed collection.The list of minimum required fields for the "Document" element:
- referenceDocumentId
- name
- loadMethod
- urn
- Name the element.
- In the first assignment field, select the "referenceDocumentId" field from the "SingleDocument" variable equals 1.The value here not only names the document but also defines its type. So if you would like it to be PDF, add the ".pdf" extension after the name.
Supported types are PDF, DOCX, DOC.The value here sets the ID of the document on the envelope level so it can be further referenced by other envelope components.
- In the second assignment field, select the "loadMethod" field from the "SingleDocument" variable equals Storage.
- In the third assignment field, select the "urn" field from the "SingleDocument" variable that equals the "DocumentUrn" variable.
- In the fourth assignment field, select the "name" field from the "SingleDocument" variable equals the name of the included document.
- In the last assignment field, select the "CollectionOfDocuments" variable and add the "SingleDocument" variable.
The Flow should have one "Assignment" element per variable with the document data. Each element adds data to the corresponding variable.
In our case, we include only one document, so there's only one variable and one "Assignment" element. -
The same manipulations await recipients and fields.
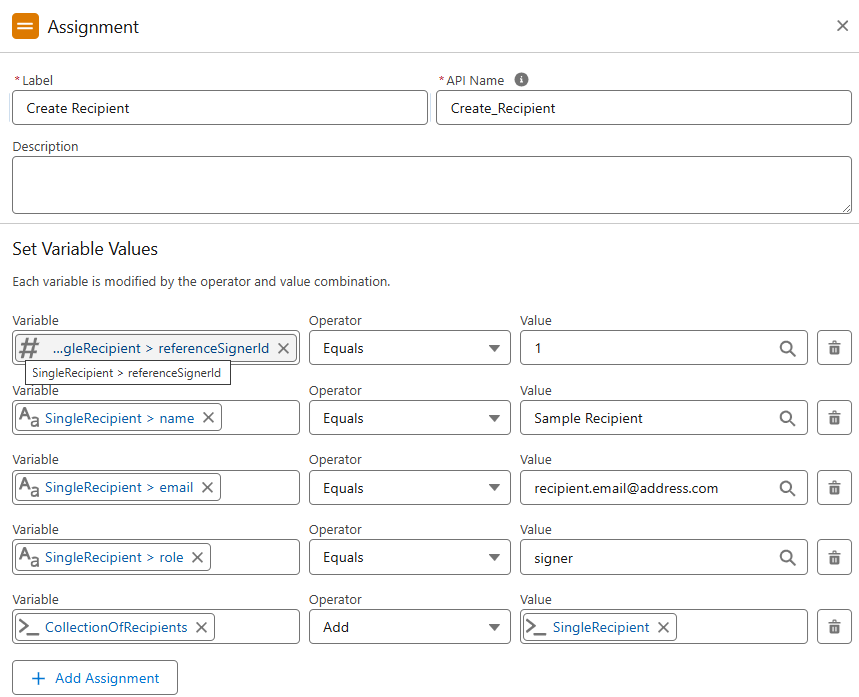
Add another "Assignment" element. It fills in the "Single Recipient" variable with the required information and forms the needed collection.
The list of minimum required fields for the "Recipient" element:
- referenceSignerId
- name
- role
- Name the element.
- In the first assignment field, select the "referenceSignerId" field from the "SingleRecipient" variable equals 1.
The value here sets the ID of the recipient on the envelope level so it can be further referenced by other envelope components.
- In the second assignment field, select the "name" field from the "SingleRecipient" variable that equals the needed name.
- In the third assignment field, select the "email" field from the "SingleRecipient" variable that equals the respective email address.
- In the fourth assignment field, select the "role" field from the "SingleRecipient" variable that equals the needed role.
Here's the list of roles available
- signer
- viewer
- cc
- In the last assignment field, select the "CollectionOfRecipients" variable and add the "SingleRecipient" variable.
The Flow should have one "Assignment" element per variable with the recipient's information. Each element adds data to the corresponding variable.
In our case, we have only one recipient, so there's only one variable and one "Assignment" element. -
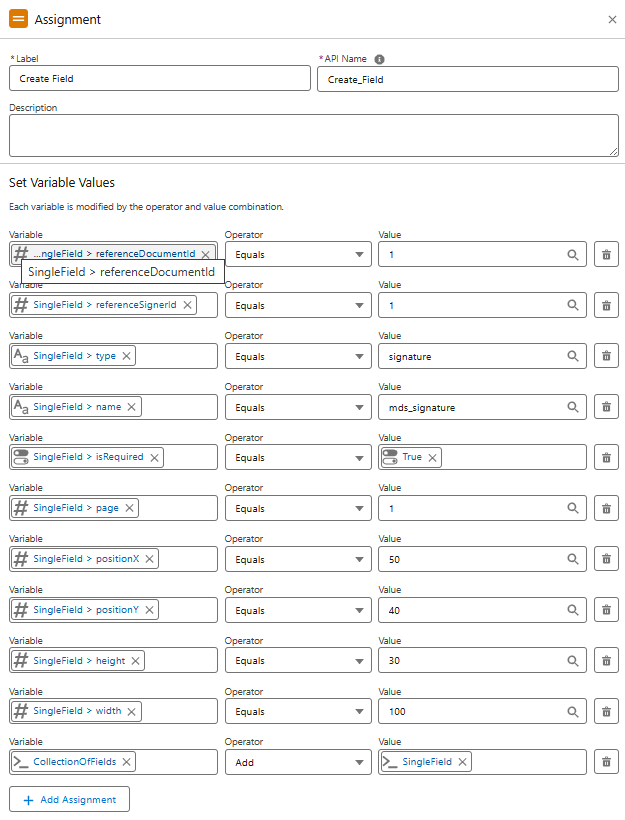
Next, add the "Assignment" element to fill in the "SingleField" variable with the needed field parameters.
The list of minimum required fields for the "Field" element:
- referenceSignerId or referenceGroupId
Only one of the fields must be present depending on the envelope logic but never both at the same time. - referenceDocumentId
- name
- type
- anchorString or positions parameters: page, height, width, positionX, positionY
Either the "anchorString" field or position parameters must be present but never both at the same time.
- Name the element.
- In the first assignment field, select the "referenceSignerId" field from the "SingleField" variable equals 1.
Here we're using the set ID value of the needed recipient, so the added field is assigned to that particular person.
- In the second assignment field, select the "referenceDocumentId" field from the "SingleField" variable equals 1.
Here we're using the set ID value of the needed document, so the added field is placed inside that particular document.
- In the third assignment field, select the "type" field from the "SingleField" variable that equals the needed field type.
There are the following field types:
- signature
- digitalsignature
- text
- initial
- company
- title
- number
- note
- name
- date
- checkbox
- radio
- stamp
- drawing
- In the fourth assignment field, select the "name" field from the "SingleField" variable that equals the respective field name.
- In the fifth assignment field, select the "isRequired" field from the "Single_Field" variable equals True.
- In the sixth assignment field, select the "page" field from the "SingleField" variable equals the page number of the document, where the field will be located.
- In the seventh assignment field, select the "positionX" field from the "SingleField" variable that equals the number defining the horizontal coordinates of the field on the document page.
- In the eighth assignment field, select the "positionY" field from the "SingleField" variable that equals the number defining the vertical coordinates of the field on the document page.
- In the ninth assignment field, select the "height" field from the "SingleField" variable that equals the number defining the field's height.
- In the ninth assignment field, select the "width" field from the "SingleField" variable that equals the number defining the field's width.
- In the last assignment field, select the "CollectionOfFields" variable and add the "SingleField" variable.
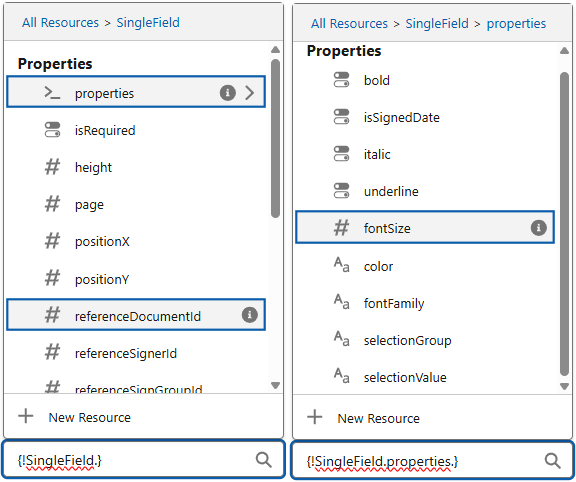
If you are adding the text field and want to change the font, you can use the properties parameter:
The Flow should have one "Assignment" element per variable with the field's parameters. Each element adds data to the corresponding variable.
In our case, we add only one field, so there's only one variable and one "Assignment" element. - referenceSignerId or referenceGroupId
-
The last "Assignment" element to add is the one that completes the "EnvelopeInformation" variable.
The "Envelope" element doesn't have required fields but the element itself is mandatory.
- In the first assignment field, select the "senderName" field from the "EnvelopeInformation" variable that equals the username of the envelope sender.
- In the second assignment field, select the "senderEmail" field from the "EnvelopeInformation" variable that equals the email address of the respective user.
- In the third assignment field, select the "subject" field from the "EnvelopeInformation" variable that equals the string that represents the subject of the envelope.
- In the fourth assignment field, select the "expireInDays" field from the "EnvelopeInformation" variable that equals the number of days before the envelope expires.
- In the fifth assignment field, select the "alertDaysBeforeExpiry" field from the "EnvelopeInformation" variable that equals the number of days before recipients start getting email notifications about the envelope expiration.
- In the sixth assignment field, select the "notifyWhenSigned" field from the "EnvelopeInformation" variable equals True.
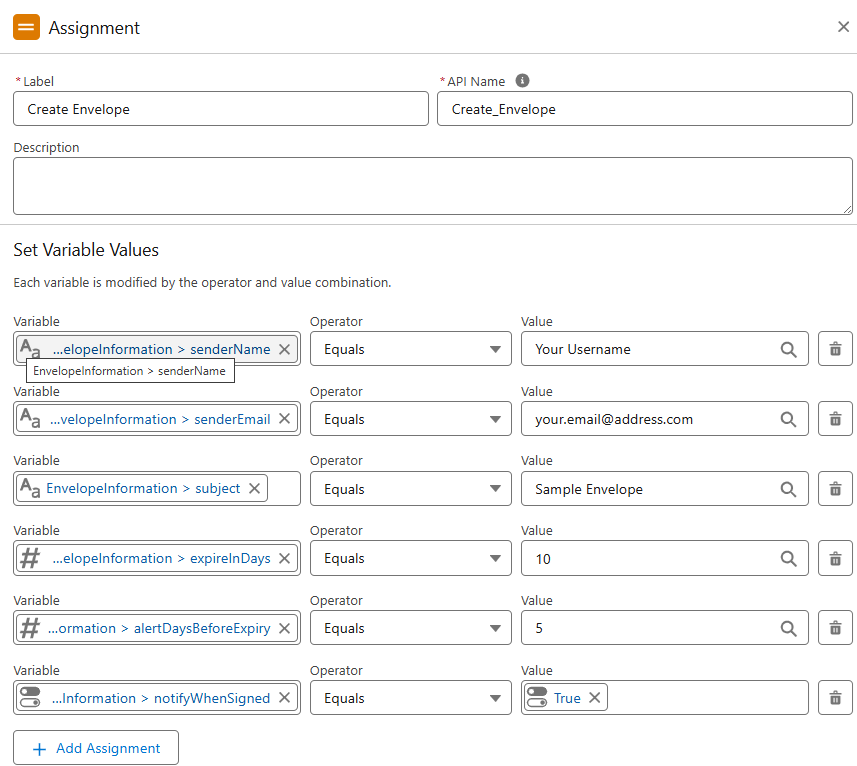
The "EnvelopeInformation" variable doesn't need to be included in any collective variable and can be used on its own.
-
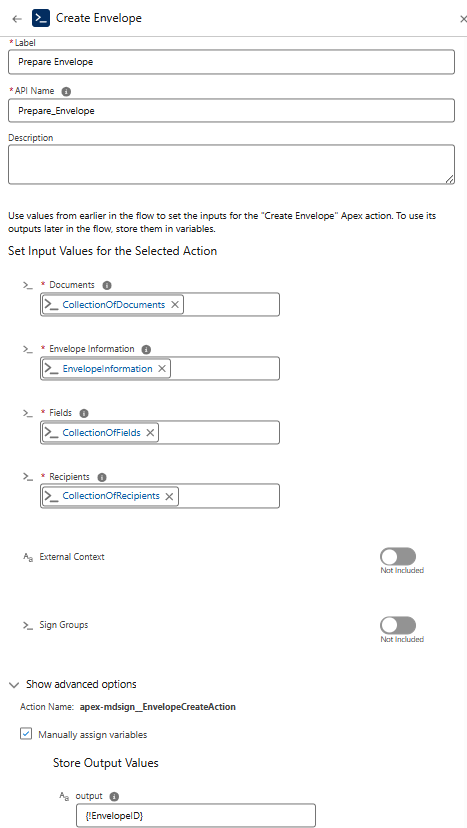
The following action prepares the envelope by gathering all the added information from the previous steps.
Add the "Create Envelope" Flow action and fill in the fields with the needed data:-
In the "Documents" field, select the "CollectionOfDocuments" variable.
-
In the "Envelope Information" field, select the "EnvelopeInformation" variable.
-
In the "Fields" field, select the "CollectionOfFields" variable.
-
In the "Recipients" field, select the "CollectionOfRecipients" variable.
-
Unfold the "Show advanced options" menu and mark the "Manually assign variables" checkbox.
-
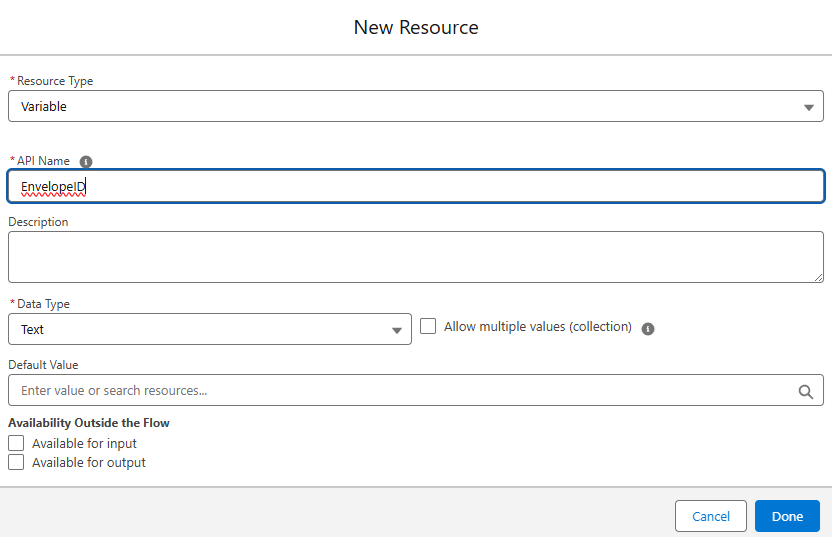
In the "output" field, select the "+New Resource" option and create the text variable called "EnvelopeID".
-
Use the created variable as the output value.
-
-
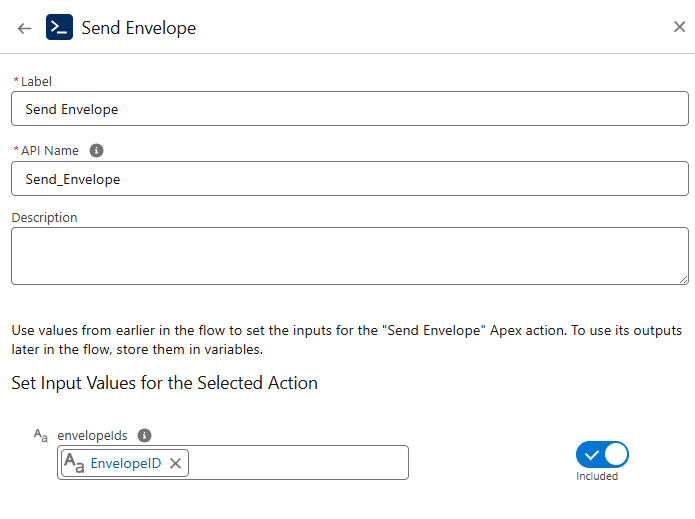
The final step is to add the "Send Envelope" action.
The action finalizes the envelope creation with the needed parameters and sends the prepared envelope to the defined recipients.- Name the action.
- Switch on the toggle next to the "envelopIds" field.
- In the "envelopIds" field, select the "EnvelopeID" variable.
-
Save and Activate the Flow.
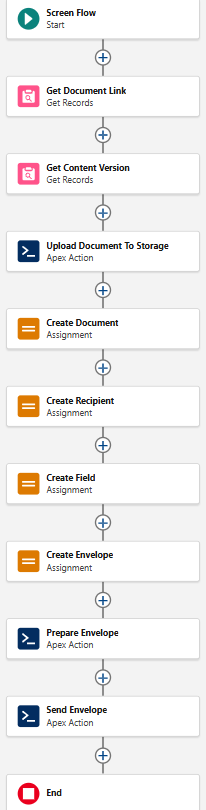
If you followed all the steps from above, you would've gotten the following Flow.


Now, you can add it as a button or a page element of the needed Salesforce record. Once you've done this, run the Flow and go to the MDS web application. In the "Sent" section, you'll find the envelope you've created with the needed attributes. The same envelope attributes are reflected in the Salesforce app, which stores them as separate records.