¶ Query Builder
After you create a Document Solution, it's time to decide which Salesforce data you want to show in the document. That's where Query Builder comes in. It is a powerful tool that lets you build queries without a single line of code.
¶ Getting Started with Query Builder
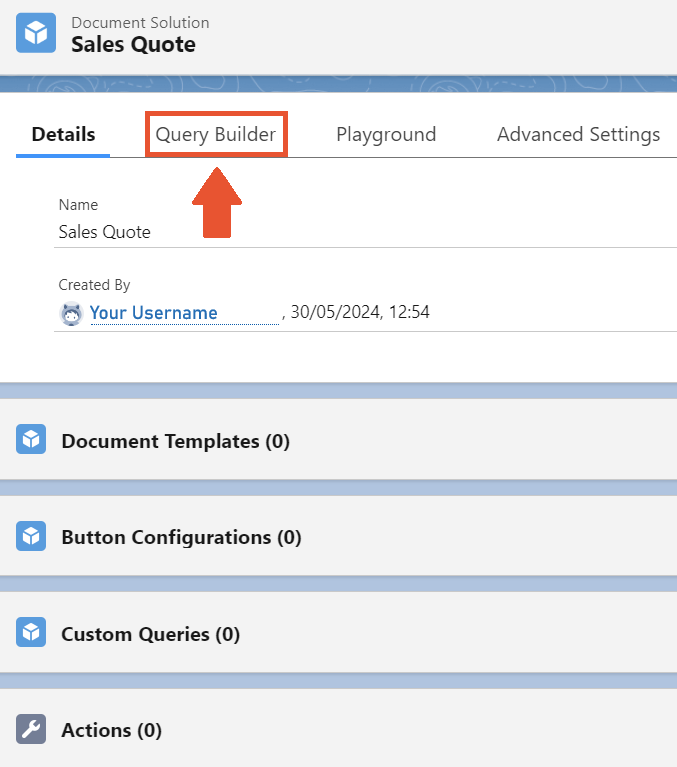
You can access Query Builder by opening the created Document Solution and selecting the Query Builder tab.
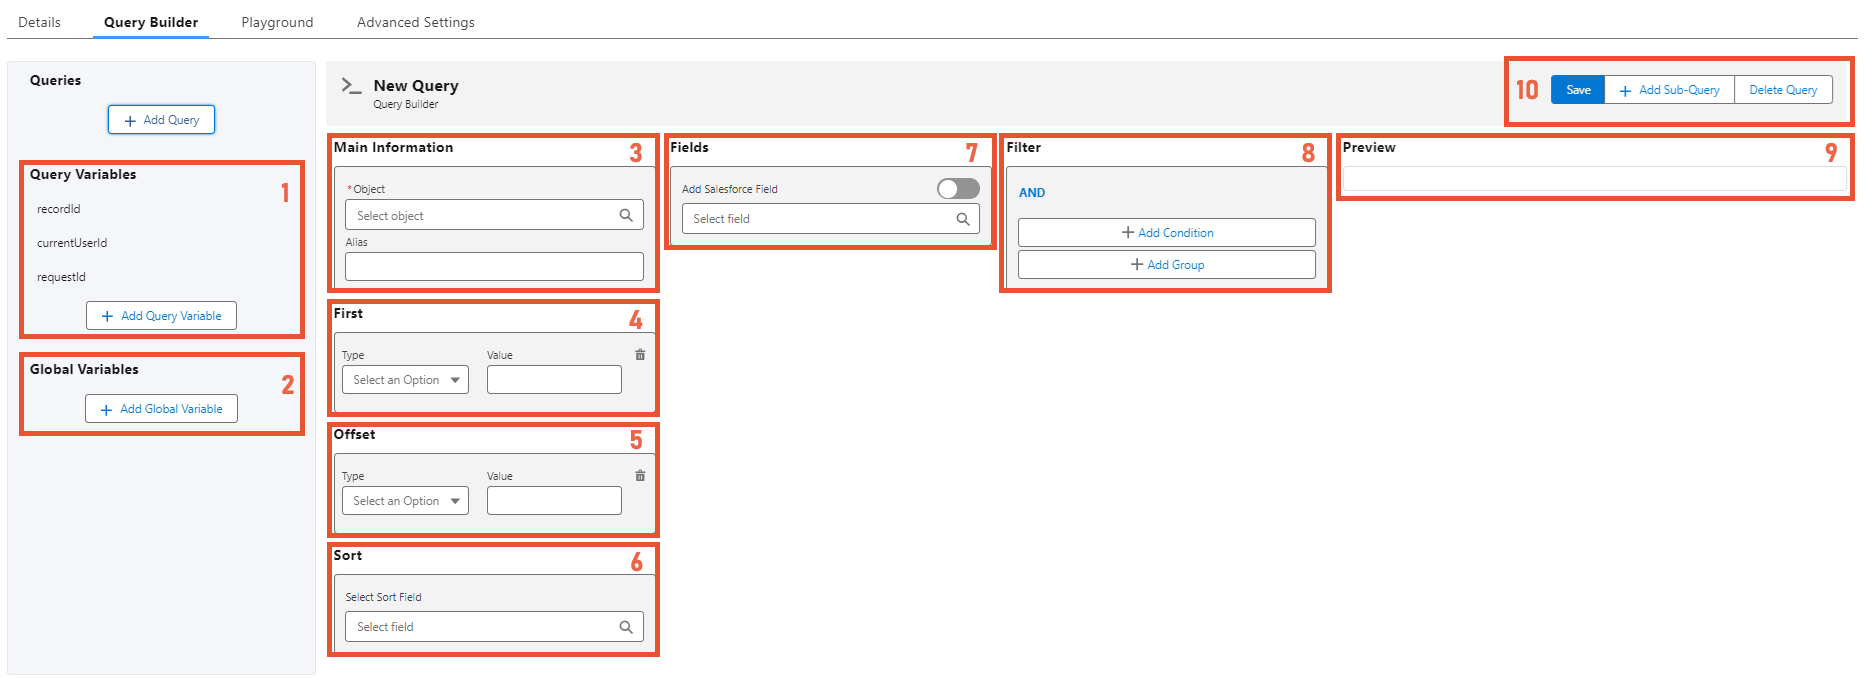
Click the Add Query button to create a new query, and let's have a quick rundown of all the Query Builder's features:
-
Query Variables. In Query Builder, you can use variables in your GraphQL filters instead of hardcoding values.
Variables hold a single value of a standard type and are useful when the same value needs to be reused in multiple places — you only need to define it once. You can create variables but by default, we provide you with three built-in generic ones:- recordId. The ID of the record from which you generate the document.
- currentUser. The ID of the current user in Salesforce.
- requestId. The ID of the Document Request that is used to generate the document.
-
Global Variables. Even though Global Variables are placed just below Query Variables, they serve different purposes:- Global Variables store a value that would be referenced in the template document and are not used as a filter in the query.
- Global Variables can be used in Expression Fields as well.
- Global Variables and Query Variables are referenced differently.
There's more information in the Global Variables section.
-
Main Information. This is where you select the Object from which you query records.
Optionally, you can add an alias to the selected Object. -
First. Using a numeric value or variable, you can choose how many records you want to have in your result.
For the defined value of n, the query will return the first n records from the result. -
Offset. You can also add an offset value or variable.
For the defined value of n, the first n number of records is skipped in the result. -
Sort. You can use it to sort query results by any field. -
Fields. Select the fields you want the query to return in the result.You can select fields from a related Object. For example, for the Contact Object, select the Account.Name field.
You can switch the toggle in the Fields section, and instead of adding a Salesforce Field, you can build and add an Expression Field. More information on Expression Fields is in the separate section.
-
Filter. Filter records based on the criteria you select.- Click Add Condition to add criteria on certain fields to compare them to a variable or a specific value.
- Then, if you have multiple conditions, click Add Group and customize the logic using standard logical operators.
-
Preview. The preview of the query in the GraphQL language. -
Actions:- Save. Save your current query.
- Add Sub-Query. Add a nested query from one of the related lists on the selected Object.
For example, while querying Accounts, you can add a sub-query to fetch the Account Contact records. - Delete. Delete the current query.
That's all you need to know before using Query Builder. With its components, you can retrieve all the data for document generation.
¶ Make queries
Now that you know how to use Query Builder, you can get started on building queries for the quote document. Let's make a dynamic query that will help create a Sales Quote for your customers in seconds. You will start by pulling customer Opportunities data:
-
Click Add Query to create a new query.
-
In the Main Information section, select the Opportunity Object.
-
In the Fields section, add the following fields:
- Id
- Name
- CreatedDate
- CloseDate
- Amount
-
You will be generating the document from the Opportunity record page (more on that in the Generate documents from record pages section). That's why you use the Opportunity record from which you are generating the document. That's where the recordId variable comes in handy. In the Filter section, add the following condition:
- Field: Id
- Operator: Equals
- Type: Variable
- Variable: recordId
We recommend using Filter to avoid Salesforce limits.
Click Save. After the query is completed it should look like this:
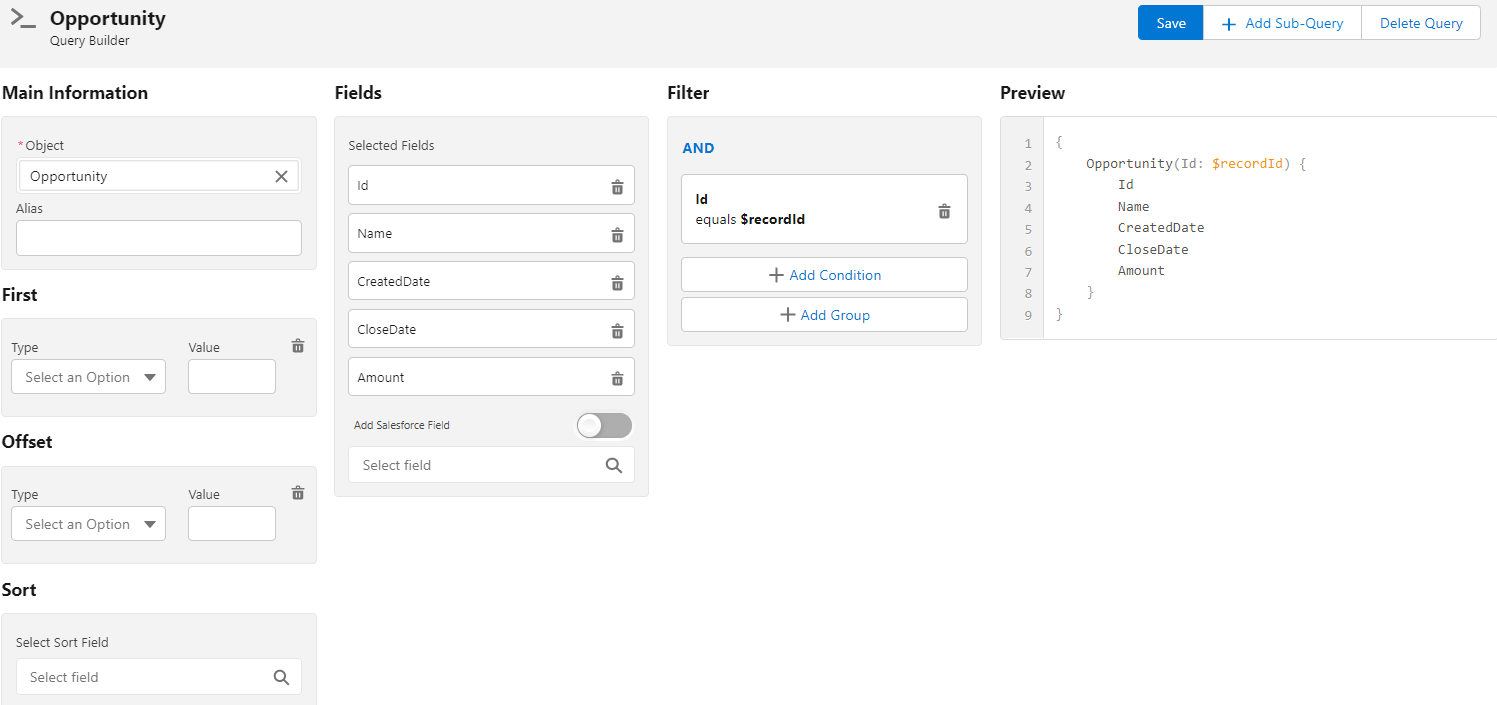
That's the first query! You now have the Opportunity record from which you are generating the document.
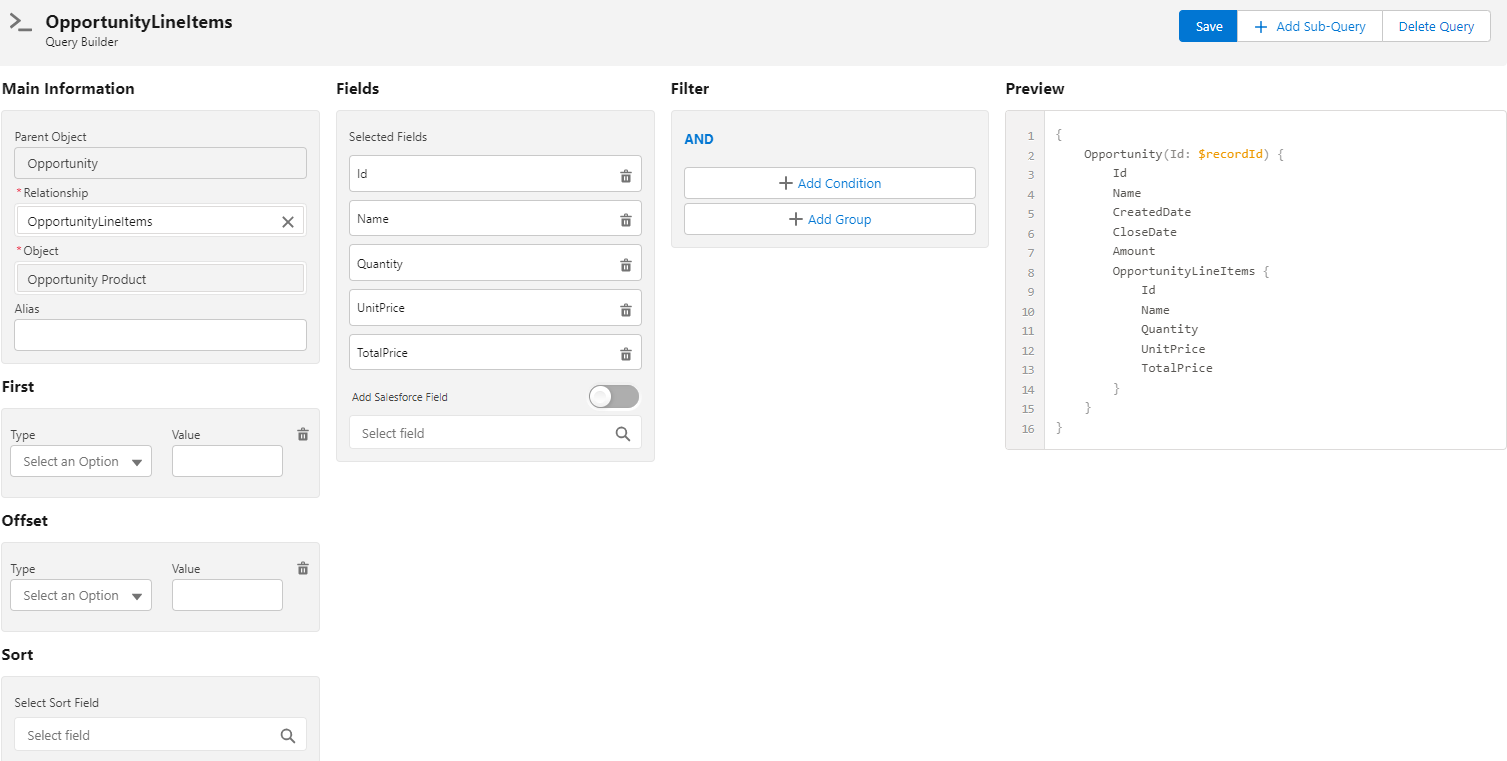
Still, you will need all the Products related to that Opportunity. To get that, you'll build a sub-query on the OpportunityLineItems related list:
-
Click Add Sub-Query.
-
In the Main Information section, select the OpportunityLineItems relationship.
-
In the Fields section, add the following fields:
- Id
- Name
- Quantity
- UnitPrice
- Total Price
-
Click Save and after that, your sub-query should look like this:

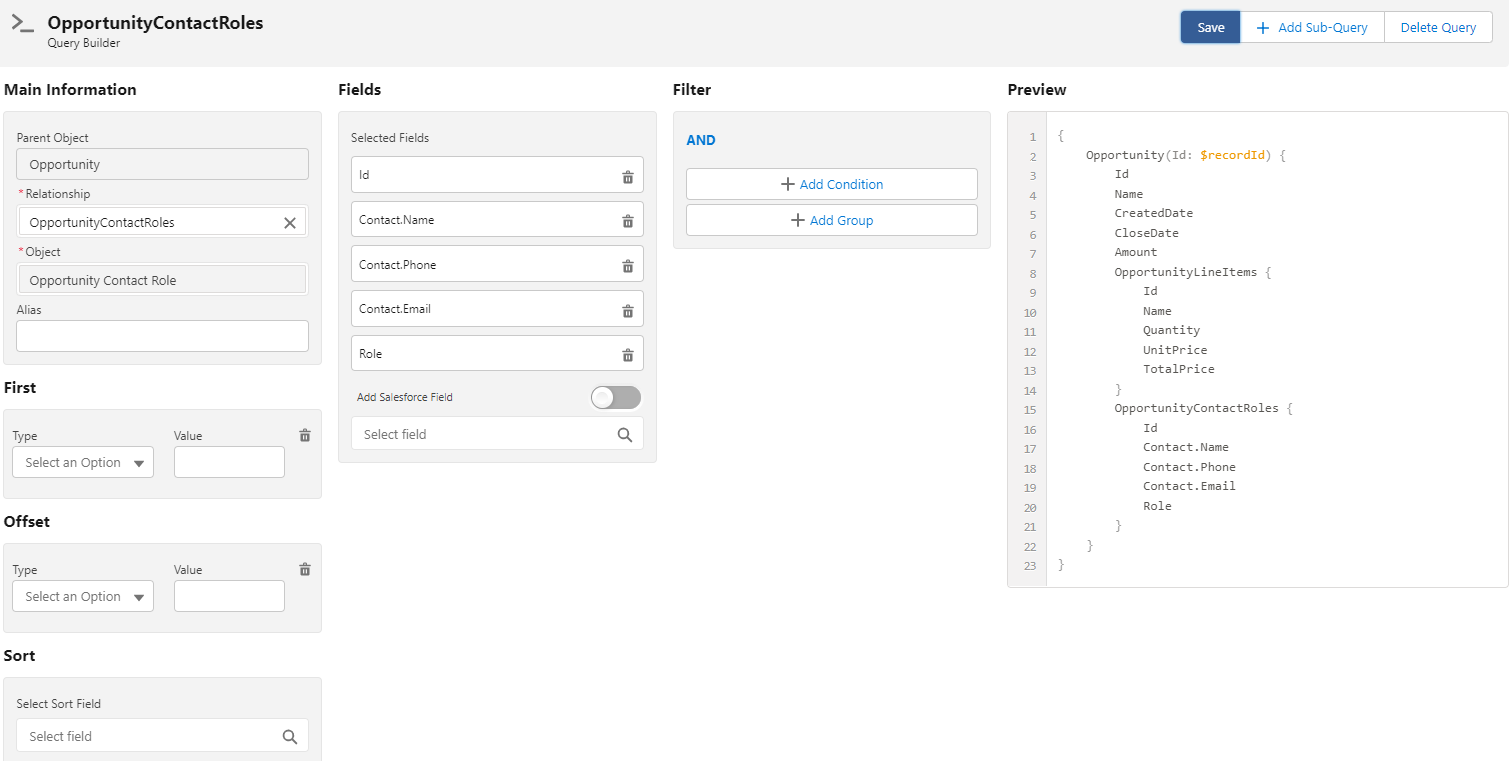
The next piece of information you are going to show in the Sales Quote document will be all Opportunity Contact Roles that are relevant to closing a deal. To get that, similar to the OpportunityLineItems sub-query, you will build a new subquery:
- Click back to the Opportunity query.
- Click Add Sub-Query.
- In the Main Information section, select the OpportunityContactRoles relationship.
- In the Fields section, add the following fields:
- Id
- Contact.Name
- Contact.Phone
- Contact.Email
- Role
- Click Save and after that, your sub-query should look like this:

The template that you will be using also requires the Account Object. There are two ways to get the needed record. You can get it directly over the Opportunity record by adding its fields to the query, or you can get it as a standalone record using the Opportunity record's AccountId field as a filter.
- Create a new variable named accountId.
- Under Type select Id.
- In the Value field, put {!Record.AccountId}.
- Click the Save button.
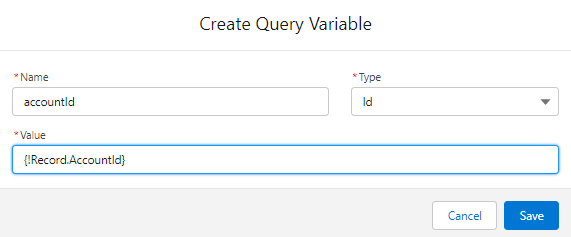
Now you have a variable that holds the Account's ID related to the Opportunity record from which the document is generated.
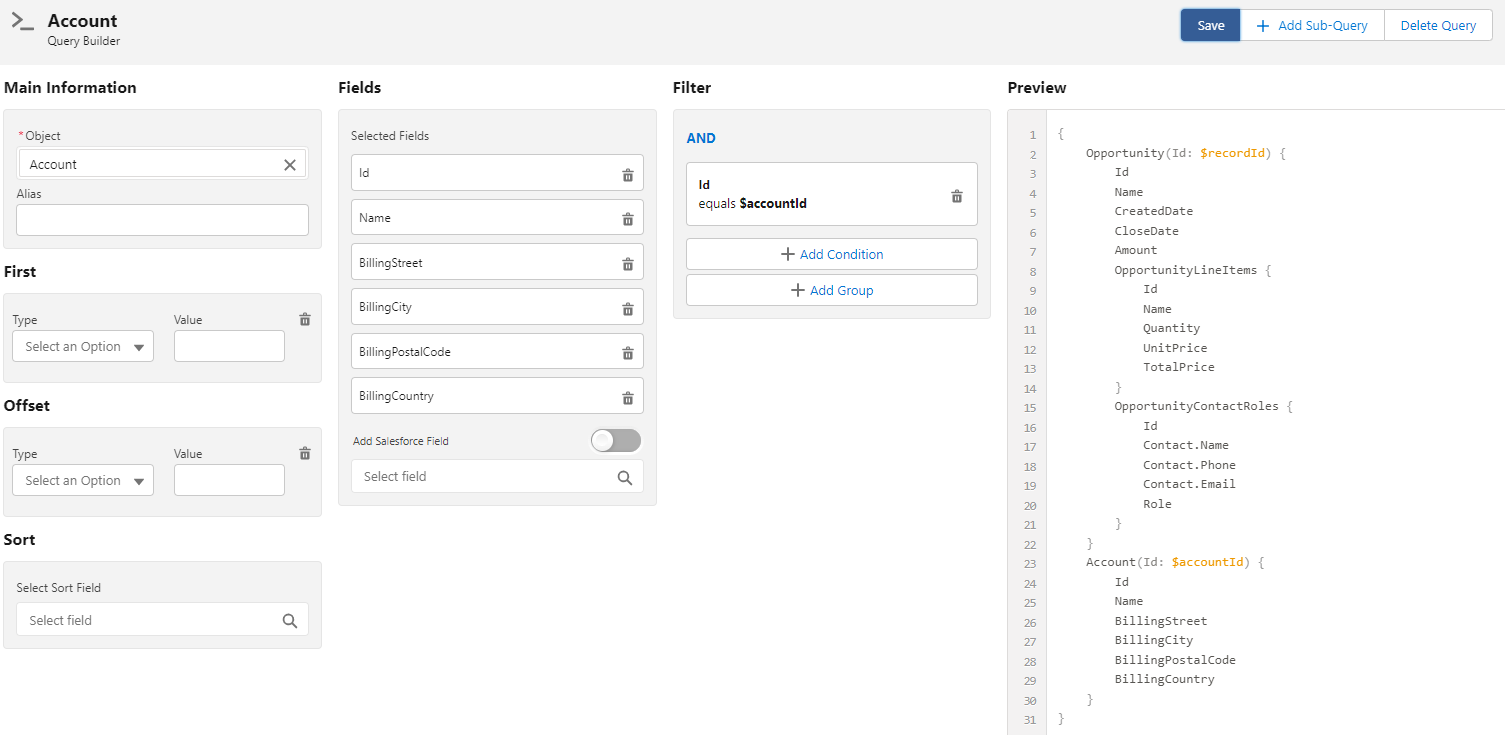
The next step is to create the query that fetches the Account record.
You won’t be able to select such compound fields as Address or Geolocation in Query Builder. However, it does not mean that the fields that are included in the compound field are forbidden. For example, BillingAddress will not be provided as an option on the Account Object, but BillingStreet, BillingCity, and the others are.
- Click on the Add Query button.
- Under Object enter Account.
- In the Fields section, add the following fields:
- Id
- Name
- BillingStreet
- BillingCity
- BillingPostalCode
- BillingCountry
- In the Filter section, add the following condition:
- Field: Id
- Operator: Equals
- Type: Variable
- Variable: accountId
Save the query, after which it should look exactly like this:
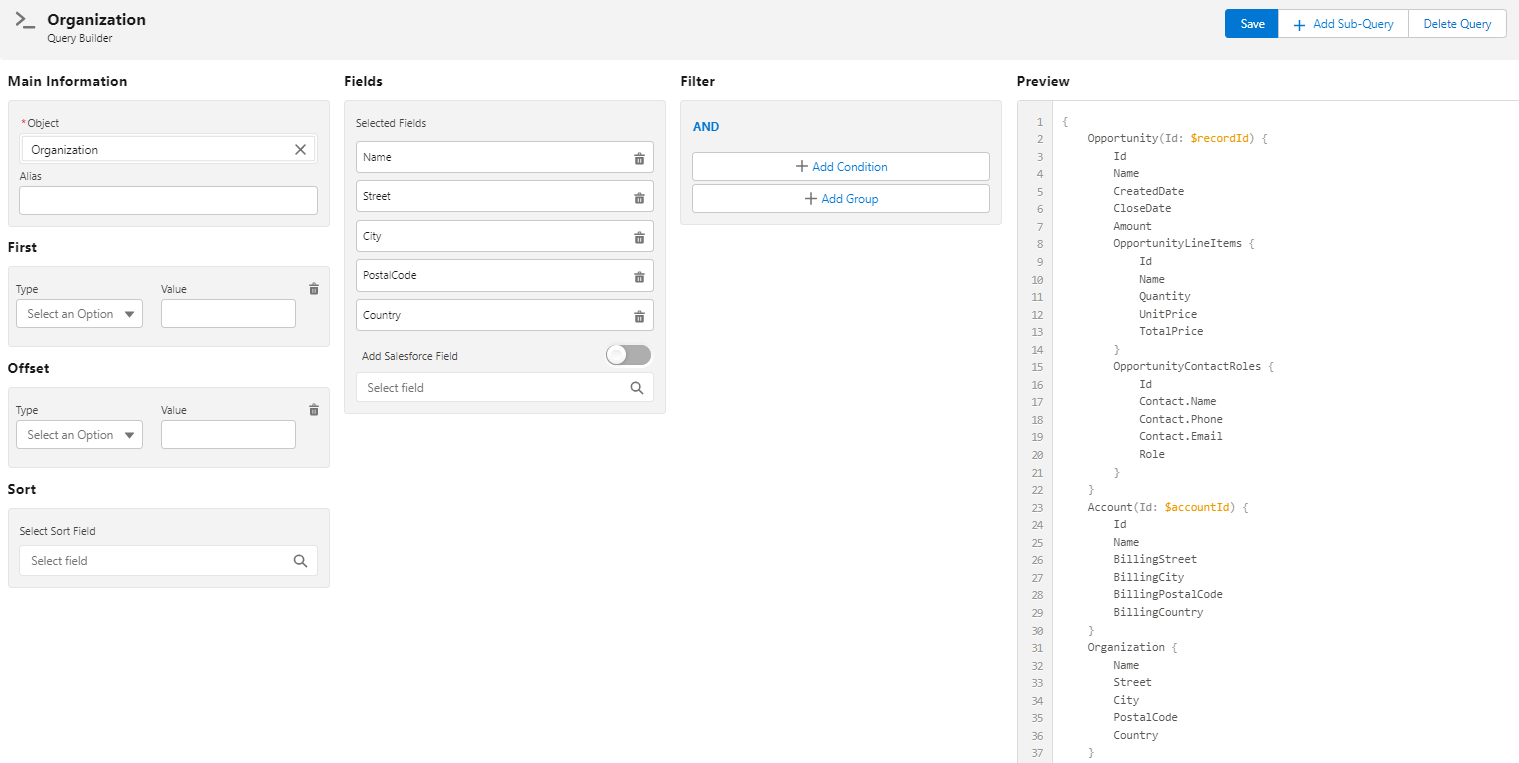
The next step is to create the query that gets the Organization record.
- Click on the Add Query button.
- Under Object enter Organization.
- In the "Fields" section, add the following fields:
- Name
- Street
- City
- PostalCode
- Country
Save the query, it now looks like this:
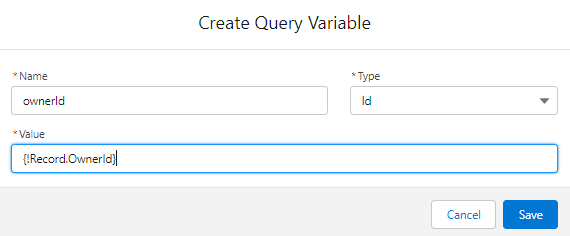
Now, you will have information about the User who owns the Opportunity (let's call him Sales Agent). For that, you first have to get the Owner's ID from the Opportunity record and save it into a Variable:
- Create a new variable named ownerId.
- Under Type select Id.
- In the "Value" field, put {!Record.OwnerId}.
- Click the "Save" button.
Then you need to add one more query on the User Object.
Note: Unsupported characters and spaces will be automatically removed while you write down Aliases for Objects or fields.
Supported characters are Latin letters in upper and lower cases and digits from 0 to 9.
-
Click Add Query.
-
In the Main Information section select the User Object and type the alias SalesAgent.
-
In the Fields section, add the following fields:
- Id
- Name
- Phone
-
In the Filter section, add the following condition:
- Field: Id
- Operator: Equals
- Type: Variable
- Variable: ownerId
Save your SalesAgent query (it should look like this):
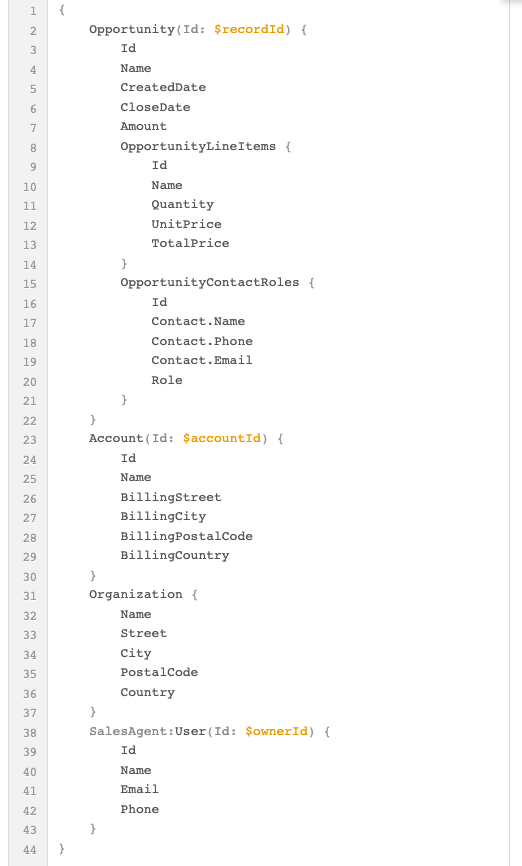
That's it! Using Query Builder you've collected all the data for the quote document. Now, you can build a Document Template in Google Docs or Google Sheets connect it to a Document Solution in Maven Documents, and fill it with data you have just acquired with Query Builder. You can also build a Document Template using Microsoft Word or Excel, and transfer and use queries defined in Query Builder.
¶ Query Variables
Variables are used to store values of standard types which cover all types needed for document generation. The value comes either from the user or is a value of a field from a record inside the Salesforce app. A complete list of types:
- Id. IDs of Salesforce records.
- String. Any standard String.
- Boolean. Either the True or False value.
- Date. Any Date.
- DateTime. Both the Date and the Time.
- Time. Only the Time of day.
- Integer. Any whole number.
- Decimal. Any number.
- Formula. Any Salesforce formula.
To create a variable press the Add Variable button located under the query elements on the left side of the application. After that, a form opens for you to fill in with the desired values. Then, clicking on the save button saves the variable inside the query and makes it available for further use inside documents linked to that query.
A dissection of the popup is explained below:
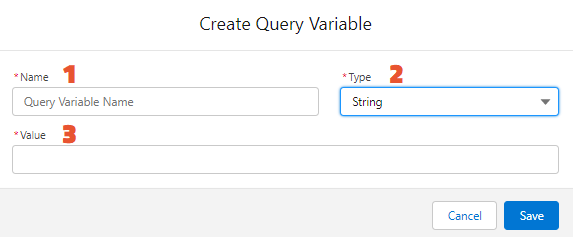
- Name. Text is used to identify the variable within the document.
- Type. One of the 9 available types of variables that can hold a value.
- Value. The value that is stored inside the variable.
They can serve different purposes and allow users to have a single source of truth for any value required in the query.
¶ Global Variables
As was mentioned earlier, you can create Global Variables in Query Builder on Salesforce, and reference them inside the Document Template. This, together with Expression Fields can make your Templates look neat.
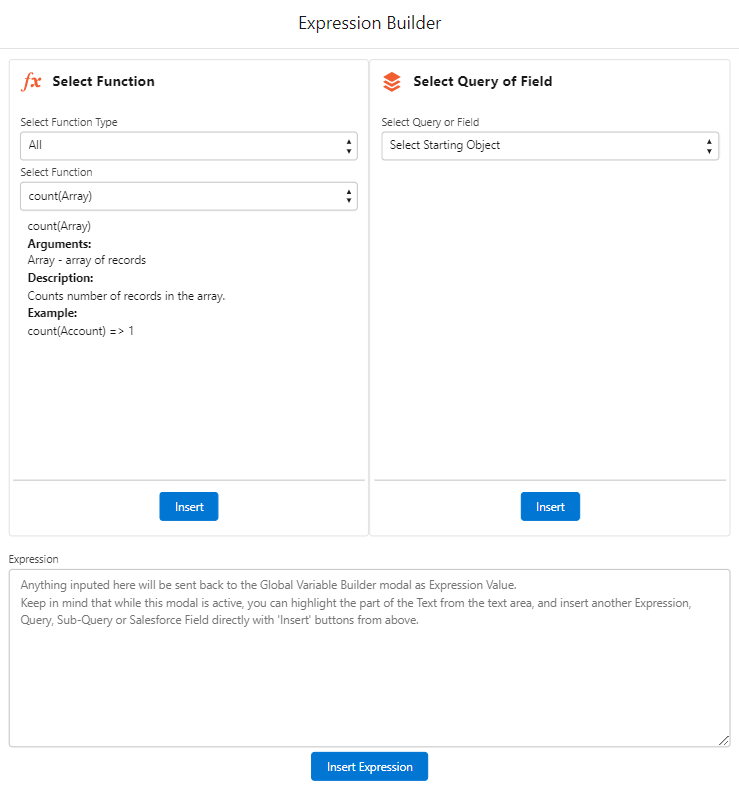
First, let's take a look at how you can create one. After you reach the Query Builder tab, click the Add Global Variable button in the Global Variable section. The following window opens.
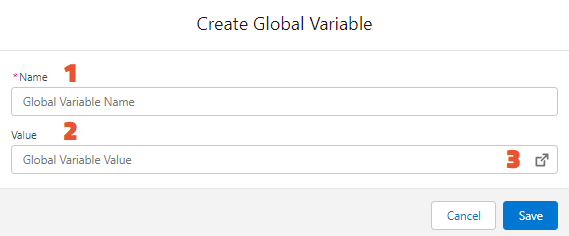
- In this field, you will name the Global Variable. The name can be descriptive and based on the value of the variable.
- Here, you can define the value the Global Variable will contain. You can use Expressions, References, or just regular text.
- If you need help building an Expression, you can use Expression Builder by clicking on the Open Expression Builder button. Here is the instruction on using Expression Builder.
After you finish with all the fields, click Save. The created variable appears in the corresponding section on the Query Builder work pane. After running the Maven Add-in on your document, you will find the created variables alongside Salesforce fields. You will also be able to use these in Expression Fields.
¶ Expression Fields
With the Expression Field, you can create and add Expressions while building a query. These expressions will become a part of the query and appear in the add-in alongside the fields of the corresponding Object.
You can think of Expression Fields as formulas on Salesforce. Rather than creating a new Formula Field in the Object modal, you can create an Expression Field, that serves the same purpose as our Expressions do. You will then be able to use it in the Maven Add-in just like you would any other regular Salesforce Field. Expression Fields have access only to the record they are located on and everything below them.
Moreover, you can define part of the data in Global Variables and then reference those Global Variables in Expression Fields. For all the developers, think of Global Variables as getters of Query data for Expression Fields.
Here is a quick instruction on how to add an Expression Field.
-
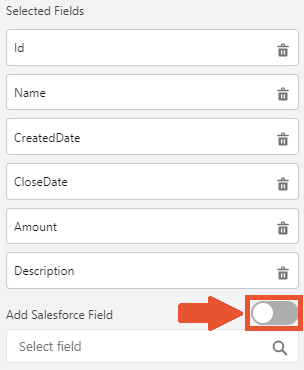
After you select an Object in Query Builder, switch the toggle next to the Add Salesforce Field signature in the Fields section.
-
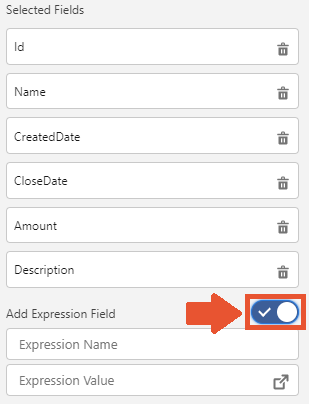
In the Expression Name field, write down the name of the expression.
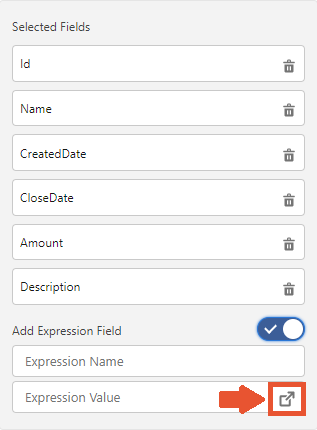
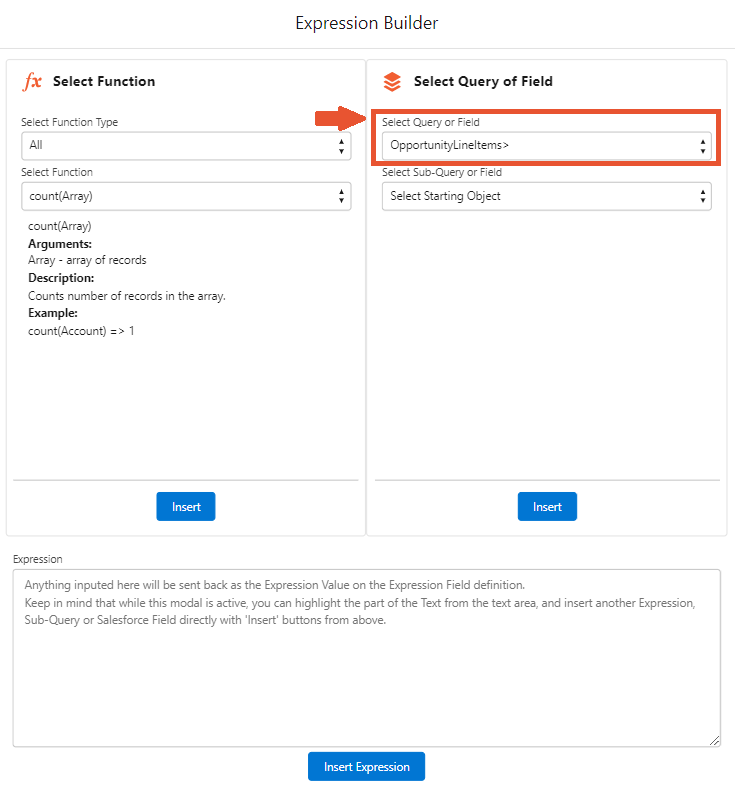
Expression Value, can either be an Expression written manually or with Expression Builder by clicking on the corresponding icon.
Note that the Select Object or Field section of Expression Builder already has the starting sub-query selected. You can only continue from that. (Remember that Expression Fields only see the record they are currently on and everything below that.
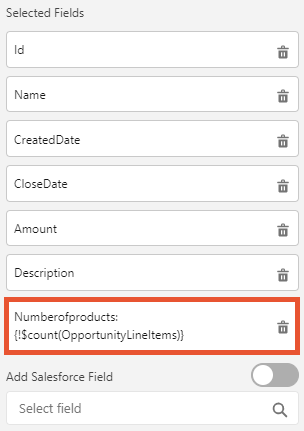
After you build the expression, the Expression Field appears in the Fields section with other added fields from the Object.
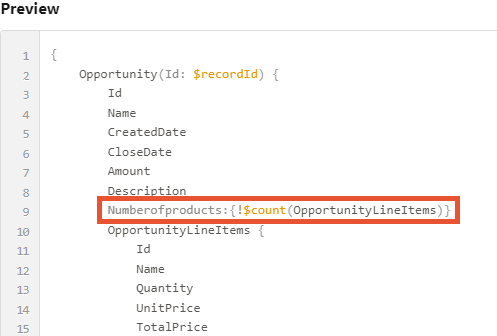
When you've saved the query, its preview will appear in the corresponding section. The constructed expression will also be displayed there.
Before placing the expression in the document, you can evaluate it in Playground:
- Go to the Playground tab on Document Solution.
- In the Variables section, replace the {!record. Id} variable with the ID of the needed opportunity
- Refresh Context.
- In the Expression section, open Expression Builder, and in the Select Query or Field section, select the corresponding Expression Field.
After all the steps from above, the Expression Field appears in the Expression section in the {!$Object.Expressionfield} notation.
Expression Fields are referenced as references!
So make sure to use notation such as {!Object.ExpressionFieldName}, and not {!$Object.ExpressionFieldName}. The first resolves the Expression Field and the latter outputs its content.
Now, you can go to Document Template, run the Maven Add-in, and insert the Expression Field inside the document by clicking on it.