¶ Configuration
¶ Setup Assistant
Now that licenses and permissions are managed on Salesforce, we can discuss settings in the Maven Documents application.
In the App Launcher on Salesforce, find and open Maven Documents. There, you'll find the Setup Assistant tab, which contains all the settings you need to work with the application.
The tab is visible only for users with the Maven Documents Administrator permission set assigned.
To try out Maven Documents, you must have a valid Microsoft or Google user account and a connected email address.
Follow the link to check an offer in the Microsoft Store.
Or send your Microsoft or Google account email to contact@mavenmule.com and we will provide you with a temporary subscription ID. You need to enter it in the Maven Headless Settings during the setup process.
The tab is divided into 4 sections:
- Maven Headless Configuration
- Haven Headless Browser Login Flow
- Maven Headless App-to-App Flow
- Application Settings
Sections are collapsed by default, but once you click on them, the content of the section becomes visible.
¶ Maven Headless Configuration
This set of settings is the first step and the foundation for configuring Maven Headless. Here, you provide the Marketplace Product Subscription, set up the Maven Headless Connected App, and add some extra System Permissions.
-
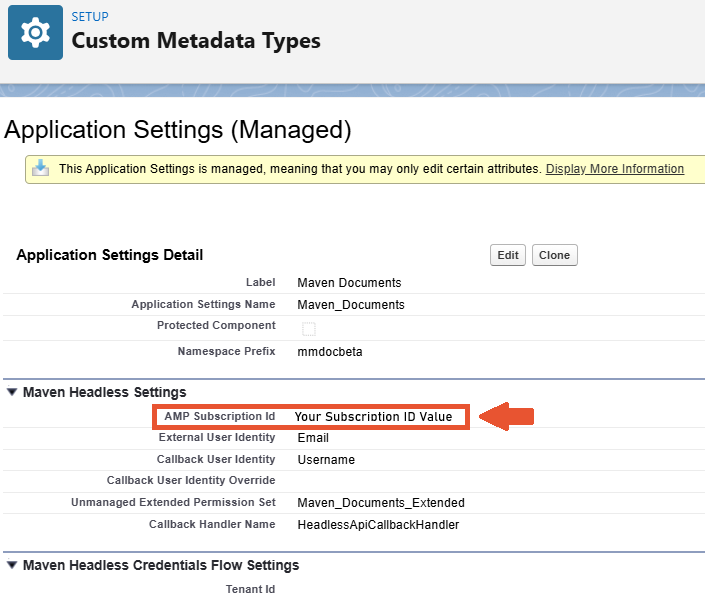
Enter the AMP Subscription Id. You provide this value to prove the Azure or Google subscription. The subscription is vital for Maven Documents to function if you work with Word or Excel templates.
You get the AMP Subscription Id from Maven Mule. Contact your administrators to determine the required value.
a. Click the Open Application Settings button. The Application Settings page from the respective Custom Metadata Types section is opened in a new browser tab.
b. Click Edit. The content of the fields on the page becomes editable.
c. In the AMP Subscription Id field, enter the needed value.
d. Save changes and close the tab.
After the step is finished, you can go to Salesforce Setup and check the list of Maven Documents' permission sets. The Maven Documents Extended permission set is created and assigned to the Admin user who conducted this setup through Setup Assistant.
This permission set grants access to the security and communication API prerequisites required for document generation. Due to Salesforce constraints, these permissions cannot be included in the default permission sets provided by the package.
Once the Admin user gets the Extended permissions, he needs to assign those to the users who will work with Maven Documents. -
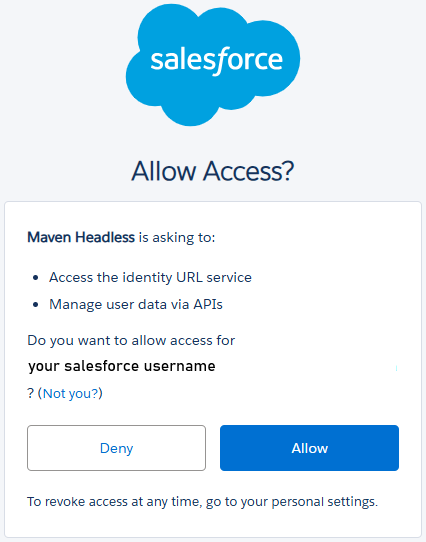
Grant Access. With this procedure, you are allowing the Maven Headless application to interact with your Salesforce org.
a. Click the Grant Access button.
b. Click Allow.
-
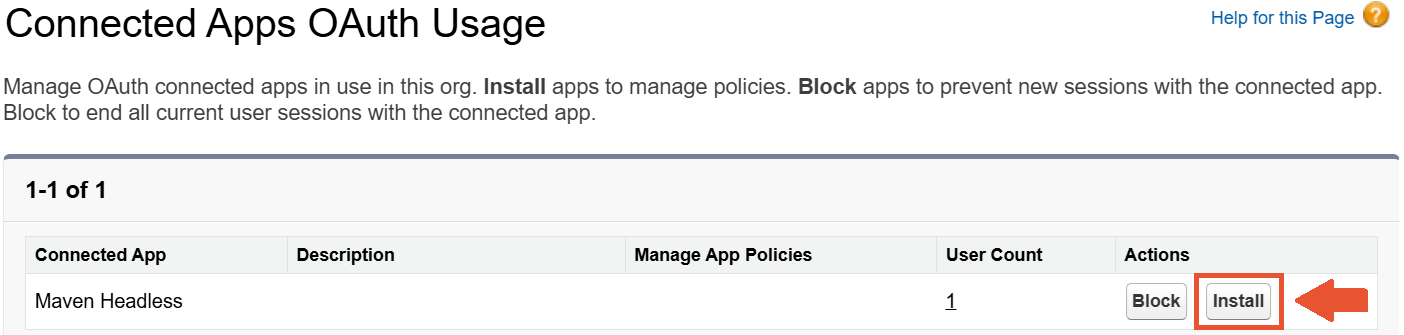
Install the Headless Connected App.
After you've granted access in the previous step, you can install and set up the Maven Headless application.
a. Click the Open Salesforce Setup button. The Connected Apps settings page is open in a browser tab.
b. Click Install and confirm the choice by clicking Install one more time on the dialogue screen.
c. In the opened Connected App Detail settings, click Edit Policies and change the value in the Permitted Users field to Admin approved users are pre-authorized.
d. In the Session Policies section, mark the Set app-specific token timeout checkbox and define the value of at least 5 minutes.
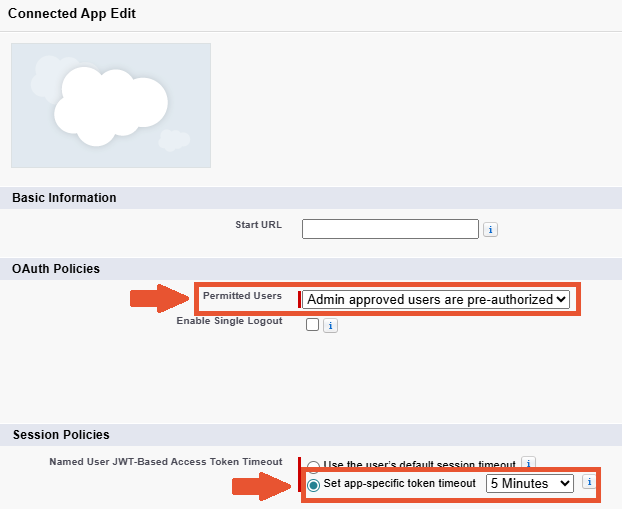
e. Save changes and close the browser tab.
Please note that the token timeout specified here will also affect the duration of your Add-in / Add-on session. After the specified timeout, you will need to log in to Salesforce again when using the Maven Add-in and the Maven Add-on.
-
Add System Permissions to the Maven Documents Extended Permission Set. This setting makes sure users who have the Extended Permissions assigned won’t have issues with Maven Documents regardless of their Salesforce Profile.
a. Click the Open Extended Permission Set button. The Maven Documents Extended System Settings page is open in a new browser tab.
b. Click Edit. The list of System Permissions becomes editable.
c. Mark the API Enabled and Apex REST Services checkboxes.
d. Save changes and close the browser tab.

¶ Maven Headless Browser Login Flow
Also known as the Authorization Code Grant flow. It lets the Maven Headless app securely access the Document Generation service on behalf of a user without seeing their password.
-
Create Named Credentials. With this step, you are creating Named Credentials that give an opportunity for Maven Documents to do callouts to the Maven Headless app.
a. Click the Create Named Credentials button.
b. Wait for the app to create credentials in the background. -
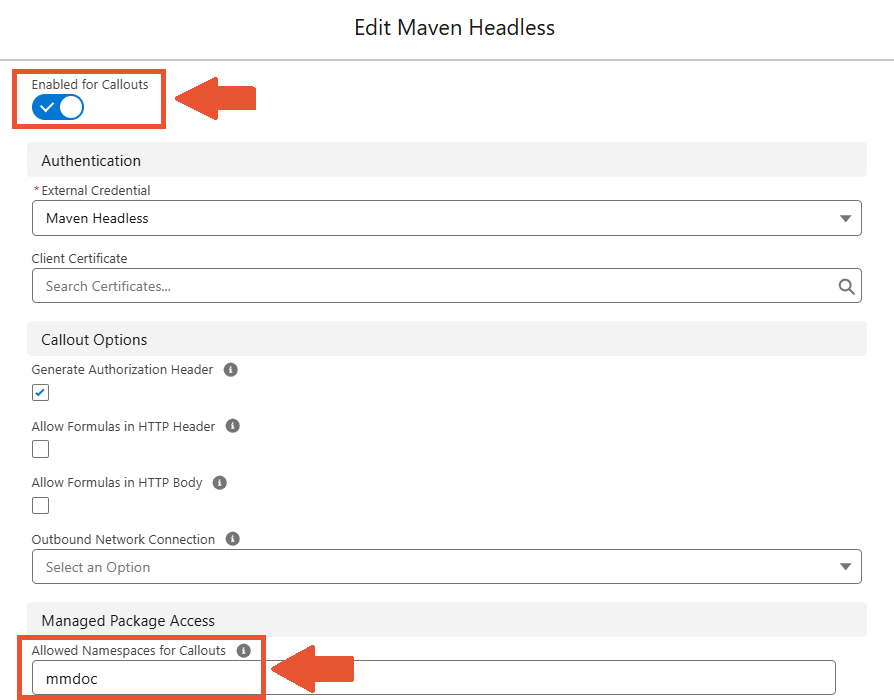
Enable Callouts. This step enables Maven Documents to do callouts to the Maven Headless app.
a. Click the Open Named Credentials button. The Named Credentials settings page is open in a new browser tab.
b. Click Edit and switch on the Enable for Callouts toggle.
c. Add the mmdoc namespace in the Allowed Namespaces for Callouts field.
d. Save changes and close the browser tab.
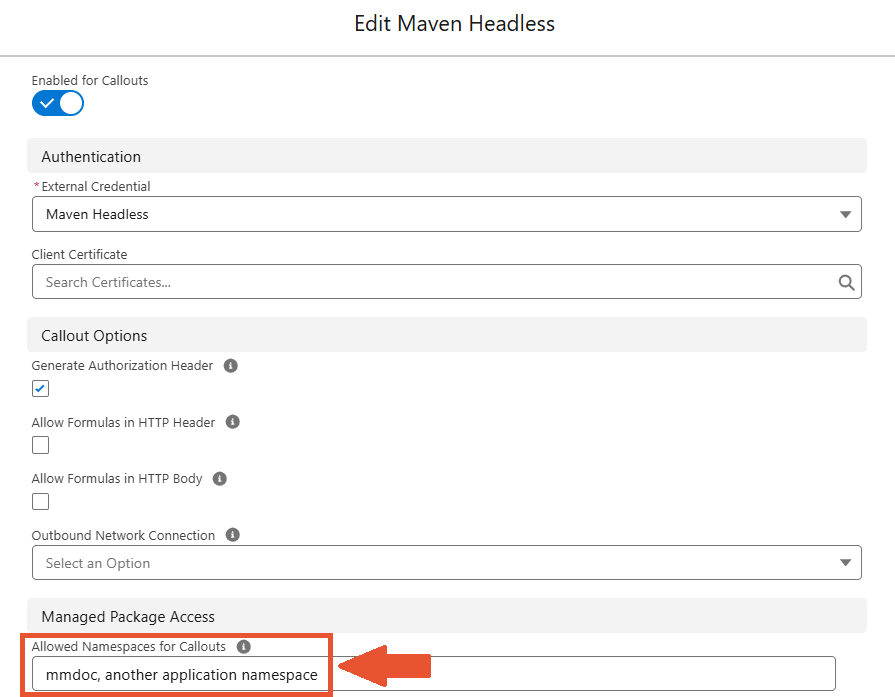
If you are installing Maven Documents into the Org that already has an application with Maven Headless configured, then in Named Credentials, you just need to add the Maven Documents application namespace alongside the existing one and separate it with a comma.
¶ Authentication
Once you enable Named Credentials for callouts, you'll need to authenticate your Microsoft or Google account.
There are two ways of authentication possible on Salesforce:
Named Principal.Per User Principal.
The Named Principal authentication enables the admin to authenticate with the "named account" credentials. In that way, it enables all users to use the same account when generating documents.
-
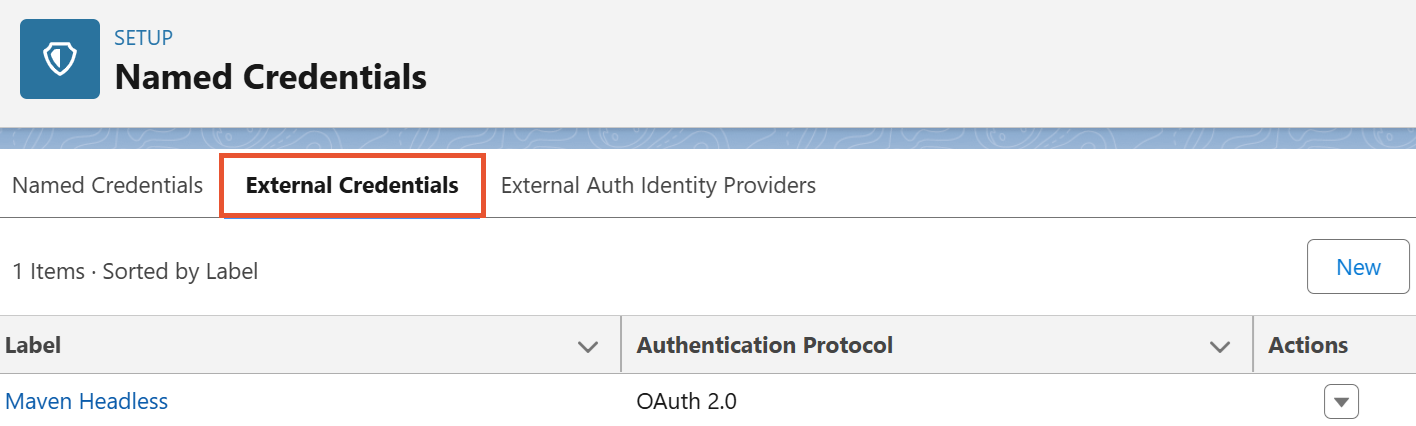
In Salesforce Setup, go to Named Credentials and select the External Credentials tab.
-
Open the Maven Headless credentials.
-
In the Principals section, click the dropdown arrow in the Action column next to Maven Service Principal and select Authenticate.


The Per User Principal authentication enables each user to use their credentials when generating documents. The Per User Principal authentication is administered on the User Settings page.
-
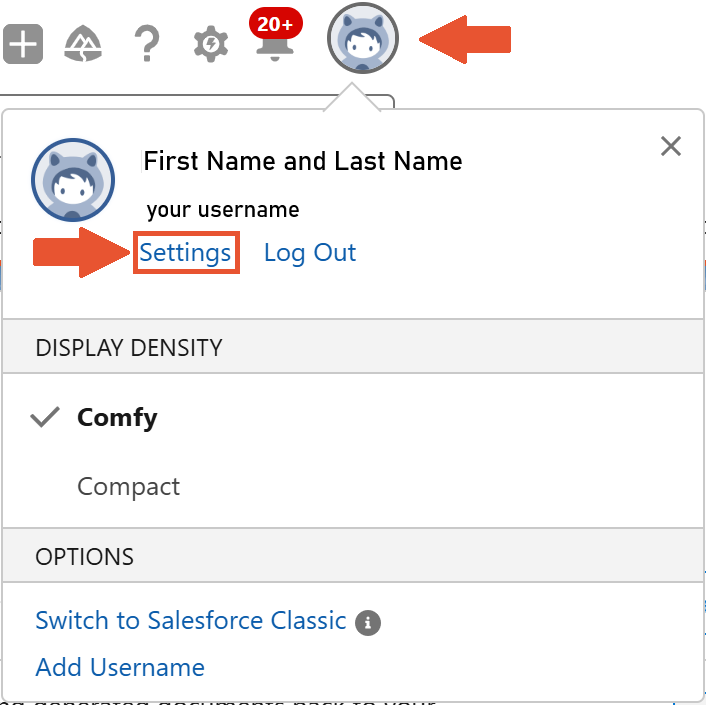
Click on your profile avatar and select Settings.
-
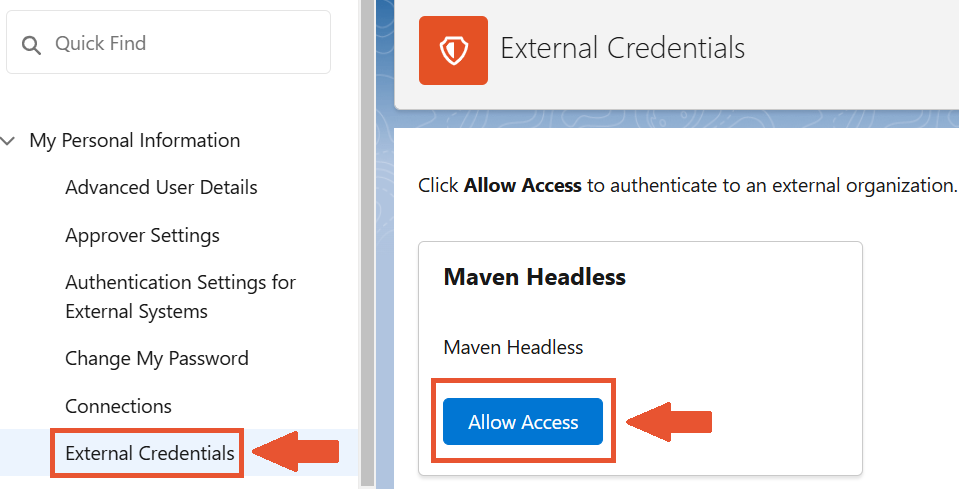
In the External Credentials section, click Allow Access in the Maven Headless card.
-
Enter your Microsoft or Google Credentials and then confirm external access.

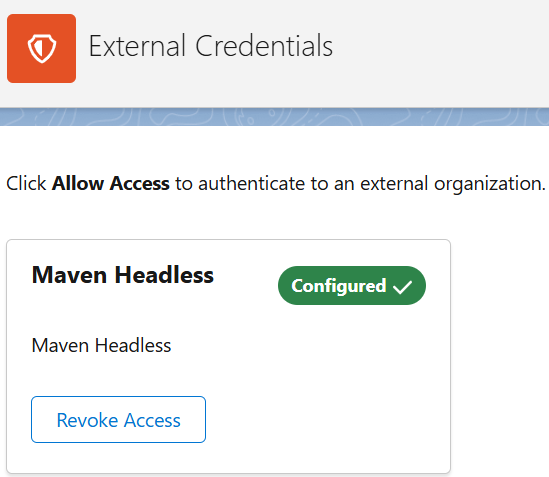
After the steps are completed, access is configured.
When you authenticate the Named Principal, you can still have individual users authenticate with their credentials.
Salesforce checks Principals in ascending Sequence Number order and uses the first that is authenticated. In this way, users utilize their credentials.
You can use the common account for all the users or have a combination of these two.
With all the steps from above accomplished, Maven Headless is set and ready for work.
When you are testing Maven Documents in the Sandbox Org, you might have issues with the document generation after the Sandbox is refreshed. Check out the following article to overcome those issues.
¶ Maven Headless App-to-App Flow
Currently, the Flow can be used for generating Microsoft documents only.
Also known as Client Credentials flow. It allows the Maven Headless app to access the Document Generation service itself, not on behalf of a user.
-
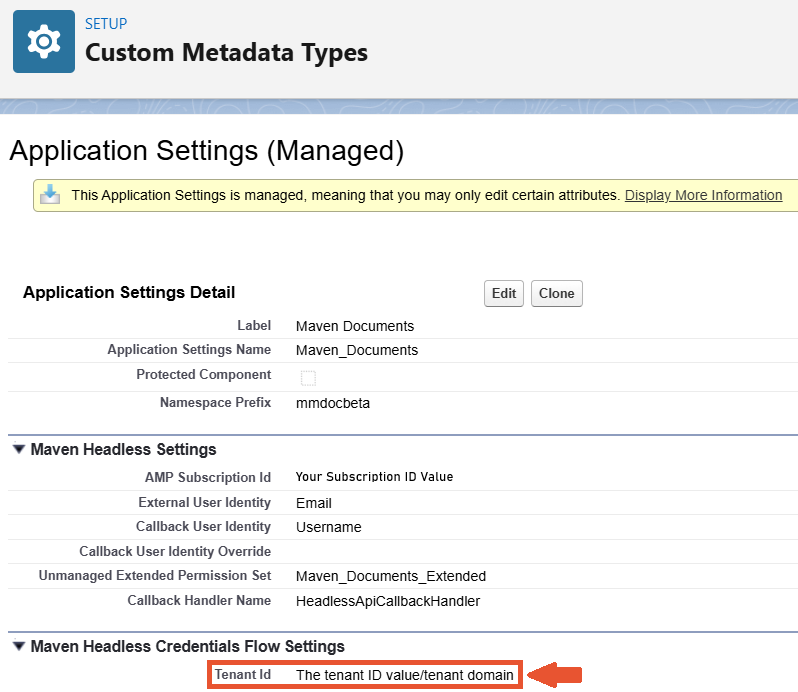
Set the App-to-App Tenant ID. It's the GUID/UUID assigned to the Azure/Entra (Formerly Azure Active Directory) Tenant. You can also use the domain of the tenant in this field.
a. Click the Open Application Settings button. The Application Settings page from the respective Custom Metadata Types section is opened in a new browser tab.
b. Click Edit. The content of the fields on the page becomes editable.
c. In the Tenant Id field, enter the needed value.
d. Save changes and close the tab.
-
Create Named Credentials. With this step, you are creating Named Credentials that give an opportunity for Maven Documents to do callouts to the Maven Headless app.
a. Click the Create Named Credentials button.
b. Wait for the app to create credentials in the background. -
Set Client ID and Secret. In exchange for the defined values, Salesforce returns the access token that is used to call Salesforce APIs.
If you need to create the Client ID and Client Secret values, check the following instructions.
a. Click the Open External Credential Principal button.
b. In the Principals section, click the Actions button and select Edit.

c. Type the Client ID and Client Secret values in the respective fields.
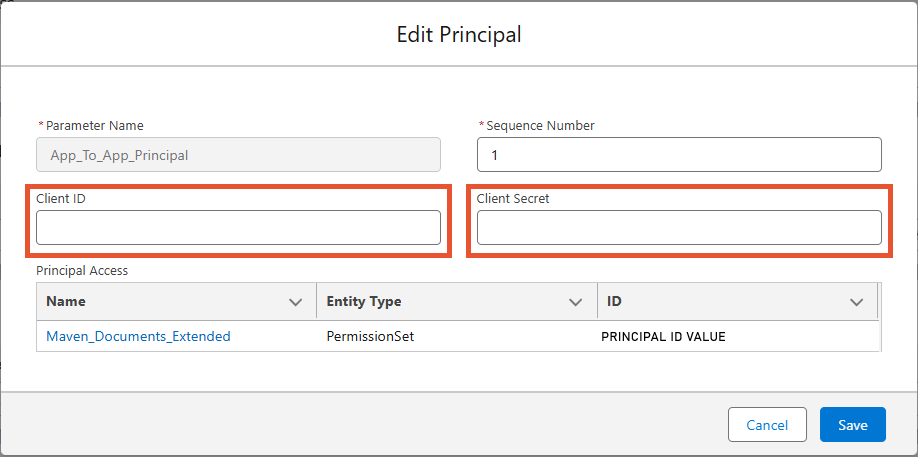
d. Save changes and close the tab
-
Enable Callouts. This step enables Maven Documents to do callouts to the Maven Headless app.
a. Click the Open Named Credentials button. The Named Credentials settings page is open in a new browser tab.
b. Click Edit and switch on the Enable for Callouts toggle.
c. Add the mmdoc namespace in the Allowed Namespaces for Callouts field.
d. Save changes and close the browser tab.
If you are installing Maven Documents into the Org that already has an application with Maven Headless configured, then in Named Credentials, you just need to add the Maven Documents application namespace alongside the existing one and separate it with a comma.

¶ Browser Login Flow vs App-to-App Flow
Although both flows let an application access your Drive, the key difference is whether a human user is involved.
Use the Browser Login Flow when an application needs to access the Drive (at the moment OneDrive is supported) on behalf of a specific user.
The user logs in through Salesforce and approves the app, and the app then receives a token to work with that user’s data and permissions.
Use the App-to-App Flow when no user interaction is needed, and the system just needs to run automatically.
The application authenticates itself using its own credentials and works using a predefined integration user in Salesforce.
When using the App-to-App Flow, your first document must be generated using an offline document. During this step, the application will automatically create a dedicated folder in your connected OneDrive.
Important:
- All documents generated with OneDrive as an output will be saved in this application folder.
- Any online template documents used for generation must also be stored in this folder.
- You may organize templates by creating subfolders inside the application folder.
Due to Microsoft’s document sharing limitations, template documents must be created directly in the application folder or copied into it. Moving templates from other OneDrive locations will cause the document generation process to fail.
Flows can be used either separately or simultaneously. If both Flows are configured, the Document Generation service is first accessed using the Browser Flow configuration. The Per User authentication principal is used prior to the Named principal.
If the Browser Flow is not configured, the system then attempts to reach the Document Generation service using the App-to-App Flow configuration.
If you want to try Maven Documents out, we recommend using the Browser Login Flow. Simply because its configuration can be done on your own without contacting your Microsoft administrator.
¶ Application Settings
This section provides the configuration of certain parts of the application. Some settings here are set to default values, so icons next to them are marked in green. You can find values by clicking the respective buttons.
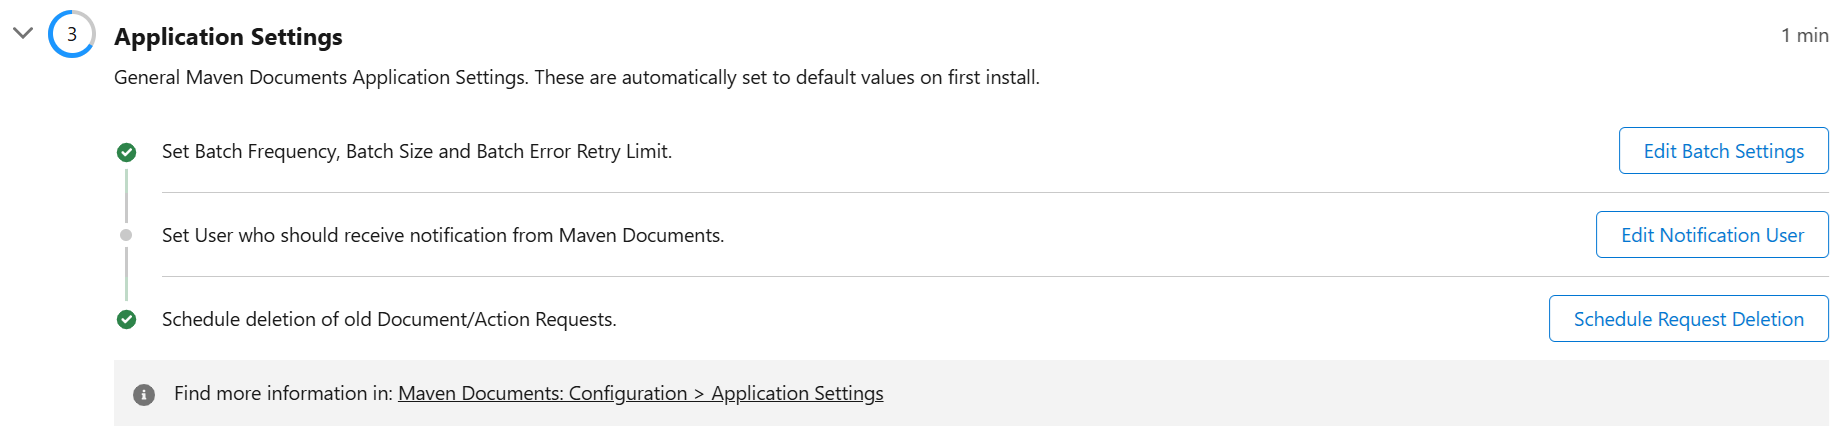
¶ Batch Settings
Maven Documents allows you to generate a large number of documents using Apex Batch. Apex Batch in Salesforce is used to run large jobs that would exceed normal processing limits. Using Apex Batch, we can process records asynchronously to stay within platform limits.
Click the Edit Batch Settings button to see what batch parameters are available:
- Batch Frequency (minutes). The number of minutes after which the batch is executed.
- Batch Size. The number of documents that are generated in one batch execution.
- Batch Error Retry Limit. The number that shows how many times a batch tries to process the same Document Request in the case of an error.
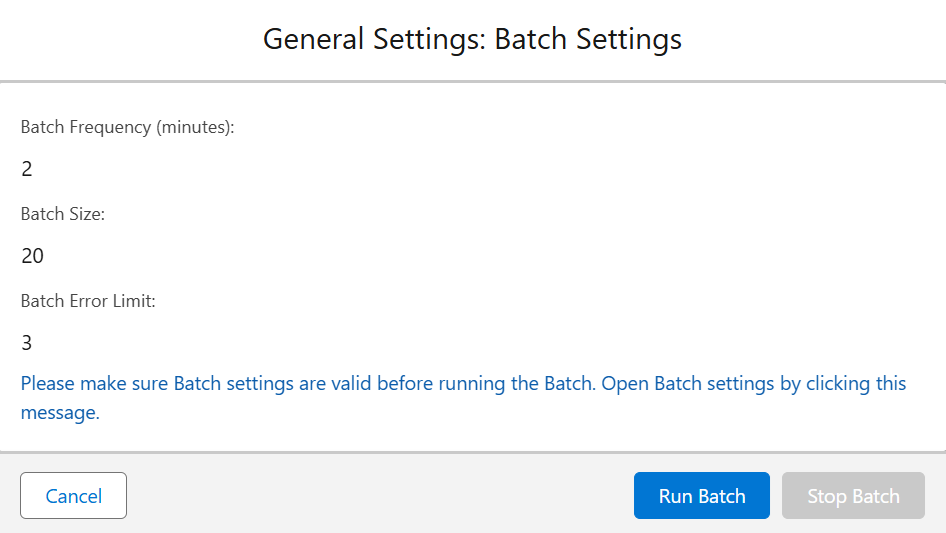
At the bottom of the card, you can see the following buttons:
- Run Batch. Starts the execution of the document generation batch.
- Stop Batch. Stops the execution of the document generation batch. The button is active only if batch execution has begun.
- Cancel. Closes the window with Batch Settings.
Here's how to change default parameters:
-
Click on the message at the bottom of Batch Settings. The Application Settings page from the respective Custom Metadata Types section is open in a new browser tab.
-
Click Edit. The content of the fields on the page becomes editable.
-
In the Batch Settings section, set the needed values in the respective fields.

-
Save changes and close the tab.
Now, when you go back to Setup Assistant and refresh the page, Batch Settings will have new values.
¶ Edit Notification User
This setting allows you to select a user who receives a notification email from Salesforce if limits on Document Requests are reached. This setting doesn't have any default value, so it's on you to provide one.
-
Click the Edit Notification User button. The Application Settings page from the respective "Custom Metadata Types" section is open in the new browser tab.
-
Click Edit. The content of the fields on the page becomes editable.
-
In the General Settings section, populate the Notification User Id field with the ID of the needed user.

-
Save changes and close the tab.
The defined user has to be active. You can't select more than one user in that field.
¶ Schedule Request Deletion
Every document generated with Maven Documents creates a new Document Request and Action Request record. These records store information required to generate the document and complete the respective post-generation action.
As you will be generating documents, there could be quite a lot of records in the Document and Action Request objects. You can easily delete old requests, either manually or by setting up the automatic deletion process.
The Deletion of old Document/Action Requests settings is right there to help you. Here are the options you have:
- Delete Now. Immediately delete all Document and Action Request records older than the provided number of days.
- Schedule Deletion. Schedules a job that deletes all Document and Action Requests older than the provided number of days. The job is executed daily.

To change the default number of days, follow the steps:
-
Click on the message at the bottom of Deletion Settings. The Application Settings page from the respective Custom Metadata Types section is open in a new browser tab.
-
Click Edit. The content of the fields on the page becomes editable.
-
In the Document Request Deletion Settings section, set the needed number of days in the respective field.

-
Save changes and close the tab.
Now, when you go back to Setup Assistant and refresh the page, the Deletion of old Document/Action Requests setting will have a new value.
Keep in mind that you can't delete Document Requests created in the current GMT month. So when you click Delete Now with some selected number of days, only Document Requests from the past months are removed.
¶ Callback User Identity Fields
Salesforce provides high assurance security features to protect enterprise data and operations. By using authentication and authorization protocols together with proven risk-mitigation techniques, Salesforce helps ensure that sensitive assets remain secure.
While these security controls improve protection, they can also affect the document generation process. During the generation process, the Maven Documents service needs to communicate with Salesforce (fetching Document Templates, delivering generated documents). If the user who is running the document generation has Multi-Factor Authentication (MFA) or other high-assurance methods enabled, communication with Salesforce for such a user might fail.
To address this limitation, we implemented a capability to run document generation under a different, trusted user, for whom these security limitations are not enforced. The configuration of this mechanism is done through Application Settings fields:
- Callback User Identity
- Callback User Identity Override
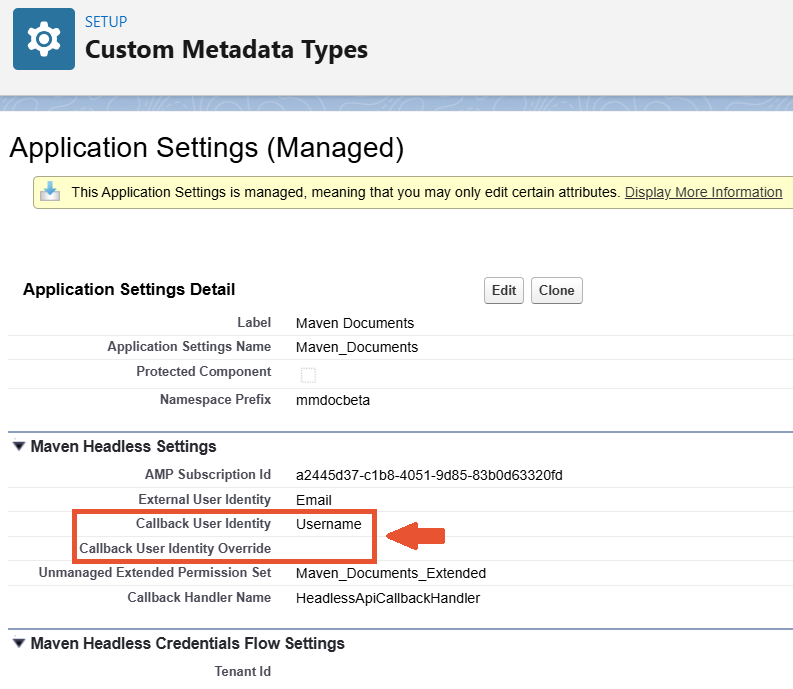
¶ Callback User Identity
This field stores the API name of a field on the User object.
If the user who is restricted by high assurance security requirements has this field populated with the username of another user who is not restricted, the document generation process runs under that alternative user.
¶ Callback User Identity Override
This field stores the username of a user who is not restricted by high-assurance security requirements.
When a restricted user initiates document generation, this field is checked first:
- If the Callback User Identity Override is populated, the process runs under that user.
- If the field is empty, the system then checks the Callback User Identity field.
Although the main motivation for introducing this configuration is to avoid the mentioned limitations, these fields can be used regardless of the high assurance. For example, if you would like all the generated documents to be delivered to Salesforce as if a specific user created them, you can do that easily by configuring the Callback User Identity Override field.