¶ Document Solutions
Before creating a Document Solution, let's review the concept first.
Think of Document Solution as an IKEA Wardrobe. It is a functional and beautiful addition to your home. But before you can start using it, you need to set it up from several individual components. We are here to guide you through the entire process so you can get the value from using the "wardrobe" as soon as possible.
These are individual pieces we have:
- Query Builder. This is the frame of our "wardrobe". With Query Builder, you can easily fetch all the Salesforce data you need for your documents without a single line of code. The builder defines what data supports your documents the way a frame supports a wardrobe.
- Document Template. This is the facade of our "wardrobe". Document Template defines the appearance of your document, just as a facade determines the look of a wardrobe.
- Button Configuration. This is the handle of our "wardrobe". Button Configuration determines how you open or generate the document, much like a handle lets you open a wardrobe.
Now that you know the concept, we can see it in action. As an example of generating a document using Maven Documents from start to finish, we will create and generate a simple quote document. So let's start!
¶ Creating Document Solution
To create a Document Solution, follow these steps:
-
Open the Maven Documents app.
-
Go to the Document Solutions tab.
-
Click the New button to create a new Document Solution.

-
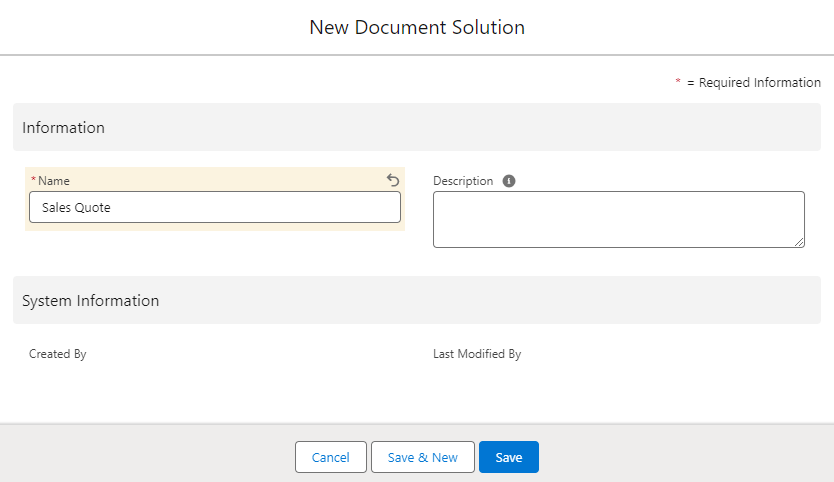
The "New Document Solution" screen contains the Name and Description fields. We're going to name the solution Sales Quote.
If needed, you can fill in the Description field with information about the created Document Solution. We will leave that field empty for now.
Once you are done here, click Save.
The Document Solution has been created. You completed the first step towards our goal: a quote document. The next step is to get started with Query Builder so you can put some Salesforce data into the document.
¶ Advanced Settings
You will find Advanced Settings as a separate tab on the Document Solution Layout. The tab contains settings that let you manually adjust certain aspects of the Document Solution's behavior.
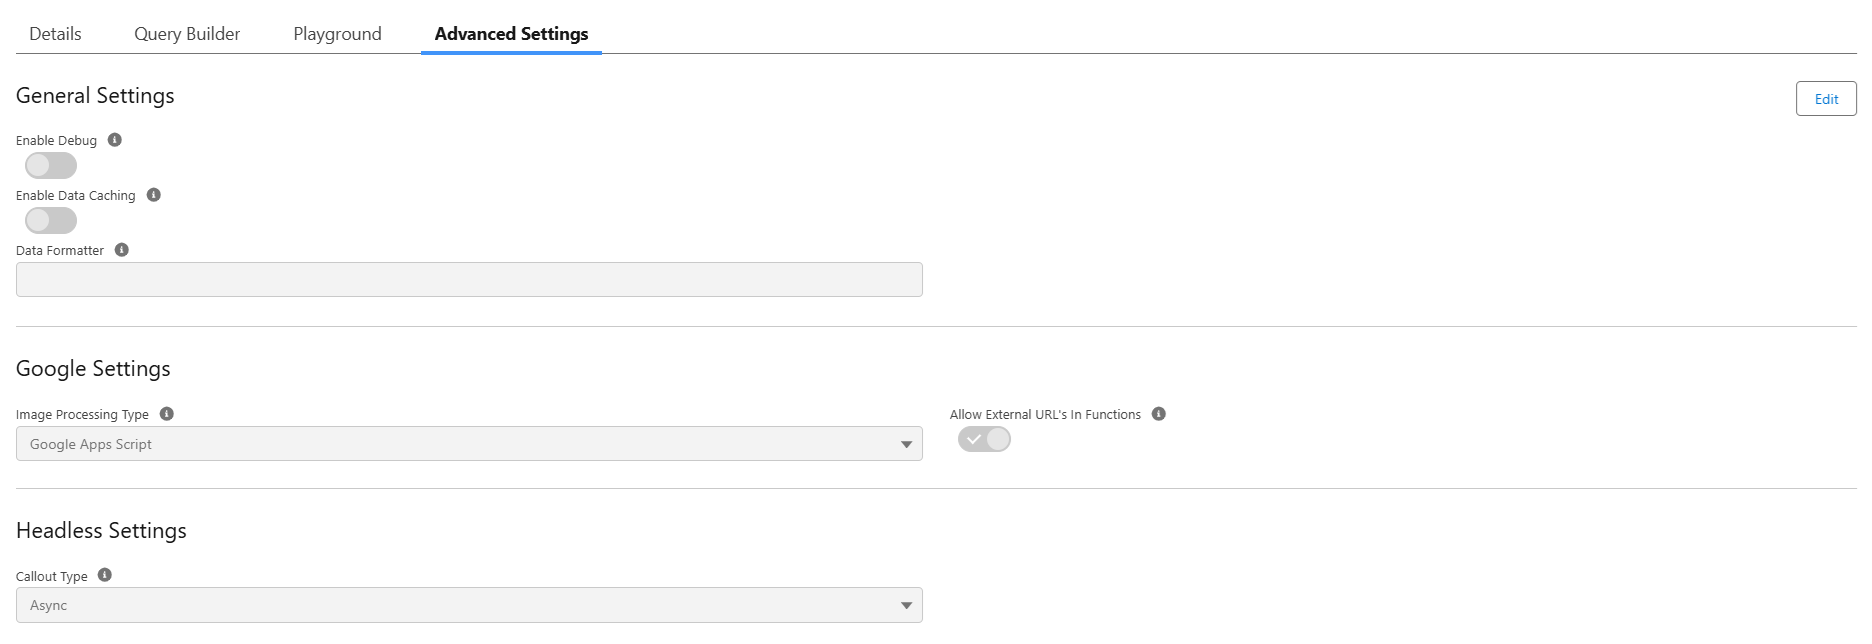
The component contains several parameters:
- General Settings:
- Google Settings:
- Headless Settings:
¶ General Settings
¶ Enable Debug
Default value: False
The value is shown as a toggle:
- When the toggle is off, the value is False. The Maven Google Service that the "Maven Documents" app utilizes doesn't save any logs of the Document processing.
- When the toggle is on, the value is set to True. Maven's Google Service will persist a debug log of the document generation process. Clients can enable it to assist the "Maven Documents" support team with debugging issues with document generation.
The support team primarily uses this parameter. Before making any changes, contact your support agent.
¶ Enable Data Caching
Default value: False
The value is controlled by a toggle:
- Toggle off → The value is set to False.
Document generation proceeds without any changes. - Toggle on → The value is set to True.
This enables an optimization for document generation when using a Screen Flow that includes the Document Template Selection component.
When the Flow runs and the Template Selection modal is opened, the GraphQL query results for all available templates are calculated and cached at that stage. As a result, after selecting a document template and proceeding to the Document Generation component, no additional time is required to process GraphQL data—generation starts immediately.
- This setting does not affect document generation performed via the Generate Document Lightning Component.
- Because the calculation and caching occur during the Template Selection stage, this setting is only beneficial when the Flow includes the Document Template Selection component.
¶ Data Formatter
Default value: Empty
The Data Formatter parameter is defined with a string value.
- The empty field for that setting means that the data from the template document is going to be formatted as usual: with spaces, new lines, etc. This leads to additional time spent generating the document.
- If you place any string value in the attribute's field, the data isn't formatted. That reduces the document generation time.
This setting is helpful when the generated file contains a large amount of data and you want to avoid a Time Out error in Salesforce. In the future, this field will allow you to enable custom formatting types.
Be aware of some consequences of having this setting enabled:
1. Date and DateTime fields will be sent in standard ISO format. If you still need a date in a specific format while formatting is turned off, you can create a formula field in Salesforce and use it as a merge field in the query.
2. Having a parent.child query will break the generation process. For example, the OpportunityContactRoles.Contact.Name field in the document will cause an error in the generation process. Instead, you can create a formula field on Salesforce that will hold the data from the child field.
¶ Google Settings
¶ Image Processing Type
Default value: Google App Script
This parameter is presented as a picklist with the following options:
- The Google App Script value indicates that images are replaced sequentially (one by one).
- The Batch value can be used if a template document includes a large number of images, probably more than 50. Selecting this value can speed up the merge process, but it may slow it down if only a few images are present in the Document Template.
¶ Allow External URLs In Functions
Default Value: True
The parameter is shown as a toggle:
- When the toggle is on, the generated document can use external URLs inside functions.
- When the toggle is off, access to the external URLs inside functions is not allowed.
The setting is only applied for the Google Sheets templates.
¶ Headless Settings
¶ Callout Type
Default value: Async
This parameter is presented as a picklist with the following options:
- The Async value signifies that document generation processes can run simultaneously. It means that you can have a couple of Document Requests with the Processing status, and it won't prevent you from running another generation process. All those requests are running simultaneously.
- The Sync value represents how the system worked before. Document Requests were processed one by one. In other words, the generation of the next request in sequence only starts when the previous one is finished.
If you are still unsure about the purpose of any of these settings, we've added some help messages. Hover over the (i) icon next to the corresponding attribute and read the text.