¶ Financial Institution Authorization
One important responsibility of the Maven Banking Administrator is to authorize Financial Institutions and Financial Institution Accounts of interest. It allows users to retrieve and manage needed data.
¶ Authorize with default values
By authorizing you are giving consent for data processing under specified terms. These terms are represented by:
- Requisition. Allows Maven Banking to access your account information.
- End User Agreement. Specifies the duration and scope of the Requisition.
To learn more about Requisitions and End User Agreements click here.
End User Agreement management is vital for the integrity and continuity of financial data. If done properly, users are guaranteed to work with the latest information available, which can be crucial for business flow, especially if there are functionalities that depend on Maven Banking data.
Here is how you can authorize the needed Financial Institution with Maven Banking and retrieve its financial data:
-
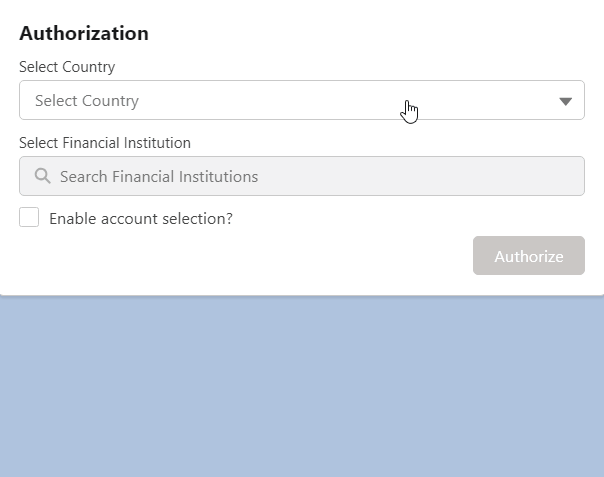
In Salesforce, open the Maven Banking application. On the Home Tab you will find the Authorization widget.
-
In the Select Country field, select the country where your Financial Account is registered.
-
In the Select Financial Institution field, select your Financial Institution.
If you want to exclude some accounts and your Financial Institution uses Account Selection, check Enable account selection.
-
Click Authorize.
-
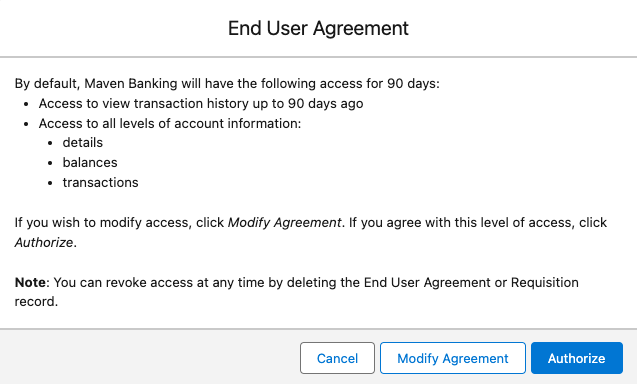
Check the default values of End User Agreement parameters, such as duration and scope. If you need to change them, click Modify Agreement. Otherwise, click Authorize.
The default values for End User Agreement are the following:
- 90 days of access.
- 90 days of transactions history.
- Access to balances, transactions, and account details.
Read more about modifying the End User Agreement in the separate section below.
-
Click Authorize again or Create and Authorize if you modified End User Agreement.
You will now be redirected to the GoCardless authorization screen.
-
In GoCardless, click I agree.
-
Follow the prompts provided by your Financial Institution to finish the authorization.
If you are stuck, contact your Financial Institution for help.
Once you finish all the steps successfully, the green toasted message appears and you are redirected back to Maven Banking.
Note that each Financial Institution has a different UI for Financial Institution Account selection/input. You will most probably be familiar with it already if you have used it for some authorization before.
That's it! You can see the information about your Financial Institution and Financial Institution Accounts in the respective tabs of the Maven Banking application.
¶ Modifying End User Agreement
During the Authorization process, you can modify the default End User Agreement. You can change the End User Agreement validity, and the transactions history period, and define which data to get from the connected Financial Institution.
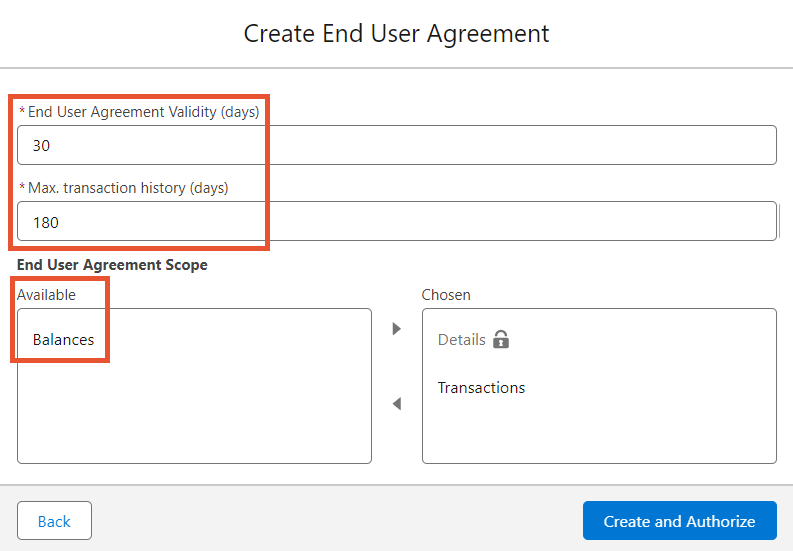
In the example above, we changed the validity of the End User Agreement to 30 days so you can work with the connected institution for 30 days.
We also set the transaction history to 180 days in the past. So the import of financial transactions retrieves all the operations from the last 180 days.
As we removed Balances from the Chosen field, you can't view Account Balances with Maven Banking. Only Account Details and Transactions are available.
Here are the Maven Banking limits you may consider when modifying the End User Agreement:
- Validity days can't be less than 1 day and more than 180 days.
- Max. transaction history can't be less than 1 and more than 730 days.
- The Details option can't be removed.
Financial institutions can have their limits on the number of validity days and days from which you can get financial transactions.
Even if you set values to 180 and 730 in Maven Banking, the created End User Agreement would have those numbers reduced to the limits set by the Financial Institution.